2.15 Audio Unit - Shaft Antivandal
Description
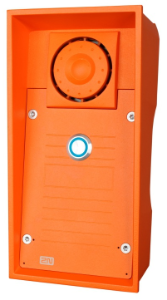
Typically, this audio unit is installed on lift shaft bottoms, cabin floors and roofs and/or any other places that require communication, e.g. for lift maintenance purposes. The audio unit features an orange robust aluminium case and is thus highly resistant against small falling objects, dripping oil and other hardships that might occur in lift shafts. This unit is designed for outdoor applications too. Press the ALARM button to establish connection with the control centre. The audio unit is equipped with an integrated microphone and speaker and, thanks to its dimensions and strength, provides a good and strong sound.
 |
Caution - diods
Alarm call
- The button is blue-backlit to indicate alarm call setup.
- The button blue backlight flashes to indicate image download from a camera module.
Upgrade
- The audio unit is initialised first – the ALARM button is blue-backlit.
- The ALARM button blue backlight flashes to indicate an upgrading process.
- The audio unit stops shining after upgrade and is ready for use.
Operation Staff
- This audio unit type is operated by well-trained persons (lift maintenance staff, e.g.).
- Use the ALARM button whenever a person falls into the shaft, for example.
- The audio unit dials the numbers stored in the ALARM button memory – set 2 (021–026).
Caution
- If set 2 (021/026) is not stored in the ALARM memory, the audio unit dials set 1 (011–016) stored in the ALARM memory.
- Use the ALARM button to call the control centre or machine room audio unit configured as an intercom.
- The ALARM button is not illuminated at relax.
Before You Start
Product Completeness Check
Check the product package for completeness before installation:
- 1 2N® Lift8 Shaft Antivandal
- 1 Torx 10 / Torx 20 double-ended spanner
- Bushings (extra package):
- 1x big two-hole, sealed bushing with nut
- 1x replaceable big one-hole bushing seal for thick cables
- 1x big blank module with nut
- 1x small bushing with nut
- 1x big bushing packing
- 2x small bushing packings
- 1x 2N® Lift8 Shaft Antivandal brief manual
- 1x mounting template
- 1x bus connector
- 4x screws (5 x 90 mm)
- 4x "intelligent" mounting wall plugs (8 x 50 mm)
The audio unit is typically mounted on a wall using the wall plugs and screws included in the delivery. Find the drilling template in an extra package.
Caution
- The audio unit is designed for outdoor applications too.
- Refer to Subs. 2.10.3 (Fireman – Mechanical Mounting) for more mounting details.
Electric Installation
Unscrew the 4 screws using the Torx 20 spanner enclosed and remove the audio unit front cover to reveal the electronics board.
Desription of Terminals, Connectors and Jumpers
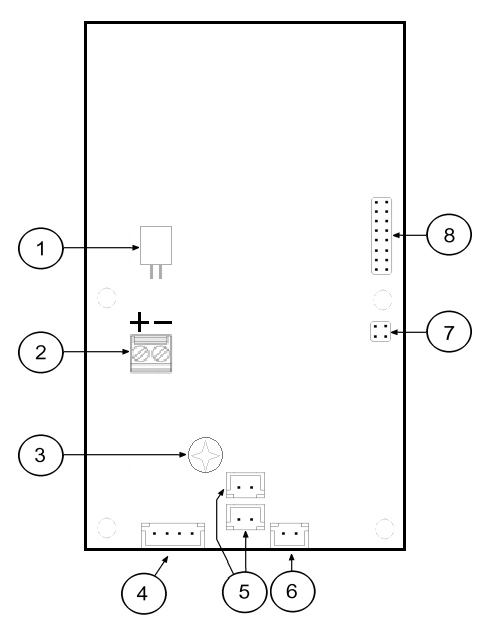 |
Audio Unit – Fireman Terminals, Connectors and Jumpers
Terminals and Connectors | |||||||||
|---|---|---|---|---|---|---|---|---|---|
1 | speaker connector | 5 | 2 microphone connectors | ||||||
2 | audio unit bus | 6 | lockable button connector (knob) | ||||||
3 | volume control | 7 | configuration jumper | ||||||
4 | button connector (push to talk) | 8 | servicing connector | ||||||
Audio Unit Location
The audio unit is designed for shaft bottom installations by default.
In other cases, follow the instructions below:
Procedure
- Unscrew the 4 screws using the Torx 20 spanner enclosed and remove the audio unit front cover.
- Set the audio unit location using the configuration jumper (7).
| Jumper setting | Audio unit location |
|---|---|
no jumper | shaft bottom |
jumper up | over the cabin |
jumper down | under the cabin |


3. Replace the cover and tighten the 4 screws.
Caution
- Avoid duplicate audio unit settings.
Bus Connection
Remove the audio unit cover. Pull the bus through the bushing and put it on terminal 2 using the connector enclosed. Maintain polarity (see the Audio Unit – Fireman Terminals, Connectors and Jumpers figure above).
Warning
The audio unit is intended for 2N® Lift8 audio unit bus connection exclusively. Do not connect it to other wires to avoid its damage or destruction.
- Maintain polarity while connecting the audio unit to avoid audio unit error.
Caution
- The audio unit is powered via a 2-wire bus. Disconnection of these wires results in the audio unit switch-off.
Volume Control
Set the required volume using the trimmer (refer to the Description of Terminals, Connectors and Jumpers above) on the electronics board.
Caution
- Use the trimmer to set the best acoustic properties eliminating feedback.
Mounting Completion
- Having connected all the wires, check the bushings if used for proper tightening.
- Replace the front cover carefully. Make sure that the wire arrangement inside the device provides enough space for front panel insertion. Tighten the 4 screws thoroughly to push the panel by 1 mm further to the metal chassis. Use the Torx 20 spanner for tightening, for example.
Caution
- An improper mounting may result in the audio unit not being waterproof. Water leakage may damage the electronics.
- 2N® Lift8 Shaft Antivandal is assembled with stainless steel screws. If you lose them, never use other screws to avoid corrosion and screw appearance deterioration!