2.11.3 Fireman - Mechanical Mounting
Mechanical Mounting – Mounting Types
See below for an overview of mounting types and list of necessary components.
Wall Mounting
- For concrete and steel structures, etc.
What you need for installation:
- 2N® Lift8 Fireman only (no need for covering frame)
 |
Flush Mounting – Classic Bricks
What you need for installation:
- Properly cut-out hole or, optionally, a flush mounting kit, Part No. 9151001
- For 2N® Lift8 Fireman:
- Covering frame: contact your distributor
 |
Flush Mounting – Thermally Insulated Wall
What you need for installation:
- Longer screws (depending on the thermal insulation thickness)
- For 2N® Lift8 Fireman:
- Covering frame: contact your distributor
 |
Flush Mounting – Hollow Bricks
What you need for installation:
- Flush mounting kit, Part No. 9151001
- For 2N® Lift8 Fireman:
- Covering frame: contact your distributor
 |
Flush Mounting – Plasterboard
What you need for installation:
- Flush mounting kit for plasterboard, Part No. 9151002
- Pro 2N® Lift8 Fireman:
- Covering frame: contact your distributor
 |
Caution
- The warranty does not cover any defects or failures of the product arisen as a result of improper mounting in contradiction to these instructions.
- A wrong mounting procedure may lead to damage to the electronics due to water infiltration. The circuits are constantly under voltage and water leakage causes electrochemical reaction. No warranty can be claimed for products damaged in this manner!
Common Mounting Principles
Tip
- Choose flush mounting where possible to make your product more elegant, vandal-resistant and safer.
- You can buy the flush mounting kit in advance and commission a specialised firm to install the device. Moreover, the flush mounting kit helps you level the audio unit properly (with a maximum vertical position deviation of 2°).
Caution
- Check the diameter of the plug holes. If the holes are too large, the plugs may come loose! Use a building glue for fixing if necessary.
- Check the depth of the plug holes! The plug length is 50 mm, the screw length is 90 mm.
- Do not use lower-quality plugs to avoid their pulling out of the wall!
- 2N® Lift8 Fireman is assembled with stainless steel screws. Using different, lower-quality screws may lead to screw and surface corrosion!
- Make sure that no impurities get into the device (especially on the sealing and microphone sound guides) after removing the front panel.
Note
- The microphone sound guides are loose after the front panel is removed. This not a defect as the fitting screw only protects the guides against falling out during installation.
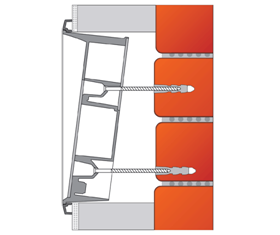
Wall Mounting
Wall (surface) mounting is used wherever flush mounting is not applicable – in concrete and steel structures, for example. The frame is not used.
Warning
- Eliminate the risk of injury! Wall mounting is not suitable for narrow passages and places where people pay attention to something else. The manufacturer shall not be held liable for injuries caused by such negligence!
Caution
- Wall mounting is a problem where the device may be damaged by vandals. In that case, use steel fitting elements instead of the plugs and screws included in the delivery.
- Seal all unused bushing holes with packings to avoid water leakage (during wall washing, e.g.). Do not leave the holes open even for a short time (between mounting and wire connection, e.g.).
- Choose the audio unit position according to the supply cables too. If the cables lead inside a structure or wall, use the holes on the audio unit bottom.
- Drill plug holes of the depth of 70 mm (as shown in the figure below) into concrete and similar walls. Push or hammer the supplied plugs into the holes. If the plugs are too loose, use a mounting glue. Use fitting elements of your own for steel structures – metric screws and nuts, for example.
- Remove the front panel from the audio unit.
- Select the holes for the cables. Choose and mount the enclosed bushing depending on the count of cables: two-hole, one-hole or both types of bushings. Fill the other holes with the packing included.
- Fit the audio unit to the wall or structure and lead in the cables leaving a small reserve inside. Insert the packings into the unused bushings and tighten the bushing nuts.
- Do not complete the mounting procedure until you have connected the audio unit electrically – refer to Electric Installation. If the cables lead on the surface, use the bushings included in the delivery.
 |
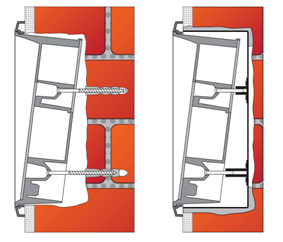
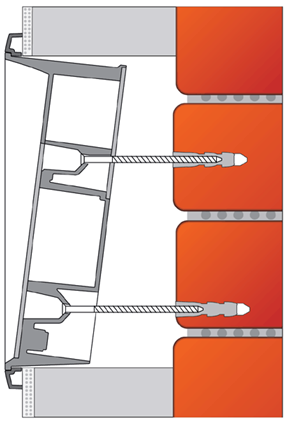
Flush Mounting – Classic Bricks
Follow the instructions for the flush mounting kit if used. Follow the instructions below if you do not use the flush mounting kit.
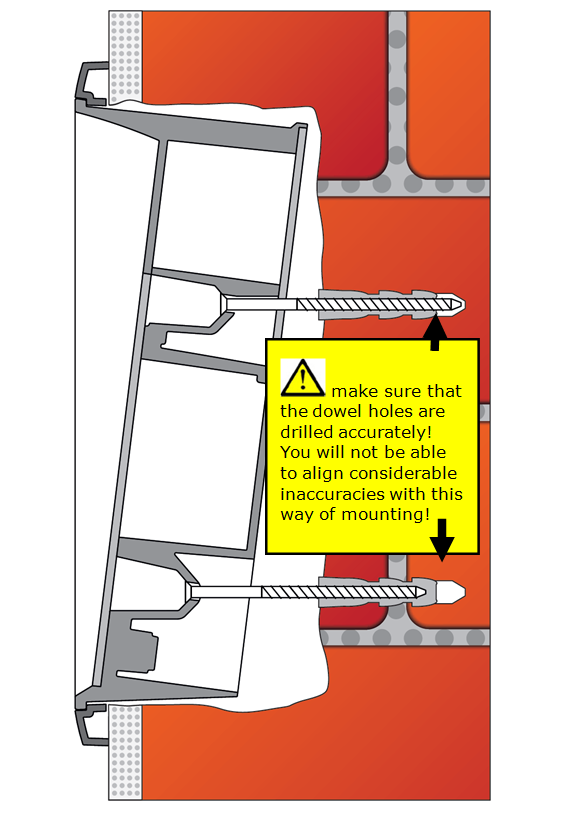
- Drill a hole using the template included for all the necessary cables. Be careful while drilling as this type of mounting does not allow to balance rather great deviations later!
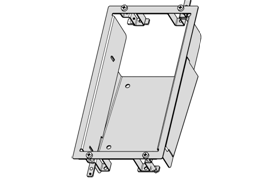
- Unpack the frame, put the audio unit onto it and put this set on the hole to test whether the hole is deep enough and its uneven edge is completely covered by the frame.
- Push or hammer the supplied plugs into the holes. If the plugs are too loose, use a mounting glue.
- Remove the front panel from the audio unit.
- Select the holes for the cables. Insert the packings in the other holes. Use the cable bushings or some sealing to avoid insect or water penetration. Mount a small bushing into the audio unit bottom hole too.
- Put a frame on the audio unit.
- Insert the audio unit in the hole and put the cables in at the same time. Leave a small cable reserve inside keeping the excessive cables under the audio unit bottom.
- Insert the screw in the plugs in the holes on both the audio unit sides. Tighten all the screws carefully. Caution: the screw tightening sequence may affect the audio unit position.
- Seal the frame against the wall if necessary with some silicon or other cement. Although unnecessary for the audio unit function, the sealing helps protect the wall against dampening due to water leakage.
- Do not complete the mounting procedure until you have connected the audio unit electrically – refer to Electric Installation.
 |
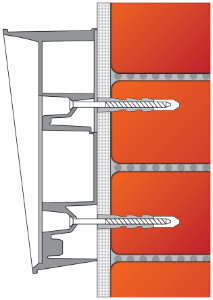
Flush Mounting – Thermally Insulated Wall
Cut out a hole in the insulation layer with the aid of the template (like with classic bricks).
Caution
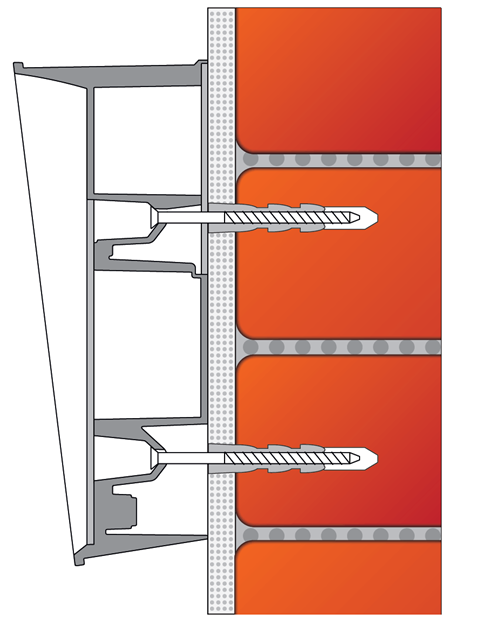
- As the hole depth depends on the insulation layer thickness, you may need longer screws! If there are hollow bricks under the insulation layer, the screws must be long enough to fill in the whole plug (50 mm)! Otherwise, the plug will come loose.
- Check the diameter of the plug holes. If the holes are too large, the plugs may come loose! Use a building glue for fixing if necessary.
- Check the depth of the plug holes! The plug length is 50 mm, the screw length is 90 mm.
It is assumed that all the necessary cables lead to the predrilled hole. Now follow the instructions for classic brick mounting yet respect a lower strength of thermally insulated walls while tightening the screws.
 |
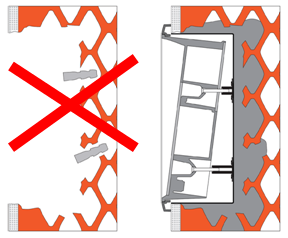
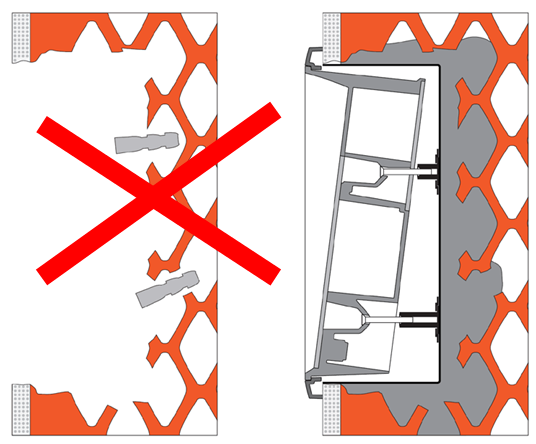
Flush Mounting – Hollow Bricks
It is practically impossible to fit plugs into hollow bricks because the inner brick walls are too thin for drilling. Therefore, use the flush mounting kit and follow the instructions included therein.
 |
Flush Mounting – Plasterboard
Use the flush mounting kit for plasterboard walls and follow the instructions included therein.