Nuki
Introduction
Nuki Smartlock can be controlled by http commands, which is also supported by 2N Intercom and 2N access units. This guide describes how it can be configured.
Requirements
Below components are required for the setup
- 2N
- Hardware: Any of 2N IP Intercoms except IP® Uni. And any of 2N Access Units, including 2.0 and M series.
- License for IP Intercom: Enhanced Integration or Gold License
- License for Access Units: not necessary
- Nuki
- Hardware: Nuki Smart Lock and Nuki Bridge
- Nuki App on Smartphone, because of the Token of Bridge and Nuki ID
Schema
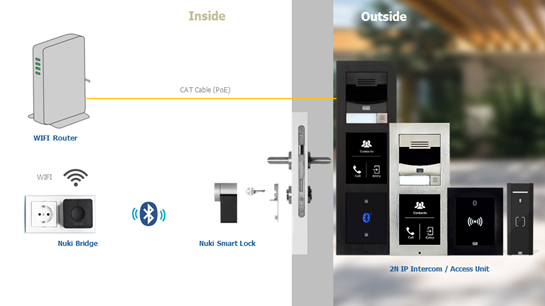 |
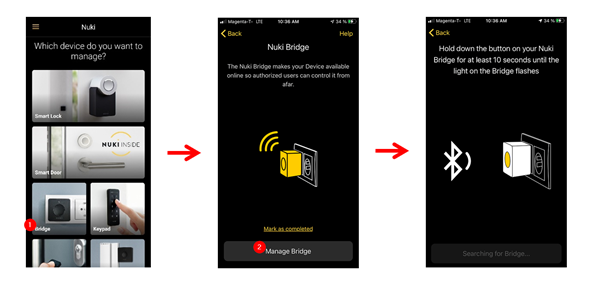
Settings in Nuki
Before starting: All the Nuki Hardware both Smart lock and Brdige should be configured successfully for standard scenario.
Enable the HTTP-API of Nuki-Bridge in Nuki-App
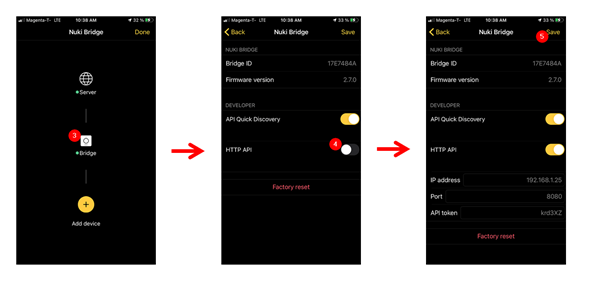
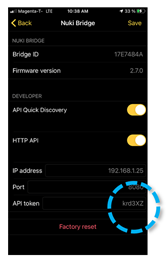
Obtain the IP-Address and the API-Token of Nuki Bridge in the Menu from last step.
- Obtain the Nuki-ID with below URL in an Web-Browser.
http://<IP-Addr>:8080/list&token =<API-Token>
e.g.: http://192.168.72.120:8080/list?&token =jc6ps3
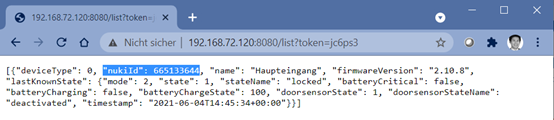 |
4. Nuki-ID (nukiId) can be returned as below:
5. Build the HTTP-comand with the Nuki-ID and API-Token. There are multiple possible commands available. The command „unlock“ is selected in this example.
http://<IP-Addr>:8080/unlock?nukiId=<Nuki-ID>&token =<API-Token>
e.g.: http://192.168.72.120:8080/unlock?nukiId=665133644&token =jc6ps3
6. The command can be tested in any Web-Browser. Once it works, can be added in to 2N devices
Settings in 2N Devices
Add the http-command into the settings for Switch1 of 2N device.
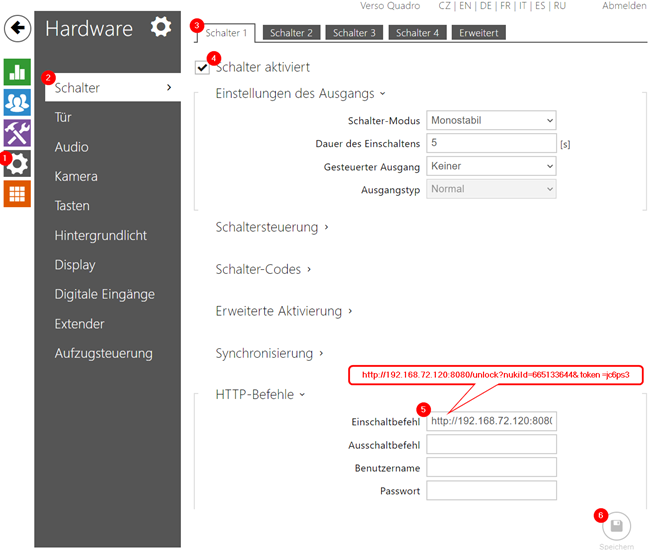
- Save
- Test it by pressing the button „unlock“.
Further http commands
For more scenarios there are further http-commands available, more info under this link:
https://developer.nuki.io/page/nuki-bridge-http-api-1-12/4/