5.4.2 Access Control
Access Control helps you manage accesses and verify user authentications.
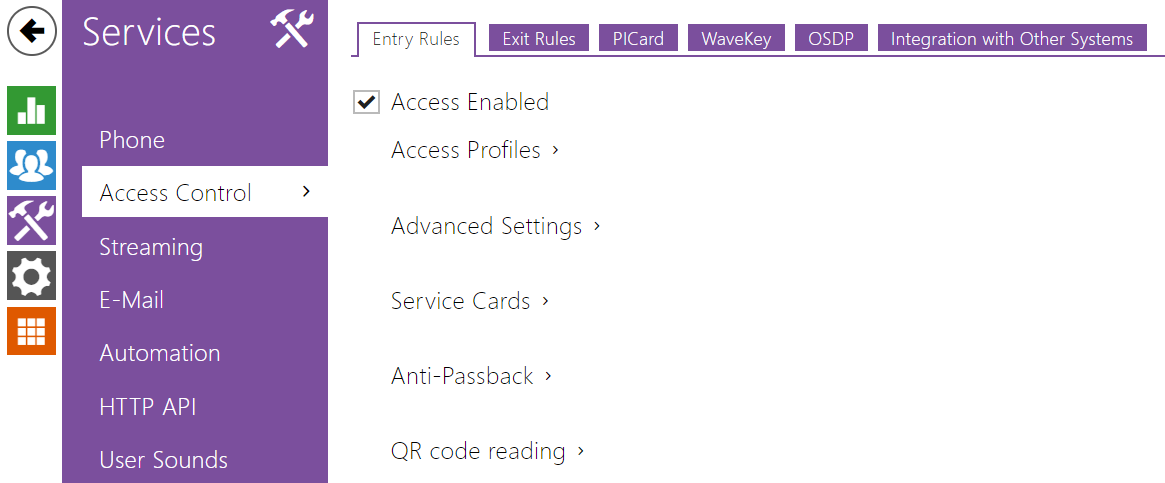
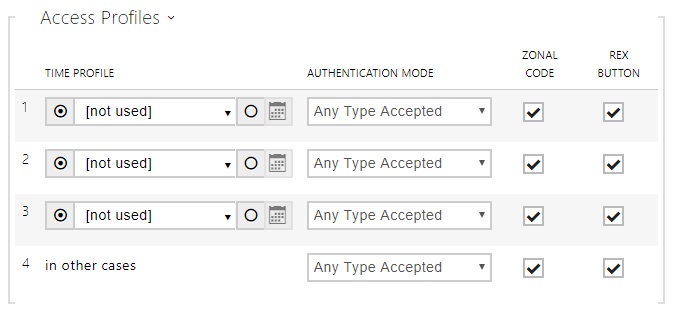
Entry Rules
 |
- Access Enabled – enable access in a direction (entry, exit). If access is disabled, the door cannot be opened from the selected side.
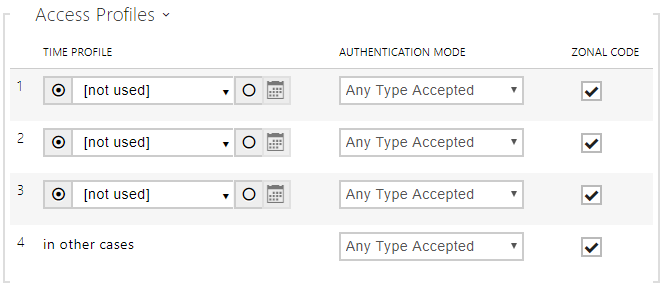 |
- Time Profile – choose one or more time profiles to be applied. Set the time profiles in Directory / Time profiles.
 – select global profiles from Directory > Time Profiles.
 – individual time profile for this specific element.
- Authentication Mode – set the authentication mode for the time profile in this row including multiple authentication for enhanced security. Select Access denied to ban access.
- Zonal Code – enable the zonal code for the time profile and authentication combination in this row. You can use the zonal code instead of the user PIN.
Caution
- If the time profile is unset, the authentication mode is ignored on the given row.
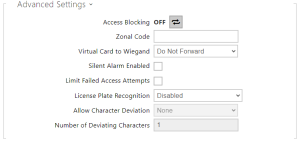 |
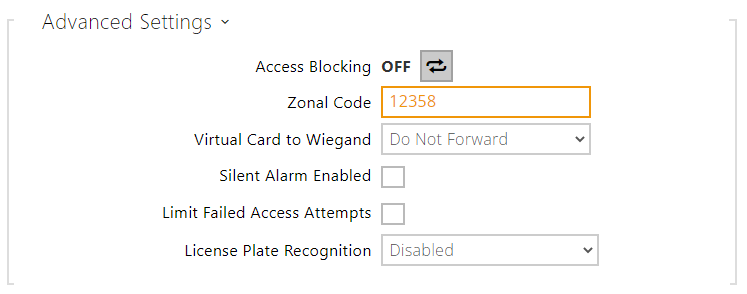
- Access Blocking – display the active Access Blocking setting: ON/OFF.
- Zonal Code – enter the switch numeric zonal code consisting of two characters at least. However, four characters at least are recommended.
- Virtual Card to Wiegand – select a group of Wiegand outputs to which the Virtual user card No. shall be sent after successful authentication. Can be combined with any authentication method, including codes, fingerprints, etc.
- Silent Alarm Enabled – a virtual code higher by 1 than the access code is assigned to each access code and used for silent alarm activation. For example, if the access code is 0000, then the silent alarm activation code is 0001. It means, for instance, that silent alarm is 0000 for access code 9999 and so on. Set the silent alarm action in the Automation section.
Caution
- In case the user authenticates itself and activates the silent alarm that is deactivated, the user access will be denied and the alarm will not be activated.
- Limit Failed Access Attempts – enable the maximum count of unsuccessful authentication attempts. After five unsuccessful attempts (wrong numeric code, invalid card, etc.), the access module will be blocked for 30 seconds even if authentication is valid.
License Plate Recognition – choose the scenario after the license plate is recognized.
Caution
It is advisable that each license plate should be assigned to just one entry in the directory. Multiple license plate assignments may result in the inability to assign a license plate to an entry in the directory unambiguously (the first entry assigned the specified license plate is selected and given the access rights).
- Disabled
- Opening by License Plate – the door is unlocked if the entry in the directory with the recognized license plate has currently the entry/exit right. Door (gate etc.) opening after a valid license plate is detected works independently of the other Authentication ways set in the Access profiles.
- LPR Multifactor – this option is only available if Multifactor Authentication of License Plates beta function is activated. Enable permanent access blocking and permanently disable Bluetooth (WaveKey) authentication. Once the license plate is read, its user will be assigned a temporary (60-second) exception and the Wave Key function will be activated for the same time. Access will only be granted to the read license plate user who authenticates using another authenticating method (WaveKey/QR code) within 60 seconds. Users with a permanent exception will be granted access during the whole access blocking period, but will be able to authenticate themselves using WaveKey too within 60 seconds after their license plates are recorded.
Every next car license plate cancels the preceding temporary exception and, if there is a user with a newly accepted license plate, a temporary exception is assigned to this user.
– select whether or not a deviation shall be tolerated in the car license plate recognition. Choose zero tolerance, tolerance from the beginning, tolerance from the end or tolerance both from the beginning and the end. If you select tolerance from both sides, the character deviation from the beginning is tolerated first during recognition and, if the license plate is not recognized, the deviation from the end is tolerated in the next reading.
The device allows you to use the recognized license plates sent in an HTTP request by the AXIS cameras equipped with an optional application VaxALPR on api/lpr/licenseplate (refer to the HTTP API Manual for IP Intercoms).
In case the function is on, the event is recorded into the LicensePlateRecognized history when a valid HTTP request has been received. If an image is sent within the HTTP request (photo part or whole photo of the license plate detecting scene), it is saved. The last five photos are stored in the device memory and can be retrieved via an HTTP request sent to api/lpr/image available in 2N Access Commander.
Warning
- The software factory reset or different configuration upload does not result in a change of the access blocking setting. It is only the hardware factory reset using the Reset button on the device that resets the default values.
- The Security Relay enhances the installation security against hardware reset misuse.
 |
- Plus Card ID – enter the service card ID for adding cards to the Installed cards: a sequence of 6 to 32 characters including 0–9, A–F.
- Minus Card ID – enter the service card ID for removing cards from the Installed cards: a sequence of 6 to 32 characters including 0–9, A–F.
 |
- Mode – enable/disable the Anti-Passback mode:
- Off – the function is Off by default allowing the user to use the access card or another identifier to re-enter an area without leaving it before.
- Soft – the user is allowed to use the access card or another identifier to re-enter an area without leaving it before. A new UserAuthenticated record with apbBroken=true will be created in the Status / Events section.
- Hard – the user is not allowed to use the access card or another identifier to re-enter an area without leaving it before. A new UserAuthenticated record with apbBroken=true will be created in the Status / Events section.
- Time Limitation – select an Anti-Passback timeout during which the user cannot re-enter an area using the given authentication method (card, code, etc.) in the same direction.
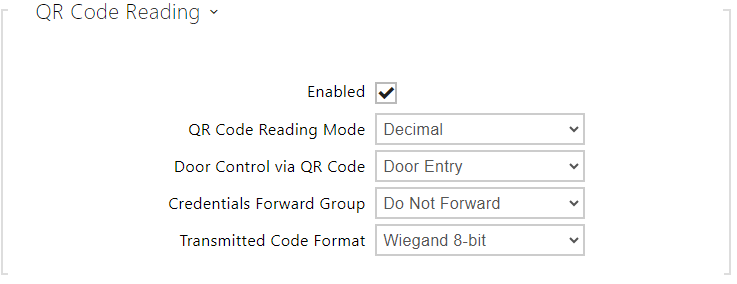 |
- Enabled – enable/disable QR code reading using the device camera. If QR code reading is enabled, it is possible to enter PIN codes and individual switch codes longer than ten digits by showing the QR code to the device camera.
- QR Code Reading Mode – the device always stores decimal codes. In Decimal mode, the scanned codes must match the 4 to 15-digit codes stored in the device. In Hexadecimal mode, the codes are converted to decimal after scanning and compared with the stored decimal codes, disregarding any leading zeroes. Accepted hexadecimal range: 1000 to FFFFFFFF.
- Door Control via QR Code – Enables or disables door control by reading a QR code.
- Credentials Forward Group – set the group to which all entered access codes will be forwarded.
- Transmitted Code Format – selects a 4bit or 8bit (higher security) format for the codes to be transmitted
Caution
- Do not use privacy masking in combination with QR code reading to make the QR code reading function work properly.
For increased security, limit the count of unsuccessful accesses in the Advanced Settings block above.
- The QR code reading function is only available in models equipped with the ARTPEC-7 microcontroller supplied by Axis.
Exit Rules
|
- Access Enabled – enable access in a direction (entry, exit). If access is disabled, the door cannot be opened from the selected side.
 |
- Time Profile – choose one or more time profiles to be applied. Set the time profiles in Directory / Time profiles.
- – select one of the pre-defined profiles or set the time profile for the given element manually.
- Authentication Mode – set the authentication mode for the time profile in this row including multiple authentication for enhanced security. Select Access denied to ban access.
- Zonal Code – enable the zonal code for the time profile and authentication combination in this row. You can use the zonal code instead of the user PIN.
- REX Button – enable the exit button function for the selected time profile. Set the exit button input in Hardware / Door / Door tab.
Caution
- If the time profile is unset, the authentication mode is ignored on the given row.
 |
- Access Blocking – display the active Access Blocking setting: ON/OFF.
- Zonal Code – enter the switch numeric zonal code consisting of two characters at least. However, four characters at least are recommended.
- Virtual Card to Wiegand – select a group of Wiegand outputs to which the Virtual user card No. shall be sent after successful authentication. Can be combined with any authentication method, including codes, fingerprints, etc.
- Silent Alarm Enabled – a virtual code higher by 1 than the access code is assigned to each access code and used for silent alarm activation. For example, if the access code is 0000, then the silent alarm activation code is 0001. It means, for instance, that silent alarm is 0000 for access code 9999 and so on. Set the silent alarm action in the Automation section.
Caution
- In case the user authenticates itself and activates the silent alarm that is deactivated, the user access will be denied and the alarm will not be activated.
- Limit Failed Access Attempts – enable the maximum count of unsuccessful authentication attempts. After five unsuccessful attempts (wrong numeric code, invalid card, etc.), the access module will be blocked for 30 seconds even if authentication is valid.
- License Plate Recognition – choose the scenario after the license plate is recognized. Refer to the manual for function details.
Caution
It is advisable that each license plate should be assigned to just one entry in the directory. Multiple license plate assignments may result in the inability to assign a license plate to an entry in the directory unambiguously (the first entry assigned the specified license plate is selected and given the access rights).
- Disabled
- Opening by License Plate – The door is unlocked if the entry in the directory with the recognized license plate has currently the entry/exit right. Door (gate etc.) opening after a valid license plate is detected works independently of the other Authentication ways set in the Access profiles.
- LPR Multifactor – this option is only available if Multifactor Authentication of License Plates beta function is activated. Enable permanent access blocking and permanently disable Bluetooth (WaveKey) authentication. Once the license plate is read, its user will be assigned a temporary (60-second) exception and the Wave Key function will be activated for the same time. Access will only be granted to the read license plate user who authenticates using another authenticating method (WaveKey/QR code) within 60 seconds. Users with a permanent exception will be granted access during the whole access blocking period, but will be able to authenticate themselves using WaveKey too within 60 seconds after their license plates are recorded.
Every next car license plate cancels the preceding temporary exception and, if there is a user with a newly accepted license plate, a temporary exception is assigned to this user.
– select whether or not a deviation shall be tolerated in the car license plate recognition. Choose zero tolerance, tolerance from the beginning, tolerance from the end or tolerance both from the beginning and the end. If you select tolerance from both sides, the character deviation from the beginning is tolerated first during recognition and, if the license plate is not recognized, the deviation from the end is tolerated in the next reading.
The device allows you to use the recognized license plates sent in an HTTP request by the AXIS cameras equipped with an optional application VaxALPR on api/lpr/licenseplate (refer to the HTTP API Manual for IP Intercoms).
In case the function is on, the event is recorded into the LicensePlateRecognized history when a valid HTTP request has been received. If an image is sent within the HTTP request (photo part or whole photo of the license plate detecting scene), it is saved. The last five photos are stored in the device memory and can be retrieved via an HTTP request sent to api/lpr/image available in 2N Access Commander.
Warning
- The software factory reset or different configuration upload does not result in a change of the access blocking setting. It is only the hardware factory reset using the Reset button on the device that resets the default values.
- The Security Relay enhances the installation security against hardware reset misuse.
 |
- Plus Card ID – enter the service card ID for adding cards to the Installed cards: a sequence of 6 to 32 characters including 0–9, A–F.
- Minus Card ID – enter the service card ID for removing cards from the Installed cards: a sequence of 6 to 32 characters including 0–9, A–F.
|
- Mode – enable/disable the Anti-Passback mode:
- Off – the function is Off by default allowing the user to use the access card or another identifier to re-enter an area without leaving it before.
- Soft – the user is allowed to use the access card or another identifier to re-enter an area without leaving it before. A new UserAuthenticated record with apbBroken=true will be created in the Status / Events section.
- Hard – the user is not allowed to use the access card or another identifier to re-enter an area without leaving it before. A new UserAuthenticated record with apbBroken=true will be created in the Status / Events section.
- Time Limitation – select an Anti-Passback timeout during which the user cannot re-enter an area using the given authentication method (card, code, etc.) in the same direction.
PICard
The 2N PICard technology is used for encryption of access card login data. To read the login data, the 2N devices need access to the keys generated by the 2N PICard Commander application. The keys can subsequently be imported to 2N Access Commander for distribution to all of the supported 2N devices.
Caution
- Refer to the 2N PICard Commander Configuration Manual for the devices on which cards with the PICard technology can be read.

- Description – encryption key name.
- Hash – project numerical ID.
- Upload PICard Keys – select the key file and enter the valid password to upload the PICard key.
- Delete PICard Keys – delete the uploaded PICard keys.
WaveKey
The 2N IP intercoms equipped with the Bluetooth module allow for user authentication via the 2N Mobile Key application available to devices with iOS 12 and higher (iPhone 4s and higher phones) or Android 6.0 Marshmallow and higher (Bluetooth 4.0 Smart supporting phones).
User Identification (Auth ID)
The 2N Mobile Key application authenticates itself with a unique identifier on the intercom side: Auth ID (128-bit number) is generated randomly for every user and paired with the intercom user and its mobile device.
Note
- The generated Auth ID cannot be saved in more mobile devices than one. This means that Auth ID uniquely identifies just one mobile device or its user.
You can set and edit the Auth ID value for each user in the Mobile Key section of the intercom phone book. You can move Auth ID to another user or copy it to another intercom. By deleting the Auth ID value you can block the user's access.
Encryption Keys and Locations
The 2N Mobile Key – intercom communication is always encrypted. 2N Mobile Key cannot authenticate a user without knowing the encryption key. The primary encryption key is automatically generated upon the intercom first launch and can be re-generated manually any time later. Together with AuthID, the primary encryption key is transmitted to the mobile device for pairing.
You can export/import the encryption keys and location identifier to other intercoms. Intercoms with identical location names and encryption keys form so-called locations. In one location, a mobile device is paired just once and identifies itself with one unique Auth ID (i.e. a user AuthID can be copied from one intercom to another within a location).
Pairing
Pairing means transmission of user access data to a user personal mobile device. The user access data can only be saved into one mobile device, i.e. a user cannot have two mobile devices for authentication, for example. However, the user access data can be saved into multiple locations in one mobile device (i.e. the mobile device is used as a key for more locations at the same time).
To pair a user with a mobile device, use the user's page in the intercom phone book. Physically, you can pair a user locally using the USB Bluetooth module connected to your PC or remotely using an integrated Bluetooth module. The results of both the pairing methods are the same.
The following data is transmitted to a mobile device for pairing:
- Location identifier
- Location encryption key
- User Auth ID
Encryption Key for Pairing
An encryption key other than that used for communication after pairing is used in the pairing mode for security reasons. This key is generated automatically upon the intercom first launch and can be re-generated any time later.
Encryption Key Administration
The intercom can keep up to 4 valid encryption keys: 1 primary and up to 3 secondary ones. A mobile device can use any of the 4 keys for communication encryption. The encryption keys are fully controlled by the system administrator. It is recommended that the encryption keys should be periodically updated for security reasons, especially in the event of a mobile device loss or intercom configuration leak.
Note
- The encryption keys are generated automatically upon the intercom first launch and saved into the intercom configuration file. We recommend you to re-generate the encryption keys manually before the first use to enhance security.
The primary key can be re-generated any time. Thus, the original primary key becomes the first secondary key, the first secondary key becomes the second secondary key and so on. Secondary keys can be deleted any time.
When a key is deleted, the 2N Mobile Key users that still use this key will not be able to authenticate themselves unless they have updated the encryption keys in their mobile devices before deletion. The mobile device keys are updated at every use of the 2N Mobile Key application.
List of Parameters
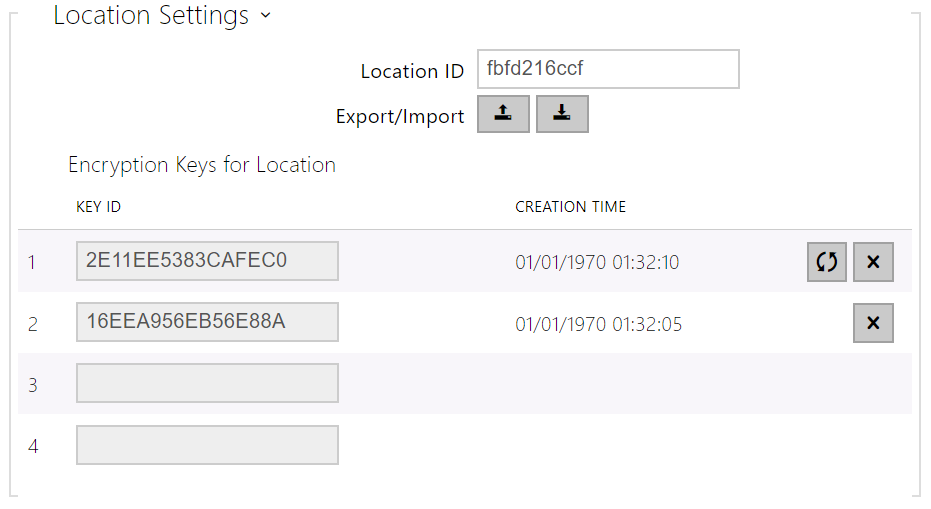 |
- Location ID – set a unique identifier for the location in which the selected encryption key set is valid.
- Export – push the button to export the location ID and current encryption keys into a file. Subsequently, the exported file can be imported to another device.
- Import – push the button to import the location ID and current encryption keys from a file exported from another intercom.
- Restore Primary Key – by generating a new primary encryption key you delete the oldest secondary key. Thus, the 2N Mobile Key users that still use this key will not be able to authenticate themselves unless they have updated the encryption keys in their mobile devices before deletion. The mobile device keys are updated at every use of the 2N Mobile Key application.
- Delete Primary Key – delete the primary key to prevent the users that still use this key from authentication.
- Delete Secondary Key – the 2N Mobile Key users that still use this key will not be able to authenticate themselves unless they have updated the encryption keys in their mobile devices before deletion. The mobile device keys are updated at every use of the 2N Mobile Key application.
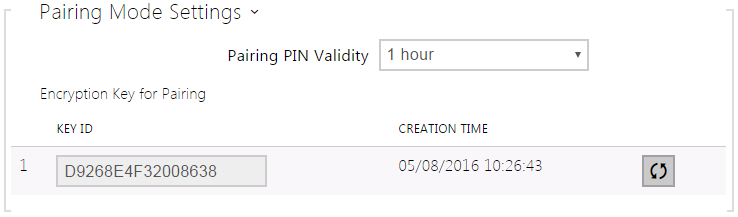 |
- Pairing PIN Validity – set the authorization PIN validity for user mobile device pairing with the intercom.
Tip
- In the case of loss of a mobile phone with access data proceed as follows:
- Delete the Mobile Key Auth ID value for the user to block the lost phone and avoid misuse.
- Re-generate the primary encryption key (optionally) to avoid misuse of the encryption key stored in the mobile device.
Warning
- With upgrade to version 2.30, the Bluetooth modules will also be upgraded. With downgrade to version 2.29 and lower, they may malfunction.
OSDP
The OSDP provides secure communication for sending such login data as access card IDs or PIN codes between the connected OSDP device (control panel, door controller) and a 2N IP intercom. The goal is to enable signaling on the 2N IP intercom based on the counterparty's response to the card signaling definition sent.

- OSDP Signaling Enable – definition string for access enable signaling.
- OSDP Denied Signaling – definition string for access denial signaling.
Note
- If identical definitions are inserted in the two parameters above, an evaluation is made with audio visual signals as if one authorized access and one unauthorized access have been used closely one after another.
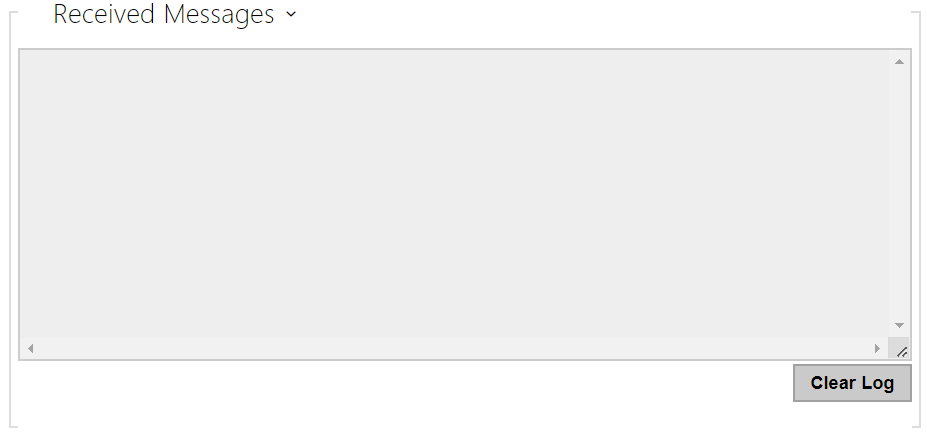
The Received Messages box helps you get the definition string. When an access card is tapped on the 2N IP intercom reader, the counterparty's OSDP signaling definition is displayed for authorized / unauthorized access.
The received message is displayed in the following format:
13:46:39] led(0,0,0,0,0,0,0,0,1,1,1,2,2)
13:46:39] buz(0,2,1,1,1)
13:46:42] led(0,0,0,0,0,0,0,0,1,1,1,1,1)
13:46:42] buz(0,1,0,0,0)
A part of the message (without the time value) is used as the definition string, whose length may not exceed 255 characters, e.g.: led(0,0,0,0,0,0,0,0,1,1,1,1,1) or buz(0,2,1,1,1). Having evaluated a match on the counterparty, the device responds with an adequate signaling. Any part of the definition can be replaced with "*", which will be interpreted as an arbitrary message content (e.g. it is possible to ensure that signaling will be activated upon any LED 0 light on the device regardless of the other message parameters).
- Clear Log – delete a Received messages record.
Note
- Make sure that the Door / Unused parameter is set for the card reader and keypad in Hardware / Extending modules to make the function work. The 2N IP intercom confirms the card reading by a beep and the device responds with an appropriate signaling after evaluation.
Integration with Other Systems
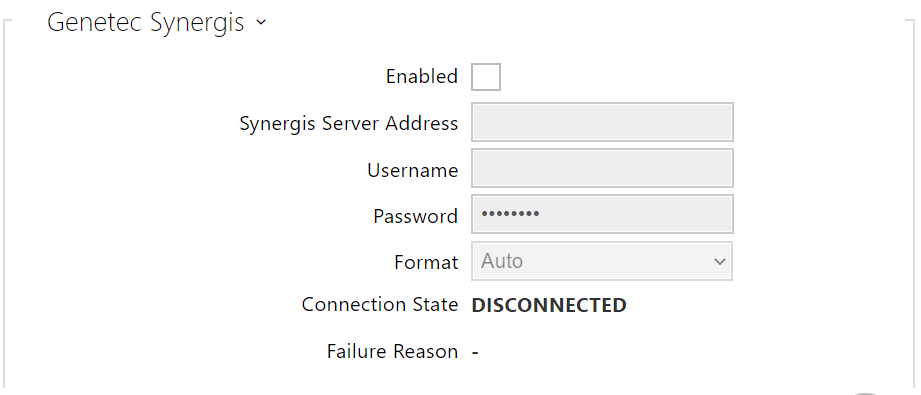 |
- Enabled – enable connection with the Genetec Synergis external security system.
- Synergis Server Address – Synergis server IP address or domain name.
- Username – authentication user name.
- Password – authentication password.
- Format – set the card reading format for sending card IDs to Genetec Synergis.
- Forward Code – set whether or not the set codes are to be resent. The codes may contain up to 6 digits and their ends have to be confirmed with a key.
- Connection State – display the current Synergis server connection state or error state description if necessary.
- Failure Reason – display the failure reason of the last Synergis server connection attempt – the last error response, 404 Not Found, for example.
Advanced Folder
|
- Compatibility Mode – support older card reading modes. This mode is not recommended in combination with the PICard cards. If this mode is off, the card numbers must be a perfect match for successful authorization.