3.2 Introduction to Application
In this subsection, we will show you the application menu layout and basic controls. The application is divided into three menu levels. The first screen upon start includes Configuration / Intercoms; see the figure below, which displays the first menu levels. The horizontal Main menu helps you select whether to configure the 2N® Lift8 system or supervise the history of check and alarm calls. The vertical menus help you select the area to be administered. The third menu level, if meaningful, gets displayed horizontally behind the intercom/user list in the right-hand upper corner and includes a list of user/intercom card forms that have to be completed or display a list of calls for the given intercom.
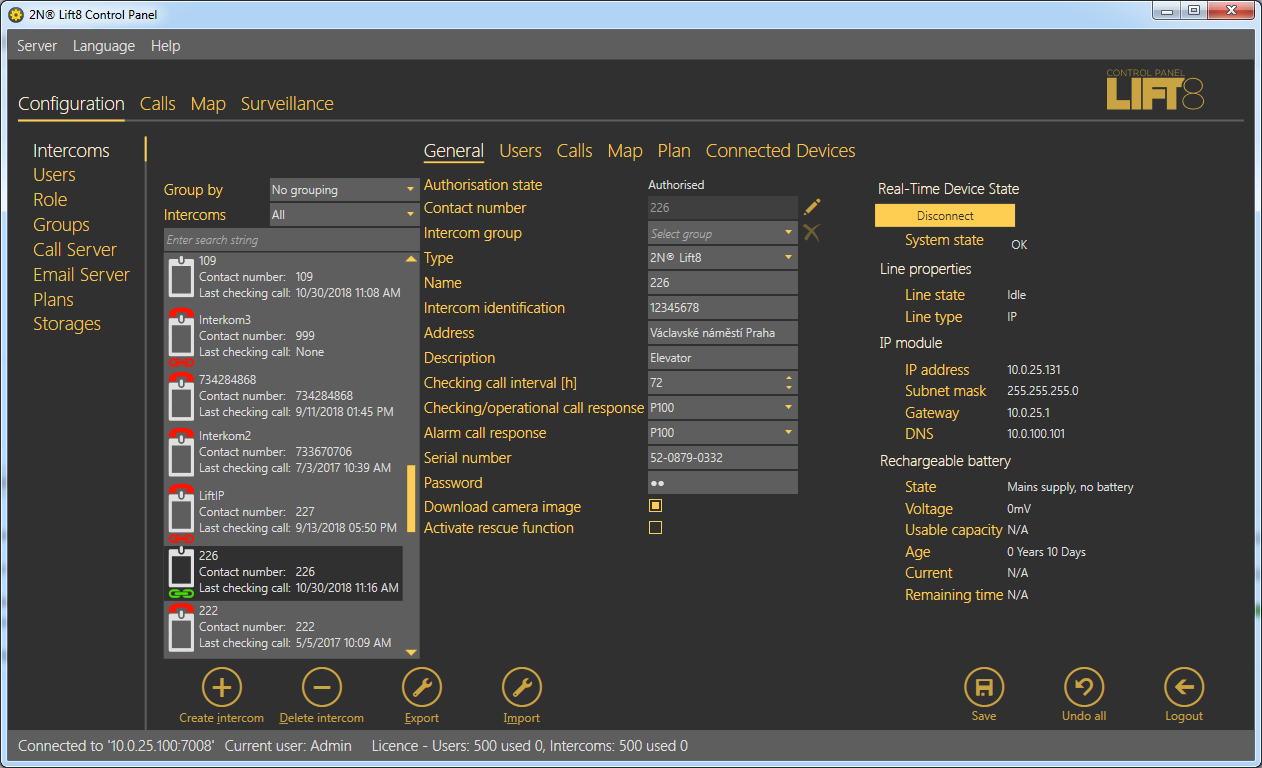 |
2N® Call Center – Control Panel Window
The main menu contains three pop-up menus. The Server menu helps you disconnect from the server or terminate the application. You will always be warned before logout or termination against data loss. The Setting submenu includes a Statistics window: confirm the request to enable transmission of your system data and software use surveys to help the 2N TELEKOMUNIKACE a.s. company improve the software quality, availability and performance within the applicable law. You can participate in this cooperation voluntarily and cancel your prior approval any time. Select the language mutation in the Language menu: CZ and EN are available so far. The Help menu provides information on the product manufacturer and version.
Note
- The language change will not be executed until the application restart.
The Status line displays connection information. From the left: 'Connected to' includes the name of the server to which you are currently connected, 'IP' specifies the IP address of the server to which you are currently connected and the server listening port, and 'Current user' displays the currently logged in user. In case you are logged in as Administrator, licence information is also displayed on users and intercoms: the maximum count of server-licensed objects and their current use. See the figure above. Find the Logout button in the right-hand bottom corner and various important control buttons in the lower part of the application. The table below describes all the buttons available in the application.
Upozornění
- Set the minimum screen resolution to 1024 x 768 px to ensure the proper application display and layout.
Basic Controls
| New server helps you create a new connection in the login screen. | |
| New group helps you create a new server connection group in the login screen. | |
| Delete selected deletes the currently selected objects from the list in the login screen. | |
| Connect is used for user login to the selected server. | |
| Logout is used for user logout. | |
| Save is a common button for saving new objects into the database. The button has three states: inactive – all changes are saved, flashing – changes have been made in the database and should be saved, and red – changes cannot be saved as the validator disapproved some of the parameters (marked with a distinct red frame). | |
| Undo helps undo all changes made since the last saving.
| |
| Create Intercom helps you add an intercom card to the database by adding a central unit. | |
| Remove helps you remove objects from configuration. | |
| Create role adds a user role to the server configuration. | |
| Create user card adds a user in the Configuration/Users menu. | |
| Create group helps you create a new group of users/intercoms depending on which menu view is currently switched on. | |
| Add plan helps you add a building plan to the selected storage. | |
| Remove plan helps you remove the selected plan. | |
| Change plan updates the plan stored by storing a new map under the same name. | |
| Download plan helps you save the selected plan to a local disk. | |
| Export helps you export the table in the currently displayed menu. | |
| Import helps you import the intercom or user table. | |
| Pin view is accessible in the Calls menu only and helps you 'tear' a screen away from the application and display it on another monitor, for example. | |
| Load calls from archive helps you display all the server database calls. Both the current records and records moved to the archive are displayed. | |
| Refresh intercoms is available in the Map menu. Use this button to refresh the list of intercoms and their states. | |
| Filter reset is available in the Map menu. Use the button to reset the filters to the default values. | |
| Start surveillance is used for switching on/activation and online status reading of data tunnels to the intercoms.
| |
| End surveillance is used for deactivation and ending of status reading of data tunnels to the intercoms. | |
| Zoom in helps you magnify the scheme to be displayed. | |
| Zoom out helps you shrink the scheme to be displayed. |


License Expiry
No calls can be made and no notifications/reports can be sent from the 2N® Call Center – Server, no calls can be made on the 2N® Call Center – Control Panel and all the 2N® Call Center – Communicator functions are suspended without a valid license. The 2N® Call Center – Control Panel administration remains available.
Should the maximum count of licensed users/intercoms be exceeded, a temporary license is activated, which will be valid for 800 hours. Once the temporary license is exhausted, the 2N® Call Center functions will be limited. The user license will be recovered once the user/intercom count meets the count allowed by the user license. Download a new user license for the required user/intercom count administration via the 2N® Lift8 License Tool (2.1 Installation and Licensing).
Find the information on the user/intercom count on the 2N® Call Center – Control Panel bottom bar.
The 2N® Call Center – Control Panel application notifies that a temporary license has been activated and displays the time until expiry. The temporary license is activated whenever the user/intercom count is exceeded. The 800-hour validity of the temporary license is on a one-time basis.
All users with the technician authority get an e-mail informing them of the temporary license start and course.