10.3.6 Settings
Menu Structure
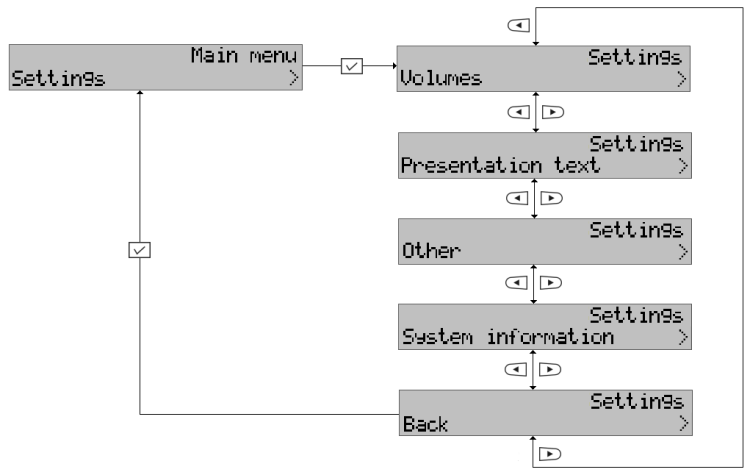
Use the following sequence at relax to enter the Telephone settings menu:  > 2x
> 2x  > . The figure below shows the main items of the menu. Use the and
  arrows to browse through the items. Push to confirm selections.
 |
Tip
- All the settings included in this section can also be made from the 2N® NetStar Assistant web application, which provides a higher user comfort. Refer to the 2N® NetStar Assistant Manual for more details.
Volumes
Use the and arrows to adjust the volume levels in all submenus. Push for confirmation.
- Handset volume – set the handset volume level (i.e. how you can hear the opponent with your handset picked-up).
- HandsFree volume – set the HandsFree volume level (i.e. how you can hear the opponent in the HandsFree mode with your handset hung-up).
- Ringing volume – set the phone ringing volume (i.e. how loud the telephone should ring to announce an incoming call).
- Keys volume – set the phone button volume (i.e. how loud a keystroke should be signalled in the handset).
Presentation Text
Presence text is a short message to be displayed to calling users in case the calling party uses a display-equipped 2N® StarPoint terminal. Typically, each user profile has a unique presence message announcing whether or not the user is currently available.
To set the presence text:
- Find Presence text in the Telephone settings menu and press for confirmation.
- Type the presence text using the numerical keypad buttons. Use the # button to type capital letters and digits. Press the 1 button to enter special characters.
- Confirm the complete text with .
Tip
- If you want to set a presence text for a profile, make sure that the profile is activated. Refer to 10.3.5 Profiles for details on profile activation.
Other
Use and to find the Other item in the Telephone settings menu and push for confirmation. See the figure below for the menu structure and options.
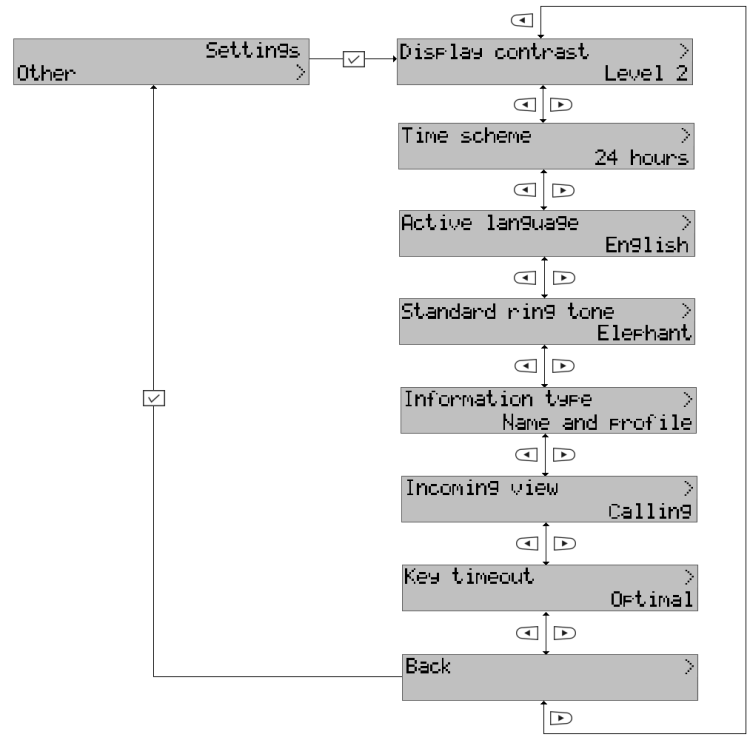 |
Display Contrast
Use the Display contrast item to change the terminal display contrast. Push and to execute a change. You can currently check the effect of the changes. Confirm the selected level with .
Time Scheme
Use the Time scheme item to change the time format to be displayed: twenty-four or twelve hours. Push and to execute the change and confirm the selection with .
Active Language
Use the Active language item to change the terminal user language. Push and to select one of the PBX supported languages. English and Czech are supported by default. Confirm your selection with .
Tip
- If you want to use a language that is currently not supported by your system, contact your PBX administrator.
Standard Ring Tone
Use the Standard ring tone item to change your terminal ringing tune. Push and to execute the change. You can currently check the effect of the changes thanks to sound examples. Confirm the selected tune with .
Information Type
Use the Information type item to change the information displayed in the bottom display row when the terminal is at relax. Push and to select the required information type and push for confirmation. The following options are available:
- Name – the station name is displayed to the left in the bottom row.
- Name and number – the station name is displayed to the left and the station number to the right in the bottom row.
- Name and profile – the station name is displayed to the left and the current profile to the right in the bottom row.
- Number – the station number is displayed to the left in the bottom row.
- Number and profile – the station number is displayed to the left and the current profile to the right in the bottom row.
- Profile – the current profile name is displayed to the left in the bottom row.
The complete information on a telephone at relax also includes the current date and time in the selected format.
Incoming View
Use the Display incoming item to change the displayed information to signal an incoming call. Push and to select a new item and confirm the setting with . The following options are available:
- Called – the called number is displayed.
- Called, calling – the calling name (or number) and called number are displayed alternately.
- Called, calling list – the calling name (or number) and called name (or number) are displayed alternately.
Key Timeout
Use the Editing delay item to change the interval for entering subsequent characters in the 2N® StarPoint system. Push and to select one of seven pre-defined levels. Confirm your selection with .
System Information
To display system information on the PBX, select the System information item in the Telephone settings menu using the and arrows and press for confirmation. The current PBX firmware version and uptime value are displayed.