7.6 Identification Tables
What Is an Identification Table?
The Identification tables are used for changing the calling extension numbers. To create and modify them use the Routing – Identification tables menu. To view an identification table, assign it to a virtual port or a virtual port type. The setup menu consists of two windows. A list of available identification tables is to the left. To configure a selected identification table, use the right-hand window. The context menu on the left side of the menu consists of the following options:
- Add – add an identification table.
- Delete – delete a selected identification table. If you delete an identification table, all the associate settings are removed from the database (e.g. assignment to a carrier).
- Rename – rename an existing identification table.
- Default – delete all current identification tables and create default identification tables. These tables have already been filled with corresponding objects (extensions, users, etc.).
- Update – update a selected identification table according to the selected type. Select the type via a dialogue box. Earlier identification table records are not deleted.
- Update all – add default identification tables and preserve all already existing ones.
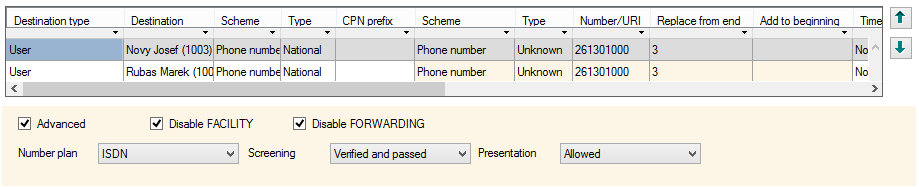 |
Figure: View of Identification Table Configuration Menu
Example
Suppose extension 1234 assigned to user Rubas Marek is calling through the virtual port with the assigned identification table from Figure 1. To change the extension identification proceed as follows:
- First create number 261 301 000 of the National subtype.
- Then, change the last three digits according to the original extension number – 234 as shown in row 1 to get number 261 301 234.
- Finally, set the ISDN numbering plan, Screening and Presentation, which are transmitted via DSS1 signalling. Also, disable the Facility and Redirecting parameters independently of the previous routing.
Identification Table Setting
In the right-hand part of the menu, set the parameters of the identification table as selected on the left. The configuration window can be logically divided into four parts: Calling party determination, New identification determination, Advanced settings and Default destination. The table rows are arranged according to priorities. To change a row priority use the arrows on the right-hand side of the screen. To add rows with a certain priority use the Insert ahead selected and Insert behind selected options. The Add option is used for adding a record behind the currently last one (i.e. the lowest priority record).
Calling party determination
Calling party determination is performed at the beginning of each identification table row. Here define the object to which the below-selected identification rule will be assigned. For this purpose, use the following parameters:
- Destination type – select a type of the calling party for the rule: Every, Extension, Extension type, User, Group, Virtual port or Virtual port type.
- Destination – define a calling party of the selected type (e.g. a extension).
- Scheme – specify if the calling party identification should be presented as a Number, URI or non-specified (Every).
- Type – define the calling party number subtype before identification changing. Choose one of the Unknown, Internal, Local, National, International and Every options. Use Every if you are not sure which number subtype is used. Use Subtype only if the Scheme parameter is set to Number.
- CPN prefix – ensure that one and the same extension can identify itself differently depending on the called number.
New identification determination
New identification determination is executed in the second part of each row. For convenience, this part can has a yellow background. The identification rule sets a completely new calling party identification using five columns with the following meanings:
- Scheme – define whether the calling party shall identify itself by a number or URI or use the previous identification after passing through this row.
- Type – if the Scheme column is set to Number, choose Unknown, Internal, Local, National or International as the new CPN subtype.
Caution
- The use of the set type depends on the Keep number type settings on the Basic tab for each port or port type.
- Number – set a number to be used for creating the new CPN identification within this row.
- Replace from end – define the count of new CLI digits (as set in Number) to be replaced by the original CLI digits. If the CLI is not transmitted, the resultant CLI is as set in the Number parameter.
- Add to beginning – add selected digits to the beginning of the new CLI.
Time condition
You can set a time condition in the last identification table column to define the validity time for each row. If the time condition is valid, the particular identification table row can be applied. If not, the row is ignored. This helps identify users and/or virtual ports differently for different parts of the day, week or month. You can assign the time conditions created in the Time Conditions subsection.
Advanced settings
You can define advanced parameters for each identification table row – Numbering plan, Screening and Presentation – to be transmitted via DSS1 signalling. In addition, you can disable the advanced Facility and Forwarding functions, which are used in some networks.
- Numbering plan – set the used numbering plan for each table row.
- Screening – set the screening information for each table row.
- Presentation – set the CLI presentation restrictions for each table row.
- Disable facility – disable Facility for a selected identification table row.
- Disable forwarding – disable Forwarding for a selected identification table row.
Default identification
The lower menu is called Default and helps you set identification parameters for all the calling parties that have not been found in the table. The functions of these parameters are the same as those of the yellow-highlighted parameters as described earlier.
Consider forward ed user – use this option to enable the use of the identification table for a changed CLI in the event of call forwarding. Refer to the example below for more details.
Example
Suppose a call is coming to user B from user A. User B's calls are forwarded outside the PBX via the port to which the identification table with the Consider forwarded user parameter enabled is assigned. The identification table has records for both user A and user B, and, in this case, the record assigned to user B is used. If the above mentioned parameter were disabled, the record assigned to user A would be used.