3.10 Virtual Port Options
Introduction
The Virtual ports menu helps you configure all virtual port types and virtual ports. In the Virtual ports – All menu you can see all virtual ports regardless of their type. For easier orientation, the virtual ports are arranged according to port types and also colour-distinguished according to the stack type. To display a selected virtual port type use the Virtual portssubmenus. By default, the following colours are assigned to virtual ports: DSS1 BRI, DSS1 PRI, CORNET, ASL, CO, GSM, SIP Proxy, SIP Gateway, SMTP client, SMTP server,Software, SMPP. These settings can be changed within the application setting as described in Chapter 1. About Application.
Creating Virtual Ports
By default, the database contains two basic virtual port types – Default IN and Default OUT. The virtual ports are created automatically in the Hardware – Boards menu. You can create more virtual ports and virtual port types manually using the following context menu options:
- Add virtual port type – create a new virtual port type. To assign a virtual port to a new virtual port type use the Drag&Drop function or the Type parameter on the Basic tab.
- Add virtual port – initiate a dialogue box for adding a new virtual port. Enter the virtual port name and choose the stack type from the available submenu list. The offerings depend on which menu you use. The Virtual ports – All menu includes a list of all stack types, but the Virtual ports – Cornet menu provides a list of Cornet stack types only. Manually created virtual ports are not assigned to physical ports automatically. They have to be assigned manually using the Hardware – Boards.
- Delete – delete a selected virtual port or virtual port type.
- Rename – rename a selected virtual port or virtual port type.
- Copy – make a copy of the selected virtual port or virtual port type retaining its settings (only the items that may not be identical are changed).
- Assign name to unchanged according to physical port – rename all the virtual ports that have not been renamed yet according to the physical ports they are assigned to.
- Assign name to all according to physical port – rename all virtual ports according to the physical ports they are assigned to.
- Set parameters as Default IN – this option is only available for the port type and helps you set all parameters of a new port type quickly according to Default IN.
- Set parameters as Default OUT – this option is only available for the port type and helps you set all parameters of a new port type quickly according to Default OUT .
Export SIP terminals – export the list of terminals of all Proxy ports into a text or csv file.
The structure of the list of exported SIP terminalsproxy (virtual port) name;terminal name;terminal type;MAC address;IP address;content of the UserAgent header
Moving records using the mouse, also called drag & drop, has been implemented in this menu for an easier transfer of existing virtual ports between the virtual port types.
The subsection below provides a description of the virtual port and virtual port type tabs. All the tabs and parameters defined below are common for all virtual port types. Some parameters or tabs are omitted in some virtual ports because they have no sense there.
Basic
The Basic tab includes the following parameters:
- Name according to the physic port – rename a virtual port according to the physical port to which it is assigned. The name consists of the stack name and hardware address in the square brackets. In the event of a manual name change, the option keeps automatically unchecked.
- Type – assign a virtual port to a specific virtual port type, which represents another hierarchical level for some parameters.
- Enable call without extension – enable/disable answering of incoming calls without the CLI. This parameter is enabled by default. For example, it can be used where a terminal is connected to a certain physical port and no extension has been assigned to the virtual port.
- Internal numbering plan – set the Calling Line Identification (CLI) subtype to Internal. YES is typically set for internal ports and NO for external ports. If YES is selected, no CLI normalisation is made and Mobility Extension terminals are not recognized.
- Call on port is accounted – insert an indicator (a = accounted) in the accounting sentence that is used for charging outgoing calls through this port. The accounting sentences are thus easily traceable by the accounting software.
CLI section
- Identification tab – assign an identification table to a virtual port. Choose any of the tables available in the Routing – Identification tables menu. The selected identification table is used for changing the Calling Line Identification (CLI) for outgoing calls through the corresponding virtual port.
- Add prefix for external CLI – assign a prefix to the virtual port as defined in the Global data – Global parameters menu. The prefix is then added to the Calling Line Identification for all external subtypes, but does not influence number assignment to a phone directory name. The prefix addition facilitates CallBacks for the virtual ports that do not support the number subtype (analog lines, SIP).
Keep number subtype
The parameter defines the final subtype of incoming and outgoing numbers for a virtual port, including the Calling Line Identification (CLI) and Called Party Number (CPN).
- You can set the following:
- Incoming CLIP – set whether or not an incoming CLI shall be retained.
- Incoming CPN – set whether or not an incoming CPN shall be retained.
- Outgoing CLIP – set whether or not an outgoing CLI shall be retained.
- Outgoing CPN – set whether or not an incoming CPN shall be retained.
- Meanings of set values:
- Default – settings from higher levels can be taken over.
- Replace unknown – the numbers are only normalised that arrive in the PBX with the Unknown subtype. The other subtypes are retained. Normalising takes place as defined in the Localisation menu.
- Replace always – all incoming numbers are normalised.
- Retain – no number is normalised. The numbers are further processed with the subtype they arrive in the PBX with.
AutoClip routers
This section is used for assigning a selected AutoClip router to a virtual port. Assign the AutoClip routers for calls and messages separately but you can use one and the same AutoClip router. For details on AutoClip routers refer to Subs. 7.7 AutoClip router.
- Calls – assign an AutoClip router for saving records on outgoing calls. To make the function work, assign the AutoClip parameters to the calling user in the Routing – Users & groups menu on the user or use group level. To assign the AutoClip parameters use the Global data – Autoclip parameters menu.
- Messages – assign an AutoClip router for saving records on outgoing SMS. To make the function work, assign the AutoClip parameters to the calling user in the Routing – Users & Groups menu on the user or use group level. To assign the AutoClip parameters use the Global data – AutoClip parameters menu. One and the same AutoClip router can be used both for SMS and calls.
Cause mapping
In this section, you can specify your own sets of causes to be used for signalling. To do this, use the Global data – Causes – Cause mapping tables menu. You can set a translation of a certain event into the given interface (SIP, GSM a ISDN) in the cause mapping table. Use these sets only if the predefined cause translations are inconvenient.
- CP to stack – define a specific cause translation for changes from the PBX to the virtual port. Hence, it is a change of a specific internal cause into any stack cause.
- Stack to CP – define a specific cause translation for changes from the virtual port to the PBX. Hence, it is a change of any stack cause into a specific internal cause.
You can choose a mapping table for each direction, disable the use of a table assigned to a virtual port type or use Default to enable the default table.
Name information sending
The settings in this section are primarily intended for the SIP Gateway port. Select one of the following two parameters to insert the caller's name in the From field of the SIP INVITE message.
- Find name in group phone book – select a group whose phone directory shall be used for matching the calling number and a name in the phone directory.
- Insert calling station name – define whether the calling stattion name shall be added to the outgoing INVITE message.
Call admission control
This section helps you limit the count of calls via a selected port. The following parameters are available:
- Internal call count – limit the count of internal calls. When a call comes in and goes out via one and the same port, the Internal call count parameter rises by 2.
- External call count – limit the count of external calls. When a calls comes in via the selected port and goes out via another, the External call count parameter is increased by 1 for both the ports.
Meaning of the options:
- Default – default value 0 = unlimited.
- Unlimited – unlimited count of calls.
- Limit to – set the maximum call count.
Own channel count
Display the count of voice channels that can be served by the virtual port.
Licences needed
In this section, you can check easily whether the Mobility Extension or Call Recording licence is required on the virtual port. If a licence is required yet absent or insufficient, it is in red letters here. If a licence is valid, the Valid licence text is blue highlighted.
Used sources for call admission control
This section displays how many internal/external calls are being made via the selected port at a moment.
Properties
The Properties tab consists of a number of subtabs, which are described in a separate chapter. This tab is exceptional because almost all of its parameters obey the fall-down hierarchy. For the hierarchy and parameter details refer to the Setting Properties subsection.
Progress Info
The parameters in this tab help you enable/disable progress tones that are to be played back to the user. In some cases, the progress tones are generated by the PBX, in others they are transmitted from the network. The final effect depends not only on the user's virtual port, but also on a combination of the user's virtual port (mostly an internal PBX port) setup and the other party's virtual port (a public network port or another internal PBX port).
The port generates the network progress info into the opposite port:
- Dial tone – the port is a source of the network dial tone for the opposite port if the latter requires the dial tone.
- Alert tone – the port is a source of the network alert tone for the opposite port if the latter requires the alert tone.
- Disconnect tone – the port is a source of the network disconnect/congestion/busy tone for the opposite port if the latter requires the disconnect tone.
- Setting options
- Default – provide fall-down to the next level (virtual port type).
- Yes – enable use.
- No – disable use.
- Conditionally – if a tone is signalled by the network, the generated tone is played. If a tone is not signalled, the internal PBX tone is played. The Reset condition section is applied to this setting only. This setting is recommended especially for the SIP Gateway virtual port.
The port requests progress info from the PBX or the opposite port:
- Dial tone – the port requests the dial tone from the PBX or the opposite port that generates the dial tone.
- Alert tone – the port requests the alert tone from the PBX or the opposite port that generates the alert tone.
- Disconnect tone – the port requests the disconnect tone from the PBX or the opposite port that generates the disconnect tone.
- Setting options
- Default – provide fall-down to the next level (virtual port type).
- Yes – enable use.
- No – disable use.
Reset condition – enable playing of some PBX tones and some network tones for one call.
- Parameters
- Alert resets condition – an incoming Alerting message resets the tone-generating condition and signalling of the played tone is awaited again.
- Connect resets condition – an incoming Connect message resets the tone-generating condition and signalling of the played tone is awaited again.
- Disconnect resets condition – an incoming Disconnect message resets the progress tone condition and signalling of the played tone is awaited again.
- Setting options
- Default – provide fall-down to the next level (virtual port type).
- Yes – enable use.
- No – disable use.
The following examples are given for easier comprehension:
- Suppose that user A's phone is connected to an internal PBX port. Set the dial tone request for this port for user A to hear the dial tone after picking up the phone. If user A makes a call to user B connected to another internal PBX port and you want user A to hear the alert tone, set the alert tone request for user A's port too.
- Suppose that your PBX is connected to a public or private network that generates progress info. If you want the calling user to hear the alert tone, set the port used for calling into the public or private network to generate the alert tone and the user extension port to request the alert tone. Otherwise, the calling user would not hear the alert tone during outgoing calls. The disconnect tone is mostly generated by own PBX.
- Outgoing call to PSTN with conditioned generating
- Suppose that a call is going out to the PSTN, which generates the dialtone only. However, you want the user to hear the ringing and disconnect tones too. Therefore, set the Conditioned option in the Generate tone section and the Alert resets condition parameter at least in the Reset condition section for all the three tones for the port used for the outgoing call. Suppose that the three-tone requirement is set for the user's internal extension. Thus, when a CO line is seized, the user is played the PSTN dialtone first and then the internal PBX ringing tone after the dialling and ringing start (Alerting state signalling), because the PSTN generates no ringing tone. When the PSTN subscriber hangs up, the user is played the internal PBX disconnect tone.
Terminate call when PROGRESS_IND received – here enable call termination on selected ports in case the oppopnent signals progress tone playing during call setup. Moreover, you can define the call rejection cause. Two basic modes are defined for call setup termination:
- Before alerting – when the PROGRESS_IND message comes before the opponent's alert signalling.
- During alerting – when the PROGRESS_IND message comes after the opponent's alert signalling.
Overlap
Overlap is one of the Called Party Number (CPN) sending methods. If enabled, the CPN is not transmitted all in a SETUP message, but digit-by-digit in an INFO message.
The setup consists of the following parameters:
- Overlap sending – enable overlap sending in the port-to-PBX direction. It is primarily used for ISDN virtual ports.
- Overlap receiving – has not been implemented yet. The selection is inactive.
- Overlap dialling – has not been implemented yet. The selection is inactive.
- First digit timeout [ms] – set the first digit dialling timeout starting at the moment of the microtelephone pick-up. When it expires, the user cannot go on dialling, obtains the disconnect tone and the call connection is terminated. The default timeout value is 14 s.
- Next digit timeout [ms] – this parameter sets the next digit dialling timeout restarting after each digit received. When it expires, the call establishment begins. The default timeout value is 6 s. To initiate call establishing before the timeout, push the # button.
Extensions
The Extensions tab provides a list of extensions assigned to the virtual port. There are three forms of the tab depending on the virtual port type:
- With the BRI, PRI, SIP Gateway and SIP Proxy virtual ports, the tab structure respects the presence of a terminal. To create a terminal, use the HW tab. Terminals are used for authorisation, MSN numbers and extension assignment. The Extensions tab consists of three parts. The first window from the left includes a list of terminals assigned to the virtual port. If you have not created any terminal, you can use the Default one. The central window provides a list of extensions assigned to the selected terminal. The field on the right-hand side of the menu helps you select a extension to be active among multiple extensions assigned to the terminal. You can make calls to all of the extensions, but all outgoing calls from this terminal are identified as the active extension and accounted to this active extension too (except for the Private call from my extension service).
- With the Cornet virtual port, the situation is similar. The difference is that extensions are assigned as Master or Slave terminals because you can connect just one terminal to a Cornet port. If multiple extensions are assigned to this virtual port, specify the active extension (one for Master and one for Slave).
- With the ASL, CO and GSM virtual ports, the situation is the simplest. The tab has two parts only. One is used for extension assignment and the other for active extension specification.
Free Minutes/SMS
The tab helps you set free minutes and SMS for a selected virtual port.
Select tariff rate
Click on the Set free minutes/SMS button to display a dialogue and select one of the tariff rates as defined in the Accounting and tariff rates menu. In addition, you can assign here a setting to the selected virtual port tariff rate as defined earlier for any other virtual port. To change the tariff rate if necessary, use the Used tariff rate option. If you do so, you will lose all data saved on free minutes with the given tariff rate via this virtual port. To cancel the virtual port tariff rate, push the Cancel free minutes/SMS button.
Free minutes/SMS settings
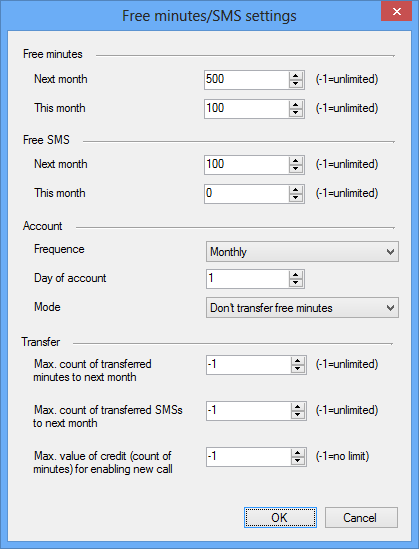
Once a tariff rate is selected, the tariff rate credit rows are displayed in this section. Click on a row to display a setting dialogue for the count of free minutes, SMS messages and other credit parameters for the given virtual port. See the figure below for the dialogue.
 |
- Credit name – the credit name as defined during tariff rate creation.
- Free minutes for month – the column includes the count of free minutes per month for the given virtual port. This count is credited to the given virtual port at the beginning of the accounting period. If the free minute count changes within a month, the port credit is not increased until the beginning of the next accounting period unless provided otherwise in the setting dialogue.
- Free minutes for this month – the column shows the current count of free minutes to be used in this month. The value includes free minutes transferred from the previous accouting period if any.
- Spent minutes – display the current count of minutes spent in the accounting period.
- Free SMS for month – the column includes the count of free SMS messages per month for the given virtual port. This count is credited to the given virtual port at the beginning of the accounting period. If the free SMS count changes within a month, the port credit is not increased until the beginning of the next accounting period unless provided otherwise in the setting dialogue.
- Free SMS for this month – the column shows the current count of SMS messages to be used in this month. The value includes free SMS transferred from the previous accouting period if any.
- Spent SMS – display the current count of SMS sent in the accounting period.
- Account – set the accounting frequency, i.e,. the accounting period length. On this date, the free minute and SMS counts are increased according to the selected transfer mode. The mimimum values are set in the Free minutes for month a Free SMS for month columns.
- Mode – select the method of transfer of old free minutes into the next accounting period.
- Do not transfer – no free minutes and/or SMS are transferred.
- First use new – old free minutes and SMS are transferred but new ones are used first. Unused units older than one month are not transferred.
- First use transferred – old free minutes and SMS are transferred and new ones are not used until these old units have been exhausted. Unused units older than one month are not transferred.
Files
The menu displays the current files with records of calls via the selected virtual port or virtual port type. The menu consists of a simple table with five columns with the following meanings:
- Name – name of the locked file.
- File type – type of the file.
- Created – the moment of file creation.
- Valid for – the file locking time, in other words a file storing time in a physical storage. When this time elapses, the file will be deleted.
- Size – size of the file.
- CLIP Scheme – scheme of the calling number.
- CLIP Type – type of the calling number.
- CLIP Number/URI – number or URI of the calling subscriber.
- CPN Scheme – scheme of the called number.
- CPN Type – type of the called number.
- CPN Number/URI – number or URI of the called subscriber.
Moreover, the context menu provides the following record handling options:
- Save – transfer the file from a storage to the PC.
- Listen – play the selected file.
- Remove – remove the selected file from a storage.
- Remove all – delete all files from a selected storage.
Stack
The Stack tab is described in S. 3. Virtual Ports depending on the stack type.