3.2.2.1 Devices
 |
The Search function works as a fulltext search in names and phone numbers. It searches for all matches in the whole directory. Press the button above the table to add a Device. Or, search a device in the LAN and then add the device as a new contact to the Directory. Click ![]() to show the device details. The
to show the device details. The ![]() icon helps remove a device from the list deleting all its data. You can arrange the list according to the name or feature (
icon helps remove a device from the list deleting all its data. You can arrange the list according to the name or feature ( ![]() indicates that the device may be displayed,
indicates that the device may be displayed, ![]() indicates that incoming calls are allowed to the device,
indicates that incoming calls are allowed to the device, ![]() indicates the feature of the device to which the call started with a short call button press is created and indicates the feature of the device to which the alarm call started with a the doorbell button press is created). One list page can include 15, 25 or 50 devices.
indicates the feature of the device to which the call started with a short call button press is created and indicates the feature of the device to which the alarm call started with a the doorbell button press is created). One list page can include 15, 25 or 50 devices.
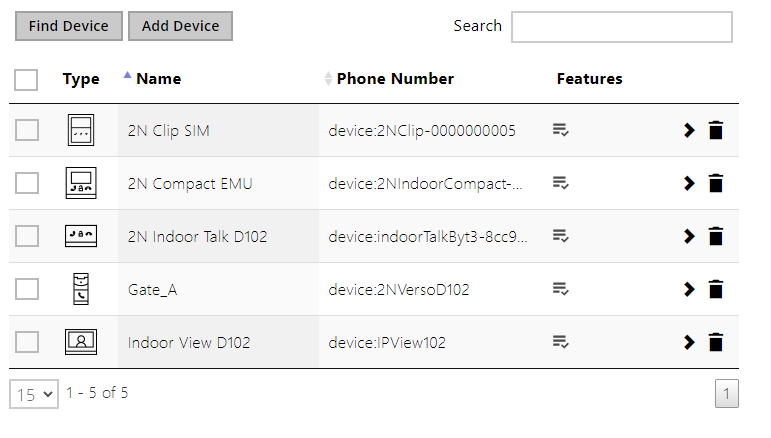 |
Each device list item includes the following data:
 |
- Device Name – enter the device name for the selected Phone Book position. This parameter is optional and helps you find items in the Phone Book more easily.
- Displayed Icon – display the reception desk symbol or a standard symbol.
- Device Type – set this parameter manually or automatically using the search for registered devices in the directory.
Phone Number – enter the phone number of the station to which the call shall be routed. Enter sip:[user_id@]domain[:port] for Direct SIP calling, e.g.: sip:200@192.168.22.15 or sip:name@yourcompany. Enter device:device_name for calls to the 2N® IP Mobile application. Set the device name in the mobile application. Enter/1 or/2 behind the phone number to specify which SIP account shall be used for outgoing calls (account 1 or 2). Enter /S or /N to force an encrypted or unencrypted call respectively. The account and encryption selections can be combined into the suffix /1S, for example.
Click to edit the phone number details.
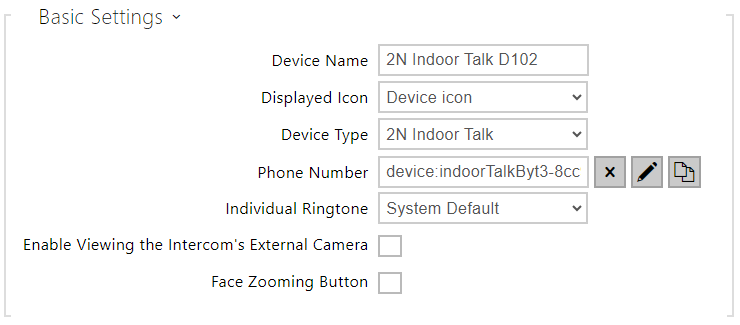
Call Type – set the scheme in the called destination URI. If you choose Without scheme, the URI is completed with the data from the SIP account settings. Further settings include direct SIP calls (sip:), 2N local calls (device:), Crestron calls (rava:) or calls with video management systems, e.g. AXIS Camera Station (vms:).
Destination – Set the other parts of the called destination URI. As a rule, it contains the number, IP address, domain, port or device identifier. Enter an asterisk (*) for calls to the VMS.
Preferred SIP Account – SIP account 1 or 2 is primarily used for calling.
Call Encryption – set mandatory call encryption or no encryption.
Door Opening – via callbacks.
- Individual Ringtone – set an individual ringtone for specific contacts to distinguish them better.
- Enable External Intercom Camera Display – set whether or not an external camera is available at the contact terminal equipment (accordingly, the internal/external camera button is/is not displayed during calls and call previews). With some 2N terminal equipment in the LAN, the information sent by the 2N terminal equipment is preferred to this setting (i.e. this setting is not needed for contacts using 2N terminals or camera-less devices).
- Face Zooming Button – set whether or not the contact’s terminal device is able to monitor faces during video calls (accordingly, the face monitoring button is/is not displayed during calls and call previews). With some 2N terminal equipment in the LAN, the information sent by the 2N® terminal equipment is preferred to this setting (i.e. this setting is not needed for contacts using 2N terminals or camera-less devices).
 |
Tip
- Individual devices can also be assigned to cameras in camera folders in Hardware > Camera, refer to Subs. 3.2.4.2 Camera. Once saved, the change will automatically be written in both the sections.
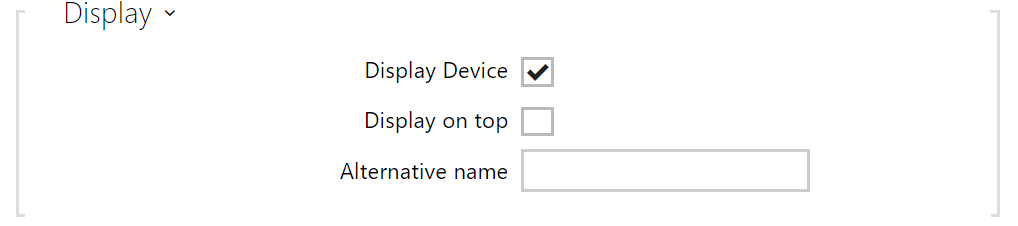 |
- Display Device – display this device. The user can select and call for any device displayed.
- Display on Top – display the device on the top.
- Alternative Name – display an alternative name instead of the device name. If no alternative name has been entered, this is shown on the display.
Caution
- The <, > and / characters are not permitted for the parameters Device name and Alternative name.
 |
- Start call with a doorbell button press – a phone call to this device will be set up after the alarm call button is pressed. Set the doorbell alarm call function in HW / Digital inputs / Doorbell button.
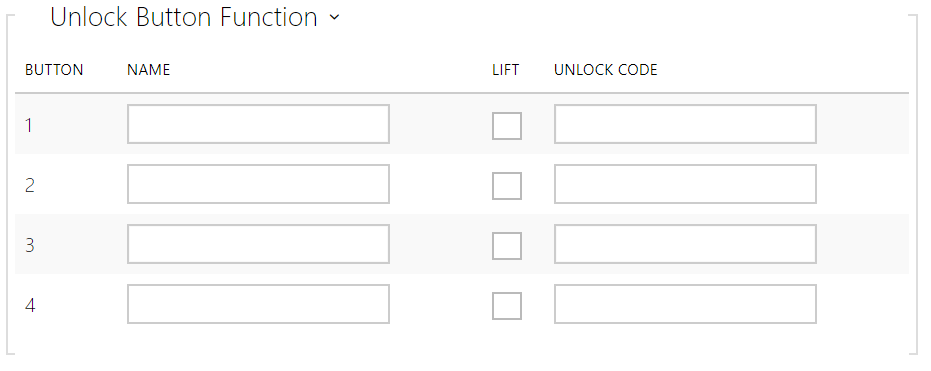 |
- Name – enter the code assigned to unlock button #1, #2, #3, #4.
- Lift – select the door lock / lift unlock button icon on the display.
- Code 1, 2, 3, 4 – It is used for remote unlocking of the entrance door, for example. Make sure that the code includes at least two door unlocking characters via the intercom keypad and at least one door unlocking DTMF character via a phone. The supported characters also inlcude * or #. Four characters at least are recommended.