8.4 Extensions
Extension Creation
Click the Users – Extensions menu to display this tab. A list of available extensions is to the left and settings for the selected extension to the right. The context menu to the left includes the following options:
- Add – add an extension. After clicking this option you will see a dialogue box as shown in Figure 1. First define the extension name. If you choose an already existing name, the extension will not be created and you will be warned. Assign each extension to a specific user in this dialogue box too. Furthermore, fill in the extension number and, if you are creating an external extension, fill in the Routing number too (for call routing within other networks) and, if applicable, check the Resend SMS option to resend all incoming SMS messages to the external extension.
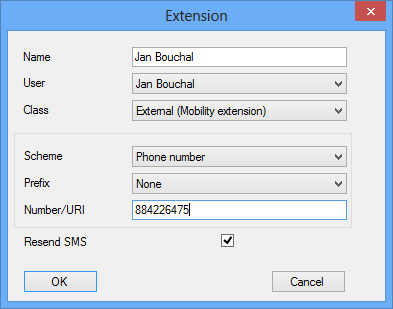 |
Figure: Extension Creating Dialogue
- Delete – delete an extension.
- Rename – rename an extension. If you fill in an already existing name, you will be warned.
- Copy extension – create an extension for the selected user with the same settings as the currently selected extension has. All the user has to do is enter a new extension name.
- Find – search extensive corporate databases for an extension by its name or number. The name or number to be searched need not be complete (may be a part of the string only).
- Find next – enable repeated searching of the string that has been entered in the Find function. This option is unavailable until you fill in the string to be searched by the Find function.
Basic Settings
If you select an extension on the right-hand side of the screen, three tabs will get displayed to the right: Basic, Properties and Profiles. The Basic tab contains the following parameters:
- Object – display the object type.
- Name – display the name of the selected station.
- Station type – define the station type. The following options are available:
- Normal – a normal internal station.
- SIP – a SIP station. It should be assigned to a terminal on the SIP Proxy.
- E-mail – an e-mail station. Not intended for calling.
- External – a Mobility Extension station.
- Scheme – define the station identification scheme. Choose either a telephone number or URI.
- Prefix – choose one of the prefixes defined in the Global parameters menu. This prefix partly substitutes the number subtype and facilitates CallBacks.
- Number/URI – define the station identification. Enter a number, e-mail address, or URI. The function of the parameter depends on the Station type setting. When an external station is identified, the originally dialled number is changed and the call is routed with this number via the defined destination.
- User – display the name of the current user. Use this option to assign an extension to another user too.
- Type – assign an extension to a specific extension type. It can facilitate setting of the common parameters for a group of extensions (e.g. outgoing routing via a GSM bundle for all external extensions).
- Ring group – select the ring group in which you may take over calls from the members of the group without being a member of the group (default dial *#).
- Active – activate/deactivate a selected extension. A deactivated extension becomes unreachable for other extensions (incoming calls are rejected) but is able to establish outgoing calls.
- Do not ring at call to user – route a call to this extension in case it is routed to the user. If it is checked, only the calls routed directly to this extension alert the extension.
- Resend SMS – enable/disable SMS resending. If this option is checked, all the SMS messages delivered to the user are resent to this external extension.
- Enable CallBack object – enable the CallBack function for a selected extension. The function is subject to licence and so make sure that the Licensed option has been selected after data saving. If not, check your licence in the Global data – Licences menu.
Others
- Virtual port – this parameter shows the port to which the extension is currently assigned. The parameter has an informative character only and cannot be changed in this menu.
- Protocol – this parameter defines the communication protocol to be used by the virtual port to which the extension is currently assigned. The parameter has an informative character only and cannot be changed in this menu.
- Terminal – this option provides a correct identification of the calling user. It is used only for the extensions that are assigned to the ISDN, SIP or Cornet ports. In other cases, you can connect one terminal only to each physical port and so the terminal identification matches the extension number.
- You can connect two terminals to the Cornet port – Master and Slave but the PBX can only connect one digital telephone to the physical port and so you are recommended to keep the Master setting.
- You can connect a bus with up to eight terminals to the ISDN BRI port. Each terminal has its own identification (Multi Subscriber Number, MSN). Assign the MSN numbers to the terminals created on the Stack tab for the BRI port. Use the Terminal option to assign a selected extension to one of the available terminals.
- The SIP terminals identify themselves with their SIP URI. Define the terminals on the SIP proxy level. Use the Terminal option to assign a selected extension to one of the available terminals.
- Active – this option means that the station on the given port is the main station. Its outgoing calls are identified as this station. Incoming calls are routed to secondary stations too.
- Goto virtual port – click the button to move to the current virtual port settings.
Required licences
This section displays the licence requirements and statuses for the CallBack, Mobility Extension and Call recording services. The fact that a licence is required yet absent or insufficient in the PBX is signalled by a red text. The fact that a licence is required and present and valid in the PBX is signalled by a blue text.
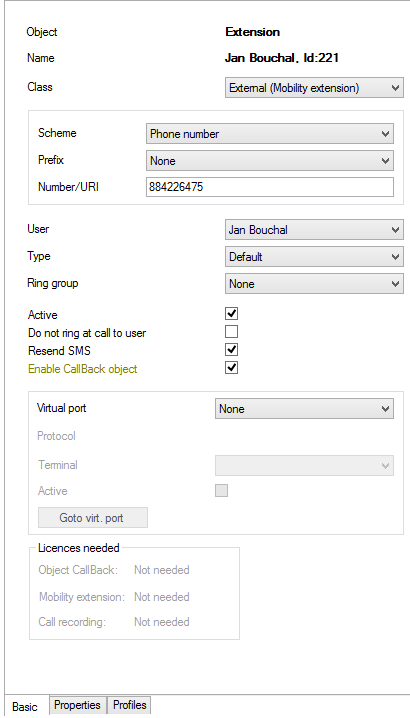 |
Figure: View of Extension Options
Extension Properties
The Properties tab consists of a lot of subtabs, which are described in a separate chapter for convenience. This tab is exceptional because almost all of its parameters follow the hierarchical structure. For the structure and all the parameters refer to S. 9.1 Setting Properties.
Profiles
In this tab define the properties of an extension within a selected user profile. The extension profile is the highest priority setting. You cannot create new profiles but can edit the existing ones. A list of the profiles created on the user level is displayed to the left. When you select one of these profiles, you will see two new tabs – Basic and Properties. Find the following parameters in the Basic tab of the extension profile:
- Active – activate an extension within a selected user profile. If it is not checked off, all calls coming to this extension are rejected. The extension can establish outgoing calls.
- Do not ring at call to user – enable call routing to an extension within call routing to an extension user when the user profile is active. If it is checked off, only the calls routed directly to this extension alert the extension.
The Properties tab consists of a lot of subtabs, which are described in a separate chapter for convenience. This tab is exceptional because almost all of its parameters follow the fall-down hierarchy. For the structure and all the parameters refer to S. 9.1 Setting Properties. Remember that the extension profile level setting has the highest priority!