8.2 User Rights
Logins
A list of all users and logins is displayed on the left-hand side of the Users – Users rights menu. The list is divided into sections according to user groups and subgroups. The user name is on the left and the respective login name, if any, on the right. You can use the following context menu options here:
- Create login – create a login for a selected user. This option is active only if the user has not been assigned any login. You can choose one of the types specified below.
- Change login – change the login type. The option cannot be used for Admin login. Each login is also assigned a type that defines the respective right assignment level. Choose one of the following options:
- Vice Admin – is a login with all rights except for Delegate logins and Manage own group.
- Super – is a login with the same rights as the Admin login.
- Vice Super – is a login with the same rights as the Vice Admin login.
- Manager – is a login designed for the manager of all user logins in a group. Hence, the Delegate logins and Manage own group rights are assigned to the manager.
- Vice Manager – is a login to be used by the Manage own group user.
- User – create a general user login.
- Change password – change the password of a selected login.
- Remove login – delete a selected login. The Admin login cannot be deleted.
- Generate missing logins – automatically create logins for all the users who have not been assigned one. Such logins are of the user type, have no password and their names are respective user names (without spaces and diacritic marks, with small letters).
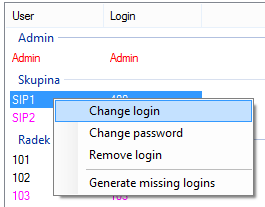 |
Figure: View of Logins According to Groups
Basic
After selecting a user, a list of all the users of the respective group including logins and rights is displayed on the right-hand side of the Basic tab. This view is useful for setting similar rights in the user group. The table of rights is divided into sections with the following meanings.
- Basic
- Disable – disable a login for a period of time without deleting it.
- Must change password – set automatic advice of a password change upon access to the Assistant application.
- Tab directly
- Read – enable reading of the database via the configuration tool.
- Write – enable writing into the database via the configuration tool.
- Database
- Write – save completed changes into the database.
- Trace
- See – display the Trace tab in the tool.
- Enable – enable trace downloading from the PBX.
- Statistics
- See – view statistic data through the Statistics tab in the tool.
Assistant
After selecting a user, a list of all the users in the respective group including logins and rights is displayed on the right-hand side of the Assistant tab. This view is useful for setting similar rights in the user group. The table of rights is divided into sections with the following meanings:
- User management – view and change the settings of other users.
- Telephone directory management – view and change the directories of other users.
- Call history management – view the call history of other users.
- Telephone management – view and change the telephone settings of other users.
- Extension management – view and change the extension settings of other users.
- Global configuration management – view and change the global configuration settings.
- Operator management – view and manage the operator settings.
- Alarm management – view and change the alarm settings.
- SMS management – view and manage the SMS messages of other users.
- Conference room management – view and manage the conference rooms.
- Hotel view – view and manage alarm clocks and emergency alarms in a hotel structure.
- Recorded calls – view and manage recorded calls of the user.
- ACD groups / Bundles – view and manage the ACD groups and bundles.