8.1 Users & Groups
User Creation
Use the Users – Users & Groups menu for user setting and group and extension management. A list of available groups, subgroups, users and extensions is displayed to the left.
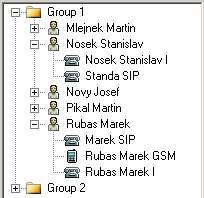 |
Figure: PBX User Structure from Groups to Extensions
In the context menu you can find the following options:
- Add user – add a user to a selected basic group/subgroup.
- Add extension – add a new extension to a selected user.
- Copy extension – create an extension for the user with the same settings as the currently selected extension has. All the user has to do is enter a new name for the extension.
- Create by wizard – initiate the automatic extension-creating wizard. With it you can import the extension list or create an extension according to preset numbers and ranges.
- Add group – add a basic user group. You cannot add subgroups and users unless one basic group has been created at least (the options are unavailable).
- Add subgroup – add a subgroup to a selected basic group/subgroup. The subgroups can be nested on several levels.
- Move to root level – move the selected object to the highest level beyond all groups and subgroups created.
- Move group content – move the content of a selected group to another group.
- Set default parameters – set the default parameters for a new group (as in Set parameters to Default IN in the port type section of the Virtual Port Options menu).
- Delete – delete the existing basic groups, subgroups or users. It is unavailable if the basic group or subgroup contains any nested object (subgroup or user). To delete such items, delete or transfer all the objects nested therein.
- Rename – rename a selected existing basic group, subgroup or user.
- Move to – move users to another basic group/subgroup.
- Find (F3) – initiate a searching dialogue within this menu using the preset rules. Items are searched for on all levels from groups to extensions.
- Find next (F5) – use this option to enable repeated searching of the string that has been entered using the Find (F3) function.
- Expand all – open the whole structure of groups and subgroups with users and stations easily.
- Collapse all – close the whole structure of groups and subgroups with users and stations easily.
Moving records using the mouse (drag & drop) has been implemented in this menu for easier moving of existing extensions, users, groups and subgroups.
While creating the basic groups or subgroups you are requested to set the group or subgroup name only. For user creation, however, a dialogue is displayed for you to define more parameters and even assign extensions to such user as shown in figure below.
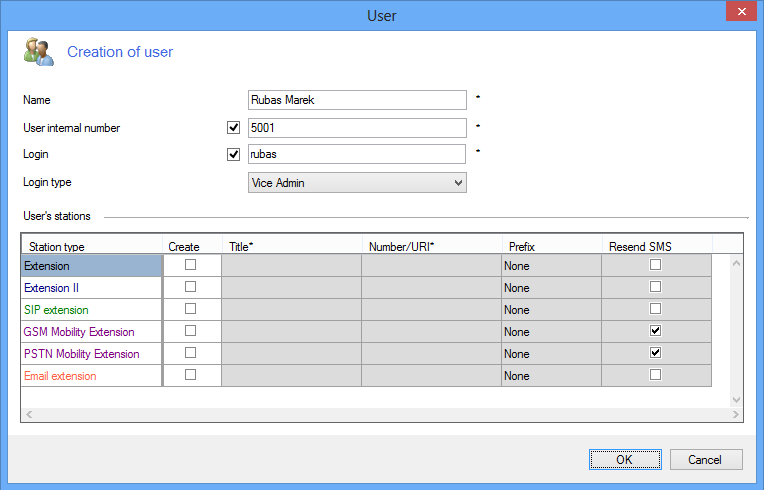 |
Figure: View of User Creating Dialogue
The following part of this chapter describes the Users and Groups menu tabs:
Basic
In case a group of users is selected, two programmable parameters are displayed to the right with the following meanings:
- Save messages – here enable message saving into the PBX memory. If message saving is disabled for a group, messages are not displayed on the group's Cornet ports.
- Maximum number of messages – define the maximum count of messages to be saved in the PBX for a user. Whenever this limit is achieved, the messages are deleted as necessary (starting from the oldest ones).
- If a user is selected, the tab includes the following additional parameters:
- PIN – fill in the Personal Identification Number (PIN). This number should contain four digits and is used for access to protected PBX services (e.g. Private call). The default value is 1111.
- Internal number – this number is primarily used for user identification within the PBX and represents the necessary condition for SMS messages routing.
- E-mail address – set the user electronic mail address for external applications (PC operator and Application server) to get the user contacts from the exchange server, for example.
- Alias – this parameter is used by the PC operator and Application server external applications. Alias in the PBX corresponds to the user name in the Active Directory. Alias and e-mail are used in the exchange server for checking user identifications and user profiles may subsequently be switched according to the calendar events. For detailed information refer to the Application server manual.
- Status – select one of the pre-defined statuses to be used for user status identification by co-operating applications. The pre-defined statuses correspond to the standard statuses applied in instant messaging applications.
- Presence string – fill in the text to be displayed to the user calling to one of your extensions.
- Active profile – define the current active profile of the user. You can also select an item from the list of available profiles.
- Automatic profile switching – enable automatic profile switching according to time conditions as defined on the 8.4 Extensions tab.
If you select an extension, you will see more options. Refer to Subs. 8.4 Extensions for all the options.
Properties
The Properties tab consists of a lot of subtabs, which are described in a separate chapter for convenience. This tab is exceptional because almost all of its parameters follow the fall-down hierarchy. For the structure and all the parameters refer to S. 9.1 Setting Properties.
Profiles
User profiles facilitate user setting handling by changing multiple parameters in one step. Each user can use up to eight profiles (or nine if we include the no-profile setup), which feature an unlimited count of different parameters. To create a profile, use this configuration tool, a key phone or the Assistant user web application. In the context menu of this tab you can find the following options:
- Add – add new user profiles. This option is disabled once the eighth profile has been created. A profile number is assigned to each profile automatically. This number is always greater by one than the current largest profile number assigned to this user. Moreover, the dialogue helps create profiles according to the existing user profiles. The profiles are copied including all respective settings.
- Delete – remove a selected profile from the database.
- Rename – rename a selected profile.
The user profile configuration is divided into the three tabs:
Basic
- Name – shows only the name of the selected user profile. It has an informative character only and cannot be changed here. To change it, use the Rename option in the context menu as described above.
- Number – enter a profile identifier to be used primarily for Profile activation. If you do not fill in this field, you will not be able to use this service.
- Bundle – assign a selected profile to one of the available PBX bundles. Upon activation of a profile to which a bundle has been assigned, the user is automatically added to this bundle. Upon deactivation, the user is automatically removed from this bundle.
ACD group – assign a user profile to one of the ACD groups available. When an ACD-assigned profile is activated, the user will log in automatically. When the profile is deactivated, the user will log out from the ACD group automatically again.
Caution
- The user can only view the ACD groups to which it is assigned. Add the user to the ACD group via your PBX configuration tool to enable the user's automatic login through profile acivation.
- Presence string – type the text to be displayed to the user calling to one of your extensions. This setting has a higher priority than the same setting on the no-profile user level. It means that if this profile is active, this text will be displayed independently of other settings.
- Status – select one of the pre-defined statuses to be used for user status identification by co-operating applications if the given profile is active. The pre-defined statuses correspond to the standard statuses applied in instant messaging applications.
VoiceMail
This tab is similar to the VoiceMail tab on the user level. However, this tab does not support all parameters. It is only used for more precise settings of the user profile. The parameters of this tab have a higher priority. You can set the following:
- Progress – set the progress tone to be played to the calling user in the case of call forwarding to VoiceMail.
- CFNA (Forwarding at no answer) – set forwarding to VoiceMail in case the incoming call is not answered before the timeout end. Specify the timeout in the Forwarding subtab in the Properties tab for the respective user. The default value is 30 seconds.
- CFU (Forwarding unconditional) – set the unconditional forwarding to VoiceMail. It means that all incoming calls will be forwarded directly to the VoiceMail if this profile is active (unless there is a hierarchical exception).
- CFEC (Forwarding on error cause or busy) – set forwarding to VoiceMail in the case of busy user or another error cause detection (e.g. call rejection).
Properties
The Properties tab consists of a lot of subtabs, which are described in a separate chapter for convenience. This tab is exceptional because almost all of its parameters follow the fall-down hierarchy. For the structure and all the parameters refer to Chapter Setting Properties.
Profiles & Time Conditions
In the Profiles & Time conditions tab assign time conditions to the user profiles created in the Users – Users & Groups – Profiles menu. The context menu of this tab has two options only:
- Add – add a new row to the table. Doing this choose one of the given time conditions for this row. You can assign one time condition just once to one user. After all the available time conditions have been used, the Add option becomes unavailable until you create another time condition.
- Remove – remove the table rows.
One profile may only be assigned to one time condition within the time condition validity period. However, different time conditions can be assigned to one user profile. To make the user profiles switch according to the preset time condition rules, check the Automatic profile switching option in the Users – Users & Groups menu of the Basic tab.
Phone Directories
The Phone directories tab is located in the Users – Users & Groups menu.
- If you select one of the user groups to the left, you will see a list of phone directories assigned to this user group. In the context menu you can use the following options:
- Add – add a phone book to a selected user group. Choose one of the items of the list of all available phone directories.
- Delete – remove a selected phone book from a user group.
You can make use of the benefits of the hierarchical structure while assigning phone directories as described in the Setting Properties subsection. The phone directories assigned on the group level are also available to the users of these groups and subgroups.
- If you select one of the users to the left, you will see the phone book assigned to the user to the right. The count of the phone book records is limited by the Maximum user tel. nums. on the Basic subtab of the Properties tab. The default value is 1000 records. The context menu contains the following options:
- Add – add a row to the user phone book. This option becomes unavailable when you reach the maximum count of the phone book records.
- Delete – remove a selected row from a user phone book.
- Delete all – remove all rows from a user phone book at once.
- Export – export the current user phone book in the xml or csv format.
- Import – import the user phone book in the xml or csv format.
- The user phone book consists of twelve columns with the following meanings:
- Name – shows the name of the user who appertains to this record. This name is shown on the calling/called user's display.
- Nickname – shows the nickname of each record. It is primarily used for easier searching of the phone book.
- Scheme – set the user identification scheme. Choose either Number or URI.
- Prefix – set the access prefix defined in the Global data – Global parameters menu. This prefix automatically precedes the user number in dialling from a phone directory .
- Number – fill in the user Number or URI according to the Scheme column.
- Ring pattern – choose a specific ring tone for each user phone book record. If the PBX accepts an incoming call with a CPN matching this record, your extension will use this ring tone.
The remaining six columns are used for forwarding incoming calls to a specific destination. The call forwarding settings in the phone directories have the highest priority of all within the PBX.
VoiceMail
The VoiceMail tab is used for configuring the user VoiceMail and is available in the Users – Users & Groups menu. The tab occurs in two forms depending on the level to be configured.
VoiceMail for Groups
If you select one of the user groups on this tab, you can change only some parameters. The settings on this level have a lower priority than those on the subgroup or user level.
- Progress – choose a VoiceMail progress tone from a list.
- Message – set the message text to inform the user of a new VoiceMail message. In addition to a static text, you can use dynamic strings with the following meanings:
- %u – called user name;
- %n – calling user name;
- %c – calling user number;
- %d – VoiceMail creation date and time.
- Save to user – enable/disable saving messages at the user regardless of the user settings, or respecting the user settings. The selection is intended for displaying messages on Cornets and in 2N® NetStar Assistant.
- SIP extensions – enable/disable resending messages to user SIP stations regardless of the user settings, or respecting the user settings (According to stations).
- Email extensions – enable/disable resending messages to user email stations regardless of the user settings, or respecting the user settings (According to stations).
- Mobility Extensions – enable/disable resending messages to user external stations regardless of the user settings, or respecting the user settings (According to stations).
VoiceMail for Users
If you select one of the users, you can set more parameters than on the group level. The meanings of the parameters are as follows:
- Enabled – enable VoiceMail function for a selected user. It is subject to licence and after saving the setup you have to check whether the Licensed option is ticked off. If not, then you do not have enough licences for this function.
Forwarding
- CFNA – Call Forwarding at No Answer – set forwarding to VoiceMail in case the incoming call is not answered within the preset period the time. To specify the time limit, use the Forwarding subtab in the Properties tab for the respective user. The default value is 30 seconds.
- CFU – Call Forwarding Unconditional – set unconditional forwarding to VoiceMail. It means that all incoming calls will be forwarded directly to the VoiceMail if this profile is active (unless there is a hierarchical exception).
- CFEC – Call Forwarding on Error Cause – set forwarding to VoiceMail in the case of busy user or another error cause detection (e.g. call rejection).
Welcome note
- Welcome note – choose a VoiceMail progress tone from a list.
- Set welcome note – enable/disable recording of a VoiceMail progress tone via the VoiceMail Record welcome note (*35) service.
Messages
- Maximum record length [s] – set the maximum voice message recording time. After this time limit, the incoming call will be cleared automatically.
- Do not store – enable/disable saving of VoiceMail to the PBX. Voice messages are only resent to the corresponding e-mail (according to the setting).
- Maximum record term [s] – set the maximum voice message storing time in the PBX. After this time limit, the voice message will be removed the moment another message is saved.
- Delete oldest at no space – remove the oldest voice messages in order to get more space for new voice messages.
- Maximum record count – set the maximum count of voice messages to be stored in the PBX.
Notification
- Message – set the message text to inform the user of a new VoiceMail message. In addition to a static text, you can use dynamic strings with the following meanings:
- %u – called user name;
- %n – calling user name;
- %c – calling user number;
- %d – VoiceMail creation date and time.
- Save to User – enable/disable saving messages at the user regardless of the user settings, or respecting the user settings. The selection is intended for displaying messages on Cornets and in 2N® NetStar Assistant.
- SIP extensions – enable/disable resending messages to user SIP stations regardless of the user settings, or respecting the user settings (According to stations).
- Email extensions – enable/disable resending messages to user email stations regardless of the user settings, or respecting the user settings (According to stations).
- Mobility Extensions – enable/disable resending messages to user external stations regardless of the user settings, or respecting the user settings (According to stations).
- Send unless voice record had meen left – enable message sending even if the calling subscriber hangs up before recording starts. Remember to enable Send to user mail to make this function work.
Box parameters
- CallBack destination – set the destination to which the VoiceMail CallBack is routed in case the record creating user is not known but the PBX has the CLIP.
- Default CallBack extension
Files
The Files tab is located on the group and user levels and used for viewing files with calls recorded via these objects. Refer to the Files section in Subs. 3.10 Virtual Port Options for details on the overview table columns and/or context menu options.
Assistant
The Assistant tab can only be used on the user level. The default Assistant settings are available in the Global data – Assistant – Administration setting menu. To change a user setting, create an individual user setting using the following parameters:
- Application main page – define the Assistant home page for a selected user.
- Default language – define the Assistant default language for a selected user.
- Image directory – define the set of images to be used by the Assistant for a selected user.
- CSS style filename – define the Assistant's appearance for a selected user.
Free Minutes/SMS
The Free minutes/SMS tab helps you set free minutes and SMS for a selected user. The set free minutes and SMS are only subtracted from the user account on the ports via which the calls go out of the PBX and which are assigned call billing via port (Basic tab for the given port). All the Default OUT ports are such ports by default.
Select tariff rate
Click the Set free minutes/SMS button to display a dialogue and select one of the tariff rates as defined in the Accounting and tariff rates menu. In addition, you can assign here a setting to the selected user tariff rate as defined earlier for any other user or virtual port. To change the tariff rate if necessary, use the Used tariff rate option. If you do so, you will lose all data saved on free minutes with the given tariff rate via this user. To cancel the user tariff rate, push the Cancel free minutes/SMS button.
Free minutes/SMS settings
Once a tariff rate is selected, the tariff rate credit rows are displayed in this section. Click on a row to display a setting dialogue for the count of free minutes, SMS messages and other credit parameters for the given user. See the figure below for the dialogue.
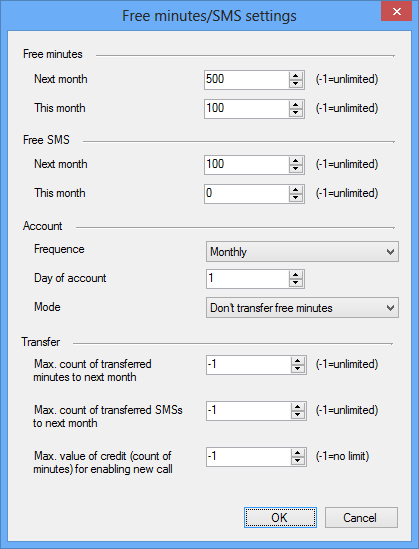 |
- Credit name – the credit name as defined during tariff rate creation.
- Free minutes for month – display the count of free minutes per month for the given user. This count is credited to the given user at the beginning of the accounting period. If the free minute count changes within a month, the port credit is not increased until the beginning of the next accounting period unless provided otherwise in the setting dialogue.
- Free minutes for this month – display the current count of free minutes to be used in this month. The value includes free minutes transferred from the previous accouting period if any.
- Spent minutes – display the current count of minutes spent in the accounting period.
- Free SMS for month – display the count of free SMS messages per month for the given user. This count is credited to the given user at the beginning of the accounting period. If the free SMS count changes within a month, the port credit is not increased until the beginning of the next accounting period unless provided otherwise in the setting dialogue.
- Free SMS for this month – display the current count of SMS messages to be used in this month. The value includes free SMS transferred from the previous accouting period if any.
- Spent SMS – display the current count of SMS sent in the accounting period.
- Day of account – set the day in the month on which a new accounting period shall start. On this date, the free minute and SMS counts are increased according to the selected transfer mode. The mimimum values are set in the Free minutes for month a Free SMS for month columns. Setting 0 means Never (Manually) and setting 32 means Every day.
Mode – select the method of transfer of old free minutes into the next accounting period.
- Do not transfer – no free minutes and/or SMS are transferred.
- First use new – old free minutes and SMS are transferred but new ones are used first. Unused units older than one month are not transferred.
- First use transferred – old free minutes and SMS are transferred and new ones are not used until these old units have been exhausted. Unused units older than one month are not transferred.