7.5.6 Ring Tables
Ring Table
The Ring table is a routing object used for sequential routing of incoming calls to multiple objects, thus combining the advantages of a bundle and a ring group. The incoming call routing obeys predefined rules, which are always searched from the beginning. If an incoming call is answered by the destination to which it has been routed, the ring table routing process is terminated.
Ring Table Setting
To set a ring table use the Routing – Routing objects – Ring tables menu. A list of available ring tables is displayed to the left. Add, delete or rename the ring tables using the context menu. The configuration menu of a selected ring table is displayed to the right, providing the following parameters:
- Default alert tones – define specific alert tones for specific situations.
- Normal – set the alert tone to be used in all situations except for the two cases mentioned below.
- Queued – set the alert tone to be used for extension routing if one of the following commands is used.
- Route with queue – the selected alert tone is used regardless of the Queue setting at the final destination.
- Route – the selected alert tone is used only if the Queue parameter is enabled at the final destination.
- No-port extension – set the alert tone to be used for routing to a no-port extension user (external extension). Such user has to be assigned an external extension and one internal (active) extension at least. Otherwise, you will hear the alert tone.
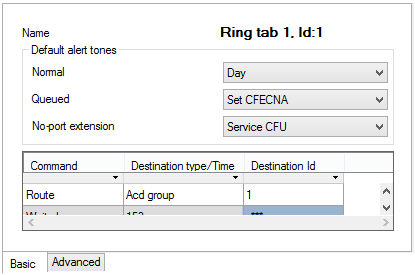 |
Figure: View of Ring Table Configuration Menu – Basic
The most important part of the ring table setup is the table located in the bottom part of the menu. Use this table to define the call routing rules. For this purpose, you can combine a few commands, which can be divided into three logical groups according to function.
- Routing – these commands determine the object to which an incoming call will be routed:
- Route – route an incoming call to the object defined in the remaining table columns. First select an object type and then an object of the selected type. Choose the extension, user, carrier, set, ring group, bundle, another ring table, AutoClip router and also such objects as DISA, VoiceMail and service. Remember that a call is answered immediately when routed to the DISA (Immediate), VoiceMail and service and it makes no sense to add other objects to the ring group!
- Route with queue – route an incoming call to the object defined in the remaining table columns. If the object is busy, the incoming call is queued regardless of the Queue setting for the object.
- End of routing – these commands terminate call routing to the object to which the call was routed using the Route or Route with queue commands.
- Do not route – terminate routing to an object. Be sure to terminate call routing only to the object to which the call has been routed to by the ring table. For example, you cannot terminate routing to a user extension if you have routed the call to a user.
- Do not route all – terminate all active routing settings in the ring table.
- Waiting – these commands are used for setting the time intervals between the routing commands and routing termination commands. To specify the time period, use the second column of the table.
- Wait – set the timeout for proceeding to the next row of the table. The timeout is not applied if the previous command has routed the incoming call to a busy destination and the call has been rejected or queued. In this case, the routing proceeds immediately to the next row. If 0 is used, the PBX waits for an indefinite period of time and the next row is only used in the event of busy destination or call rejection.
- Wait always – set the timeout for proceeding to the next row of the table. The incoming call is not routed to the next row before the timeout expiry. If 0 is used, the PBX does not wait and immediately proceeds to the next row (such row has no sense).
- Wait with queue – set the timeout for proceeding to the next row of the table. The timeout is not used if the previous command has routed the incoming call to a busy destination and the call has been rejected (not queued). In this case, the routing proceeds immediately to the next row. If, however, the call has been queued, the routing waits for a preset timeout or busy object answer (whatever comes first) before proceeding to the next row. If '0' is used, the PBX waits for an indefinite period of time and the next row is only used in the event of busy destination or call rejection.
The last command cannot be included in any of the above-mentioned groups.
- None – has the same function as an empty row (= no function).
Advanced settings
- Send CLIP – this option serves as a quick CLIP identification table. The coming identification is changed into the set format. Use Send as to set two ID displaying modes: select Display to display the Number/URI as the CLIP, but store the original calling subscriber ID in the user call history. Select Force to change both the CLIP phone display and the user call history record. Select Scheme to choose Number/URI, and Type to set the number subtype (Unknown, Internal, Local, National or International).
- Force facility – refers to the called number. It is used in DSS1 messages for communication with Ericsson exchanges for billing purposes. Again, set the Scheme (Number or URI), Subtype (Unknown, Internal, Local, National, International) and Number/URI (specific number or address).
- Force forwarding – refers to the called number. It is used in DSS1 messages for communication with Nokia exchanges for billing purposes. Again, set the Scheme (Number or URI), Subtype (Unknown, Internal, Local, National, International) and Number/URI (specific number or address).
- Accounting group – enable adding the required group number into the accounting sentence for a selected object for later cost distribution purposes.
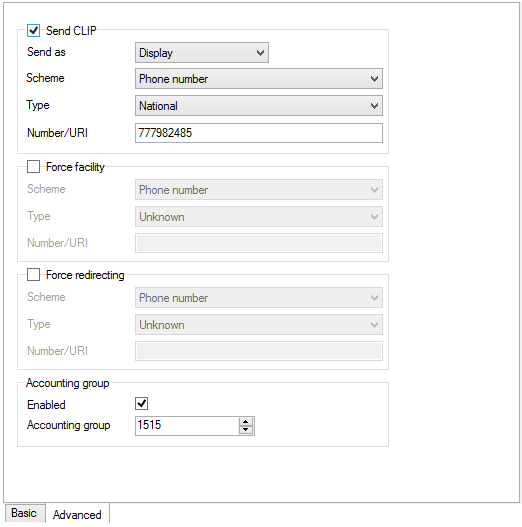 |
Figure: View of Ring Table Configuration Menu – Advanced