7.5.1 Bundles
Bundle
The bundle is a routing object that enables to route an incoming call to one (or all) of the objects specified in the bundle. Choosing an object within a bundle depends on the selected strategy. The fact that an routing object is busy need not necessarily lead to routing termination. The call can be routed to another routing object either upon a busy router recognition or after a timeout as preset. For bundle parameters and their usage see below.
Bundle Settings
Bundles can be configured in the Routing – Routing objects – Bundles menu. A list of available bundles is displayed to the left. Add, delete or rename bundles using the context menu. You can also create predefined bundles with the Default option. The parameters of the selected bundle are shown to the right. The figure below shows a possible bundle configuration.
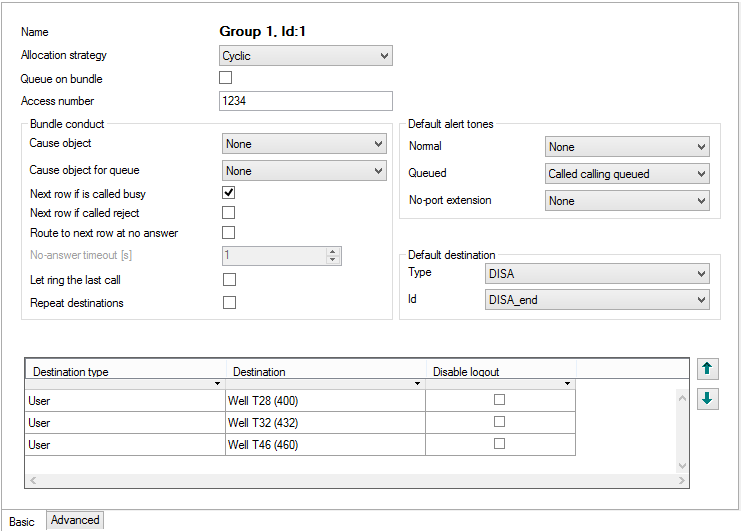 |
Figure: View of Bundle Configuration Menu – Basic
The above mentioned menu consists of the following parameters:
- Allocation strategy – select the way of object choosing within a selected bundle. Choose Linear, Cyclic, All or By credit.
- Linear strategy – an incoming call is always routed to the first bundle row. If this object is busy or unavailable, the call is routed to the next row or terminated (as preset).
- Cyclic strategy – an incoming call is routed to the bundle row that comes immediately after the one used for the previous routing to this bundle. If this object is busy or unavailable, the call is routed to the next row or terminated (as preset).
- All – an incoming call is routed to all objects at the same time. Basically, the strategy substitutes the ring group function. The main difference, however, is that stations and users can login to a bundle using a service.
- By credit – this strategy is intended for credit-monitored bundles with virtual ports. An incoming call is routed to the virtual port of the bundle with the currently highest count of free minutes. If there are more rows with the same count of free minutes, the sequence of rows in the bundle is respected. If a row object is busy or unavailable, the call is routed to the next row, or terminated.
- Queue on bundle – enable queuing of incoming calls into bundles. Depending on the strategy selected, the queue on the bundle is active either upon the first or the second passage through the bundle. With the All strategy, the queue is forced for all destinations. With the Linear and Cyclic strategies, the destinations are dialled according to the active strategy and the queue is disabled. The first attempt to call all the bundle destinations is followed by active queue routing to all the destinations that did not return causes 21 – Call Reject or 18 – No user responding and/or the cause defined in the Cause object for queue parameter.
- Access number – enter the bundle number to be used for identification in the Bundle login and Bundle logout services.
Bundle conduct
- Cause object – select one of the cause objects as pre-defined in the Global data – Causes – Cause objects menu. These objects represent a set of causes to be responded to by the bundle. When one of the cause objects has been selected, the Respond to busy and Respond to reject options are disabled automatically.
- Cause object for queue – route incoming calls with queue to all the bundle destinations except for those which returned the cause defined in the selected cause object.
- Respond to busy – route an incoming call to the next row in case the object is busy. This increases the successful routing rate. Here cause 17 – User Busy – is relevant only.
- Respond to reject – route an incoming call to the next row if rejected by the called user. Here cause 21 – Call reject is relevant only.
- Route to next row at no answer – proceed to the next bundle row in case the call is not answered within the timeout defined in the No answer timeout [s] or under causes 18 – No user responding – and 19 – No answer from user.
- Let ring the last call – if this option is checked off and Route to next row no answer is used, the incoming call is not routed to the Default destination after routing to the last unused object, but it rings at the last destination. The last unused object need not be the object from the last row of the bundle.
- Repeat destinations – if this option is checked off and proceeding to the next row on busy is applied, the call is not routed to the default destination after the last bundle record, but routing starts from the first bundle record again. First means the First used within this incoming call. A timeout for repeating destinations and acceptable count of repetitions is defined in the Global parameters for convenience and deadlock protection. If a call is routed to a destination before the timeout expires, the destination pretends to be unavailable.
Default alert tones
In this section select variable alert tones for specific situations.
- Normal – set the alert tone to be used in all situations except for the two cases mentioned below.
- Queued – set the alert tone to be used for routing to a extension with an active queue. The incoming call has to be queued, otherwise the normal alert tone is used.
- No-port extension – set the alert tone to be used for routing to the user with a no-carrier extension (external extension). Such user has to be assigned an external extension and another internal (active) extension at least. Otherwise, you will hear another alert tone.
Default destination
Here select the destination to be used whenever the call is rejected on the last bundle destination, the next row proceeding timeout expires, or the call cannot be delivered for any other reasons (all destinations are busy or logged out). Default destination routing depends on the Bundle conduct settings.
In addition to the above mentioned parameters, an object adding table is available. The table consists of two columns with the following meanings:
- Destination type – select the type of the routing object to be used for incoming call and SMS routing. Define the extension, user, carrier, set, ring group, another bundle, ringing table and VoiceMail, or disable the selected line. Remember that a call is answered immediately when routed to the VoiceMail. Also keep in mind that if an SMS is routed to the bundle, the ringing table and ring group object rows are not applied!
- Destination Id – set an object of the selected type.
- Disable logout – disable user or station logout from a bundle using the Logout from bundle service. Any logout attempt is notified as an error.
Advanced settings
- Send CLIP – this option serves as a quick CLIP identification table. The coming identification is changed into the set format. Use Send as to set two ID displaying modes: select Display to display the Number/URI as the CLIP, but store the original calling subscriber ID in the user call history. Select Force to change both the CLIP phone display and the user call history record. Select Scheme to choose Number/URI, and Type to set the number subtype (Unknown, Internal, Local, National or International).
- Force facility – refers to the called number. It is used in DSS1 messages for communication with Ericsson exchanges for billing purposes. Again, set the Scheme (Number or URI), Subtype (Unknown, Internal, Local, National, International) and Number/URI (specific number or address).
- Force redirecting – refers to the called number. It is used in DSS1 messages for communication with Nokia exchanges for billing purposes. Again, set the Scheme (Number or URI), Subtype (Unknown, Internal, Local, National, International) and Number/URI (specific number or address).
- Assistant – set a bundle with respect to the Assistant user application.
- Visible in Assistant – display a bundle within the application. If it is not checked, the bundle is not available for use.
- Group – select a group or subgroup of users who are allowed to work with a selected bundle within the application. If the selected group (or subgroup) contains subgroups, the bundle is available only to the users who are assigned directly to the group (or subgroup) to which the bundle is assigned.
- Accounting group – enable adding the selected group number to the accounting sentence for a selected object for later cost distribution purposes.
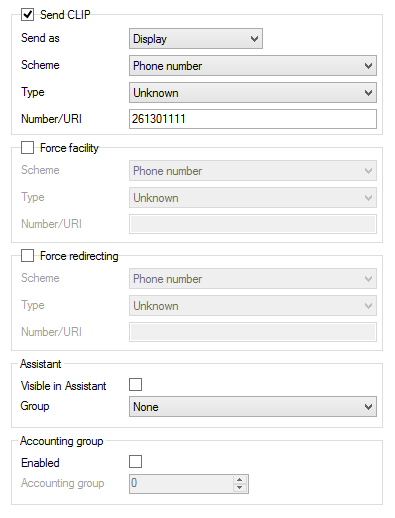 |
Figure: View of Switch Router Settings
Service Login to Bundle
The Station/User Login to bundle services have been enhanced with the option to specify the bundle position to which the station/user will be assigned. If a '0' is selected for the bundle position or no selection has been made, the station/user is placed last in the bundle (as before). Selecting a '1' means the first position, '2' means the second, '3' the third, and so on. Refer to the example below for illustration.
Example
Suppose you want to log in a station to the third position of bundle 151. Dial the service access number *64 from the station and enter the four-digit user PIN (1111, e.g.) when requested so. Now you will be asked to dial the bundle number. Dial 151 and press * for confirmation. Then dial the required bundle position for your station, i.e. 3, and press # for dialling end. The service has been completed successfully and your station is logged in as the third in the bundle.
Note
- Refer to the User Manual for details on the Login to bundle service.