7.4 Switch Routers
The Switch router helps you change call/SMS routing via 2N® NetStar using a service called Set switch router. Dial or send an SMS to the service and choose a switch router and one of its predefined parameters to specify the call/SMS destination. This object is subject to licence!
The Routers – Switch routers menu consists of two windows: the list of created switch routers is to the left and the configurable switch router parameters to the right, The context menu in the left part of the menu provides the following options:
- Add – open a router adding window and enter the router name.
- Delete – delete the selected router. This deletion automatically removes all database links to this object.
- Delete all – delete all routers in the menu. You will be asked to confirm the action before deleting.
- Rename – rename the selected router. If you enter an existing name, you will be warned and no change will be made.
- Add router group – add a group of routers.
- Add router subgroup – add a subgroup to the selected group of routers.
- Move to root level – move the selected object to a higher level beyond all created groups and subgroups.
- Move group content – move the group/subgroup content to another group/subgroup of routers.
- Copy router – make a copy of the selected router. Enter a new name. The router copy contains identical records as the original one (including the default destination).
- Show objects routed to router – activate a side window including listing of all objects that are routed to the selected router. This function helps you check the PBX routing settings.
- Expand all – expand the whole router group/subgroup structure easily.
- Collapse all – collapse the whole router group/subgroup structure easily.
Call Routing
Call and SMS routing via the switch router is similar to standard routing. The only difference is the use of a Parameter as the routing input. Use the Set switch router service to select a switch router and its Parameter. Use the Get switch router service to identify the currently active row of the switch router. This service informs the calling subscriber of the set active row by playing the respective Info tone. You can configure the switch router via the 2N® NetStar Assistant application too (refer to the 2N® NetStar Assistant manual for details).
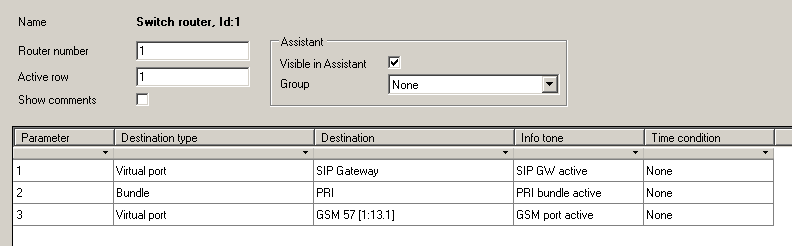 |
Figure: View of Switch Router Settings
- Router number – enter the router identifier. The number is entered into the service during router selection.
- Active row – display the active parameter of the switch router.
- Show comments – display the Comment column. This column allows you to enter a note to a row without affecting call/SMS routing . The 2N® NetStar Assistant displays comments automatically at the switch router rows.
- Assistant – use this block to set the switch router with respect to the 2N® NetStar Assistant.
- Visible in Assistant – enable switch router displaying in the application. If disabled, the selected switch router is not available in the application and cannot be worked with.
- Group – set a group/subgroup whose users can work with the switch router via the application. It holds true that if the given group/subgroup has more subgroups, the switch router is offered to the users of the set group/subgroup and not to the users of their subgroups.
- Parameter – set a string of characters for router row identification during router setting by the service. Numeric characters can be entered only.
- Destination type – set the type of destination to which the call shall be routed. All the PBX routing objects are available (if created) plus three options in which the destination is not obvious at first sight :
- Default – the call routing will jump to the next routing level if any. This option is primarily used for assigning objects to sets. Select this option to return the call from the router to the superior set and routing to the next item of the set follows.
- Disabled – terminate the call routing process. The calling subscriber gets the busy tone.
- Origin – return the modified number from the router to the original port.
- Destination – select a destination of the above selected type.
- Info tone – select a tone to be played to the user to identify the active row in the Get switch router service.
Caution
- Make sure that the Info tone parameter is set to make the Get switch router service work properly.
- Time condition – assign a time condition to each router row to make the row valid within the set time period only. Time conditions help you create rather sophisticated, time-dependent call routing schemes. Calls can thus be routed to different destinations at different times despite identical input conditions.
- Default destination – if no match is found in the Parameter column, the call is routed according to the Default destination settings (below the routing rule table):
- Type – set the destination type. All the PBX routing objects are available (if created).
- Id – select a destination of the selected type.