7.3 Complex Routers
The Routing – Complex routers menu provides a complex solution to routing calls via the PBX. This object is subject to licence!
Functionally, the menu is divided into three sections:
- Route when
- Changes
- Route to
The first section defines the parameters according to which a call/SMS is to be routed, the second section changes the call parameters and the third one selects the final call destination. Tick off one or more parameters in the Route when or Changes blocks to make the settings of the first and second sections. Click  to select or remove all the parameters. Use the
  and
and  arrows to set the sequence of the parameters.
Additional sections:
- Hide sections – hide the highlighted marking of the Route when, Changes and Route to sections.
- Show comments – display the Comment column. This column allows you to enter a note to the row without affecting call/SMS routing.
- Name information sending – add information on the name during call routing. This setting is used, for example, for SIP communication, where an item from the selected phone directory is entered into the Name field in the From and P-Asserted-Identity headers.
- Find name in group phonebook – select a phone directory for adding CLIP information.
- Find name – select whether the calling or called subscriber's phone directory shall be used.
- Insert calling extension name – add the calling extension name to the name information.
Route When
Having created a router for each row added, specify the input parameters for call routing. The following options are available:
While selecting the Called p refix, Calling p refix, Text, Facility p refix or Redirecting p refix parameters, you can either define the prefix/text to be used for call/SMS routing in the row, or click  to display an auxiliary window with extended settings. Select a value from a list of preset values to set the other parameters. The extended setting window is identical for the above mentioned parameters and includes the following options:
- Format – set the prefix format: digits or text strings (see below).
- Test – check the prefix format for a match with the input value.
- Input – enter a value to be compared with the Format value.
- Result – display the result of the Input – Format comparison.
- Help buttons
- Arbitrary number of chars – insert a text string [?] in the prefix format.
- Specific number of chars (X) – insert a text string [X] in the prefix format, where X is the Settings for buttons value.
- Clear prefix – delete the Format content.
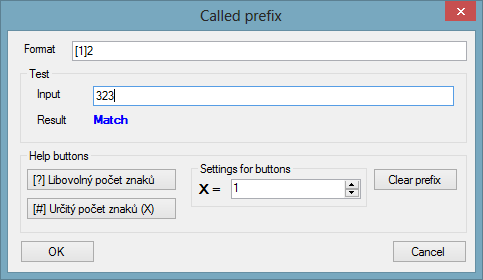 |
Figure: Route When Setting Window
Note
- If there are more call routing parameters than one, you are recommended, for convenience, to reclick the selected parameters, combine all the Route when parameters into a single
 field and just click to modify a routing rule. The window displays all the parameters included in the Route when section.
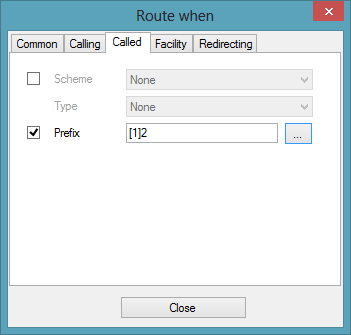 |
Figure: Route When Setting Window
Advanced information – display the current settings of the Route when section instead of in the router row.
Example
The prefix format is set in the Route When Setting Window figure in such a manner that the router row is applied to all CPNs with 2 in the second position. The prefix format defines that one arbitrary character must precede digit 2 . The count of characters following digit 2 is not defined.
Changes
The Changes section specifies the call parameters that are to be modified before routing a call to the destination. The following options are available:
Like with Route when, some parameters have extended setting windows: Called info format, Facility info format, Calling info format, Text, Redirecting info format and Name. The other parameters are set by selecting a value from a list of preset values again, The extended Changes window provides the following options:
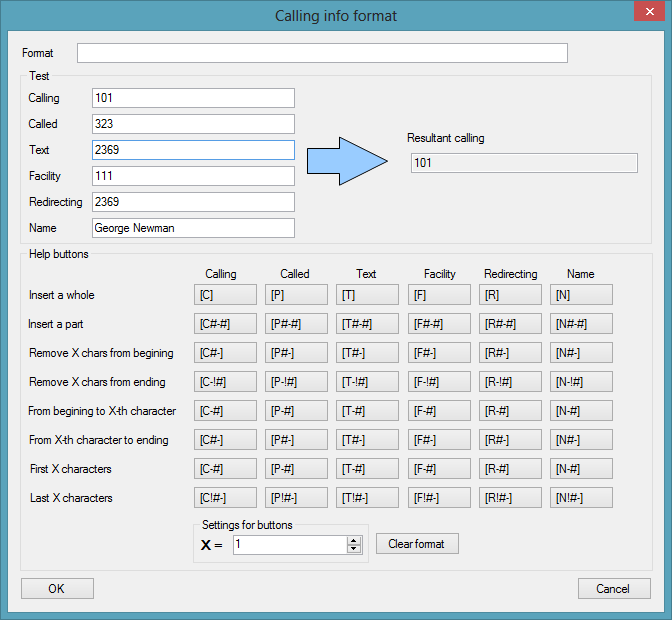 |
Figure: Changes Setting Window
- Format – set the parameter changing format (of the CLI info in our case; see Changes Setting Window figure above).
- Test – check whether the Format has changed as required by entering input values.
- Help buttons – set the format of the parameter to be changed. Select an item (Calling, Called, ...) in the button table that shall affect the parameter to be changed (Calling info format in our case). Select a row to define which item characters are to be inserted in the parameter to be changed. Click the appropriate button to enter a string into the Format field, which modifies the parameter into the required format. The strings can be entered sequentially, the count of strings is unlimited. If the Test parameter includes specific values, check the resulting format of the parameter changed. Click
 to save the defined format into configuration or click
  to delete the format.
- Insert a whole – insert the whole item into the parameter to be changed.
- Insert a part – insert a selected item part into the parameter to be changed. Click the button to display a window (see below) for you to specify the part to be inserted: starting from a certain character from the beginning/end, or before/after a certain occurrence of the specified character.
 |
Figure: Format Inserting Window for Parameter to Be Changed
- Remove X chars from beginning – remove the defined count of characters from the beginning and insert the rest of characters.
- Remove X chars from ending – remove the defined count of characters from the end and insert the rest of characters.
- From beginning to X-th character – insert all characters placed before the X-th character from the beginning.
- From X-th to ending – insert all characters placed after the X-th character incl. to the end.
- First X characters – insert the first X characters of the item.
- Last X characters – insert the last X characters of the item.
Note
- Like in the Route when section, reclick the selected parameters and combine all the Changes parameters into a single field for convenience.
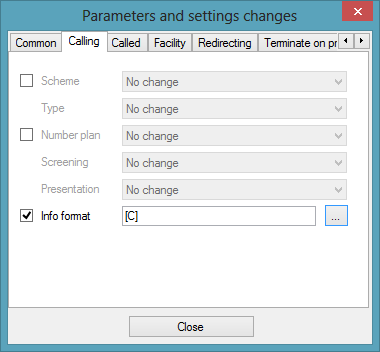 |
Figure: Parameter Changing Window
Route To
The last complex router section helps you select the final destination for a call and set the router row time validity via the following options:
- Destination type – set the type of destination to which the call shall be routed. All the PBX routing objects are available (if created) plus three options in which the destination is not obvious at first sight:
- Default – the call routing will jump to the next routing level if any. This option is primarily used for assigning objects to sets. Select this option to return the call from the router to the superior set and routing to the next item of the set follows.
- Disabled – terminate the call routing process. The calling subscriber gets the busy tone.
- Origin – return the modified number from the router to the original port.
- Destination – select a destination of the above selected type.
- Time condition – assign a time condition to each router row to make the row valid within the set time period only. Time conditions help you create rather sophisticated, time-dependent call routing schemes. Calls can thus be routed to different destinations at different times despite identical input conditions.
- Default destination – if no match is found in any router row in the Route when , the call is routed according to the Default destination settings (below the routing rule table):
- Type – set the destination type. All the PBX routing objects are available (if created).
- Id – select a destination of the selected type.