6.12 Storage Manager
Find the Storage Manager in the Global data – Storage manager menu. This menu helps you define all storages necessary for the PBX operation and services. In addition to classical internal storages (such as DATA, NAND), you can map network disks and MMC cards, which make the usable space almost unlimited and provide access to such services as call recording, for example.
Logical Storages
Logical storages represent the basic storing units for all PBX services and functions. You can add logical storages to the PBX from a pre-defined set but cannot create logic storages of your own. Logical storages themselves have no reserved data space. Hence, you have to map one physical storage at least to each logical storage, such as the internal memory, MMC card or network disk (CIFS – Common Internet File S.).
Right-hand button context menu actions:
- Expand all – unfold the logical storage tree into a view of the physical storages.
- Collapse all – fold the tree structure into a view of the logical storages.
- Add logic storage – select and add a pre-defined logical storage.
- Add physical storage – add a physical storage to the currently selected logical storage. You can only add physical storages as created in the Physical storages section.
- Remove – remove the selected physical storage or logical storage including all of its physical storages.
- Remove all – remove all logical and thus all physical storages from this section.
- Default – reset the current structure of logical/physical storages to the default values. All the physical storages added are ignored and remain in the structure.
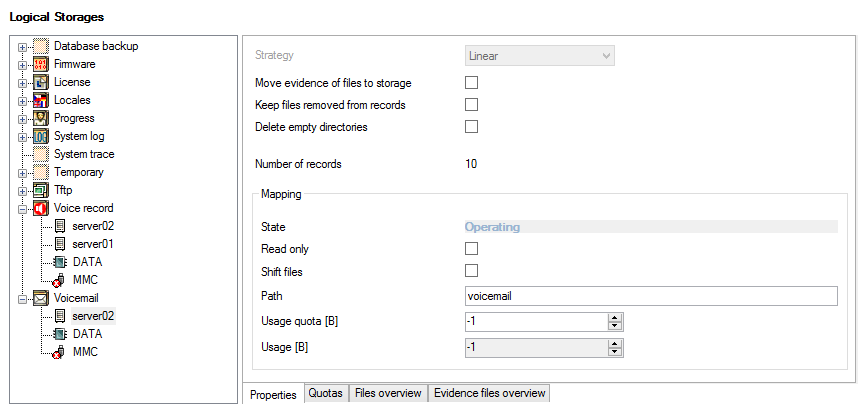
Figure: Mapped Storage Setting Options
Properties
- Strategy – select how to choose physical storages for the given logical storage. A linear strategy is only available at present. The selection is active when you click on any of the logical storages. You can change priority of the physical storages by Drag&Drop function.
- Linear – data are stored in a sequence starting from the first physical storage. When the first storage is full, the next physical storage in the sequence is used.
- Move register of files to storage – move a register of records and VoiceMail messages to a storage in a separate file instead of the PBX database. If, however, Shift files is selected too for the given physical storage, the register will remain in the PBX database. Files (records and VoiceMail messages) are always moved to a storage with the highest priority or the first available storage without the Shift files selection located above the storage from which the files are to be moved.
1;12;5;2;19;432044;2013/4/29_08:03:31_950139;"2013-04-29/vr_130116962119498780.wav";0;0;1;0;"103";0;1;0;"101";
1;1;4;2;22;44000;2013/4/29_07:15:59_753387;"2013-04-29/vm_2013-04-29-09-15-59-752663_user 102_103.alaw";22;-1;27;29;0;1;0;"103";
- Keep files removed from register – delete the removed files from the register but keep them in the physical storage.
- Delete empty directories – when the file validity expires, the respective directory will be automatically deleted too.
- Mapping – the section is active when you click on any of the physical storages and includes the following parameters.
- Status – this parameter displays the current status of the selected physical storage within a specific logical storage, including whether the storage is available or full.
- Read only – this parameter disables file editing for the given physical storage. The files can be read only.
Shift files – set the given physical storage as temporary. The files stored here are not archived but shifted to a storage with a higher priority. If this option is enabled, the Move register of files to storage parameter cannot be applied for the selected storage. For example, in the event of network storage failure, files are stored in the next storage in the sequence and the file register is stored in the PBX database. When the network storage becomes available again, the files and file registers are moved to it.
Caution
- All database records created before version 4.1.x are deleted when the Shift files option is selected. If the Move register of files to storage parameter is disabled, files are deleted from the storage too.
- Path – this parameter defines the path to a directory within the logical storage mapped. This accelerates physical storage mapping as you just search the selected directory instead of the entire structure. Make sure that the selected directory really exists in the specified location.
- Usable space – the parameter specifies some space in the currently selected physical storage to be occupied by the given logical storage. It is because one physical storage may be used by multiple logical storages (by defining the used directory, e.g.), each of which may be assigned a different data space size. Set -1 to leave the space unlimited on this level.
- Used – this non-editable parameter informs of the current occupation of the space reserved for the selected physical storage.
Caution
- Where a physical storage is used for multiple logical storages, create subdirectories and define the path on the Setting tab to apply the quotas necessary for the given physical storage.
Example:
Suppose network storage server02 is used for both recording calls and VoiceMail. While setting quotas, create a call recording folder (voicerec) and VoiceMail folder (voicemail) in the network storage and define the paths for voicerec and voicemail in the configuration tool (see the figure above).
Quotas
Table columns:
- Subject type – this column displays the subject type to which the row relates. Choose User, Group, Virtual port, or Virtual port type.
- Subject – defines a subject of the above selected type.
- Usage quota – defines the usable space for the given subject within the logical storage data space (for all its physical storages).
- Item size – defines the maximum file size for the given subject.
- Number of items – defines the maximum count of files to be stored for the given subject within the logical storage data space.
- Item life [s] – sets the time for which the file stored for the given subject shall be kept in the logical storage data space.
- Delete oldest achieving quota – enables deletion of the oldest user files within the logical storage data space (when the file retaining time expires).
List of files
If you are on the logical storage level, you can see all files contained in the corresponding physical storages. If you select a physical storage, you can only see the files saved in the particular physical storage.
Right-hand button context menu actions:
- Re-read view – you can refresh the current file list within the logical storage data space.
- Remove – use this option to remove the selected file.
- Rename – use this option to rename the selected file.
- Create directory – use this option to create a directory within the data space of the currently used physical storage.
- Import file – add a file from a PC to the currently used physical storage.
- Export file – load a file from the logical storage data space into a PC.
Table columns:
- Name – file name.
- Size – file size.
- Changed – last file revision date and time.
- Attributes – additional information on the file to be used by the system.
List of locked files
Right-hand button context menu actions:
- Save – load a file from a storage to a PC.
- Listen – play the selected file.
- Remove – remove the selected file from the storage.
- Remove all – delete all files from the selected storage.
Table columns:
- Name – name of a locked file.
- Created – file creation date/time.
- Validity – file locking time, or file lifetime in the physical storage. The file will be deleted when this time expires.
- Size – file size.
- Subject type – subject type to which the file belongs.
- Subject – file owner.
- Media – type of the memory connected (MMC, USB, ...). The function has not been implemented yet.
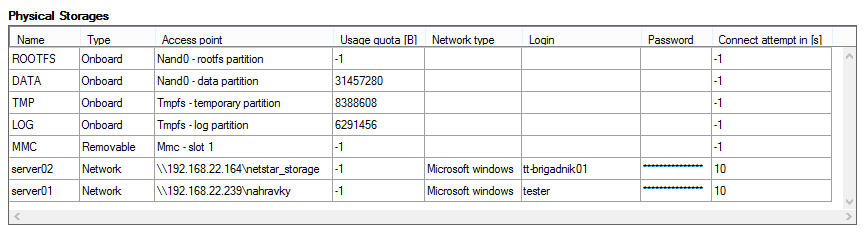
Physical Storages
Right-hand button context menu actions:
- Add – add a row for your own physical storage mapping.
- Rename – rename the selected physical storage.
- Remove – remove the selected physical storage.
- Remove all – remove all physical storages defined.
- Default – reset the default physical storages for the PBX.
Table columns:
- Name – name of the physical storage.
- Type – basic type of the physical storage. Choose Built-in, Network, or Removable.
- Access point – define the path to the storage.
- Removable or built-in – a set of pre-defined paths to specific parts of the internal data space or the MMC card slot.
- Network – define the path to the shared space of the network disk as for classical sharing (e.g. \\192.168.22.164/netstar_storage).
- Usage quota – define the total space to be used by a physical storage for all of its PBX functions. When the limit is exceeded, the physical storage will be put out of operation.
- Network type – choose either Microsoft Windows or Nfs. Used for network connections only.
- Login – set the login for connection to the shared space on the network disk. Used for network connections only.
- Password – set the password for connection to the shared space on the network disk. Used for network connections only.
- Connection attempt in [s] – define the intervals in which the PBX attempts to get connected to the given storage shall be made. If you set -1, the storage function will not be checked.
 |
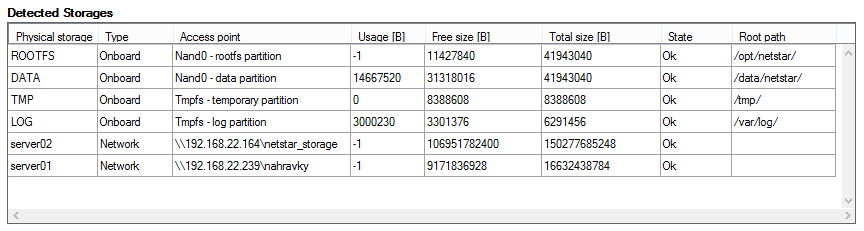
Detected Storages
Table columns:
- Physical storage – name of the physical storage.
- Type – type of the physical storage (Built-in, Network, Removable).
- Access point – path to the storage as described in the Physical storages above.
- Usage – amount of data saved in the physical storage.
- Free size – current free space in the physical storage.
- Total size – total amount of data space in the physical storage.
- State – current state of the physical storage.
- Root path – root directory of the physical storage.
 |