11.2 Mobility Extension Configuration
Mobility Extension
The Mobility Extension is an extension feature of the 2N® Netstar PBX, which enables external extensions to make use of the features that are not normally available as well as practically all PBX services. The Mobility Extension is associated with the existence of external extensions. Before starting creating external extensions and configuring their routing rules, make sure that you have a valid licence and if so, for how many extensions the licence is valid. Verify this in the licence tables in the lower right-hand part of the Global data – Licences menu. In the row called Mobility Extension user you can see the count of licences owned (third column) as well as the count of licences required by the PBX (last column). The last column shows not only the external extensions created but also the Transfer parameter on the Properties tab on the extension and user levels. If you set this parameter to Yes, only one licence will be required for the extension, and the count of licences required for the user will be the same as the count of the user extensions (external extensions are counted only once).
External Extension Creation
In principle, an external extension can be created in three ways. First, you can create an external GSM/ PSTN extension while adding a user as shown in Figure 1. A conventional GSM extension (cellular phone) is configured in the GSM part and a normal fixed line of a public network subscriber is configured in the PSTN part. In the case of GSM external extensions, the GSM text is automatically added to the end of the name, and in the case of PSTN external extensions, the PSTN text is added. To forward SMS messages delivered to the user's cellular phone of an external extension, check the Resend SMS option. For the SMS routing configuration see below.
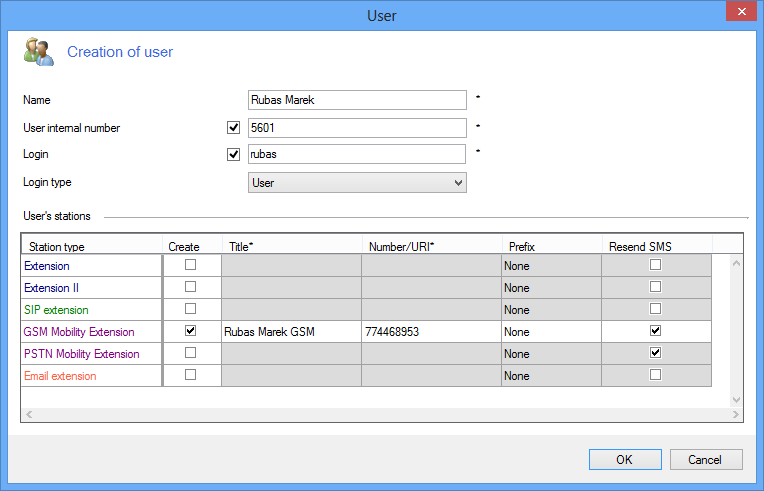 |
Figure 1: Creating External Extension by Adding a User
The second way to create an external extension is to create an external extension and then assign it to a specific user (an external extension may not exist without its user). This can be done in the Users – Extensions – External menu. In the context menu, add an extension, enter the name and number, assign the extension to a user and, if necessary, enable the Resend SMS option. Finally, click OK for confirmation. See Figure 2 below.
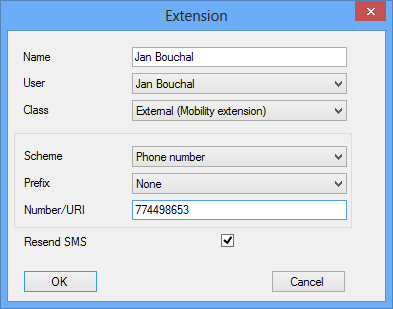 |
Figure 2: Additional Adding of External Extension to User
The third and last way is to add an external extension over the given user. In the Users – Users & Groups menu select the user, display the context menu and click Add extension. Complete the extension name and number and enable the Resend SMS option if necessary. See Figure 2 above again.
Having added an external extension and saving the configuration, check the external extension for a valid licence on the Basic tab in the Required licences section on the extension level. Refer to the Global data – Licences menu for the total count of the Mobility Extension user licences.
Routing Incoming Calls with Mobility Extension
What is necessary:
- an external extension
- From port routing
- DISA direct inward dialling
- permitted transmission for putting a call on hold
Routing of incoming calls from external extensions is associated with the recognition of these calls immediately after arrival at one of the 2N® NetStar ports. This recognition is based on CLIP (caller identification) compliance with its subtype. Further routing is then governed by the settings of the recognised external extension (Routing tab in the extension properties, see Figure 3). The From port item helps route the incoming calls. It consists of Normal and Services and held. The first item sets the destination for the initial routing of an incoming call. The other is used for holding of a call or dialling a service with no destination defined. For easier understanding, Annex 1 shows a flow chart of processing of an incoming call from an external extension.
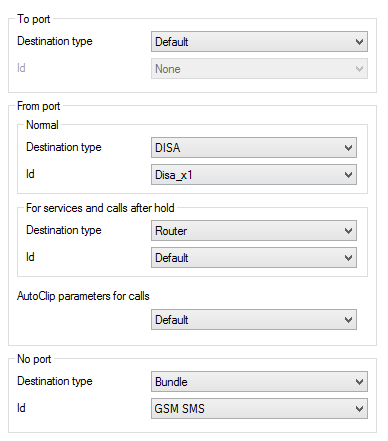 |
Figure 3: View of External Extension Routing Tab
As shown in Fig. 3, incoming calls from an external extension are routed to the DISA dial-in. See Figure 4 for specific DISA settings. With this configuration, the incoming call is routed to the Default router. Then a 10-second dialling timeout follows, which is detected by the DTMF detector (to include it, check the DTMF option in the lower part). If the 10-second timeout expires without dialling detection, the call is routed to the Operator extension.
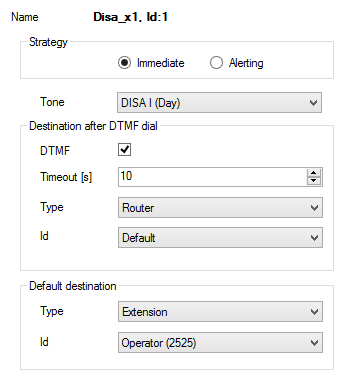 |
Figure 4: View of DISA Configuration for Mobility Extension
The Default router usually gives the user a much broader scope of operation than the above-mentioned Internal router because it is one level higher in the hierarchical structure. It allows the user to call internal extensions, use the services and also call public networks. Restriction of calling international numbers can be achieved, for example, by including an authorisation router.
To distinguish the rights of different external extensions, just create multiple DISA dial-ins and routers and assign different routers to groups with identical rights in the DISA to specify the calling user rights.
After the call has been made, it is possible to put it on hold any time. In order to access this function it is necessary to permit it at one of the hierarchical levels. Such permission is made in the ME tab in the Properties (Figure 5). Flash pattern is used for putting a call on hold and switching between active calls. Disconnect pattern helps terminate one of two active calls and return to the other one. The Pattern time interval specifies the possible delay between the entering of the characters of one pattern (time between pressing 7 and pressing *). If the delay is longer than the set value, the entered pattern will be evaluated as invalid.
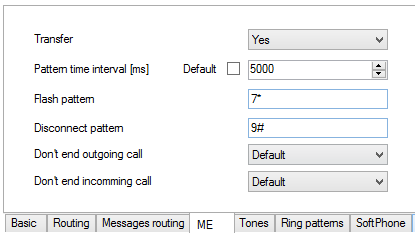 |
Figure 5: Common ME Tab Configuration with Enabled Transmission of Dialling of External Extension
What Is Necessary for Routing Outgoing Calls with Mobility Extension
- an external extension;
- No port routing;
- From port routing;
- a bundle of ports;
- permitted transmission for holding a call.
Routing of outgoing calls to an external extension mainly depends on the configuration of this extension and on the way it is called. In principle, an external extension can be called in two ways. The first is to call a number, which is then routed to the respective external extension. The second way is to call a user of this extension. In such case, it is necessary to uncheck the Do not ring when calling a user option on the Basic tab at the extension as shown in Figure 6.
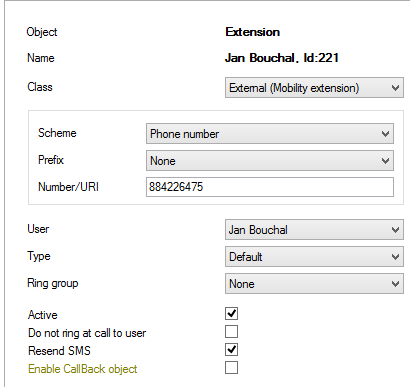 |
Figure 6: Part of Configuration of External Extension with Number Used for Routing
The port via which the call is to be made determines the setup of the Without port routing on the Routing tab in the extension properties (or, as the case may be, the type of the extension when using mass configuration by the fall-down structure). Figure 3 shows a suitable routing solution for an outgoing call of an external extension. The inclusion of a bundle of GSM ports in the Without port routing reduces the probability of call rejection at the respective external extension when one GSM port is busy at the moment.
One of the possible settings of the bundle is shown in Figure 7. The selected cyclic allocation strategy means that at the first attempt to call one of the external extensions with this bundle set in the Without port routing, the call is routed to the first row of the bundle, i.e. to port GSM 1. At the second call attempt it is routed to port GSM 2, subsequently to port GSM 3, and then to port GSM 1 again. In case the specific port is busy at the moment of routing, the next row is automatically used. To ensure this, check the Next row if caller busy option. In case all the ports are busy, the call can be routed to the Default destination, which is a back-up solution.
By credit is another suitable bundle strategy for this case. This strategy is intended for credit-monitored bundles with virtual ports. An incoming call is routed to the virtual port of the bundle with the currently highest count of free minutes. If there are more rows with the same count of free minutes, the sequence of rows in the bundle is respected. If a row object is busy or unavailable, the call is routed to the next row or terminated.
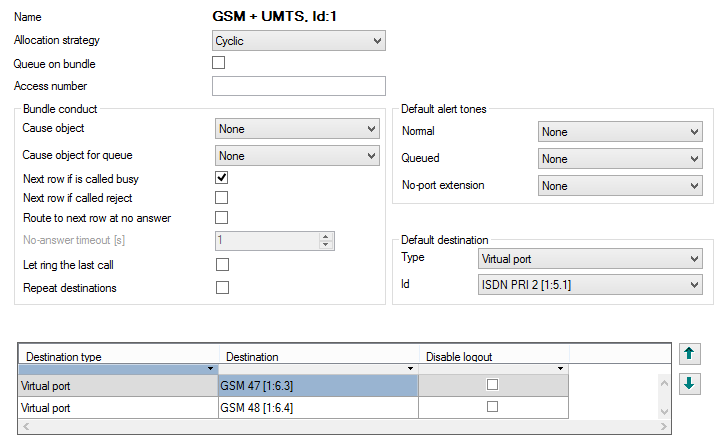 |
Figure 7: Typical Configuration of GSM Port Bundle for Outgoing Routing to External Extension
What Is necessary for SMS at No Answer
- an external extension;
- SMS at no answer setting in Properties.
These SMS messages are used for information on missed calls. To send them, configure the SMS at no answer item on the Properties tab on one of the hierarchical levels correctly. A typical configuration is shown in Figure 8. Here you can see that the configuration is divided into two parts. The first part represents configuration for the SMS sent by the PBX to the counterparty when the call initiated by an internal or external extension of the PBX with these settings is not answered or is rejected. The second configuration part is used for notification on a missed/rejected call of the external extension from the PBX, which was initiated over the GSM network.
You can enable/disable the SMS and set the Minimum alerting time after which the SMS shall be sent if the call is not answered by the counterparty. Both the SMS configuration parts can be active at the same time as shown in Fig. 8. The SMS at no answer in the incoming direction (first part of configuration) has the priority in sending. The SMS is sent via the selected destination, typically a GSM port or a GSM port bundle. If you set Origin as the destination type, the SMS will be sent directly via the port (GSM) via which the unsuccessful call attempt was made.
The possibility to use the strings %n and %c for caller identification is very useful: %c provides the caller's number (CLIP) and %n includes the name specified in the respective phone book.
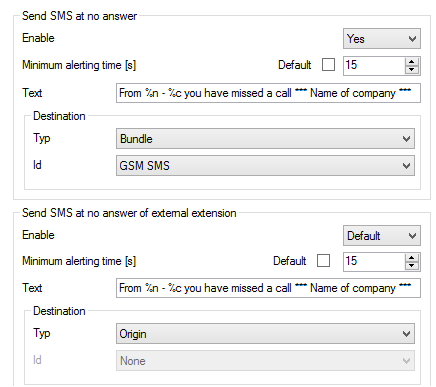 |
Figure 8: Typical Settings for Sending SMS at No Answer
What Is Necessary for Routing Outgoing SMS to External Extension
- an external extension;
- No Port message routing
Routing of outgoing SMS in 2N® Netstar is governed by the message routing settings on the Properties tab on one of the hierarchical levels (typically Group, User or Extension). This tab, together with the typical settings, is shown in Figure 9. The part of configuration marked as No port is used for SMS routing or forwarding to an external extension. Here a specific port is set via which the SMS is sent to the routing number of the external extension, but it is also possible to set a bundle of ports.
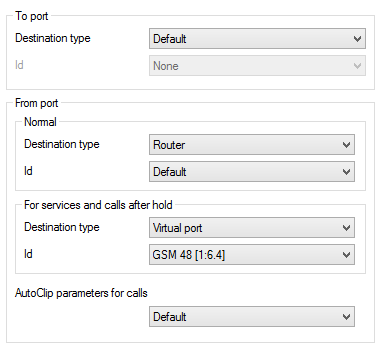 |
Figure 9: View of Typical Settings for Message Routing to External Extension
To make SMS sending to an external extension work properly, check the Resend SMS option in the configuration. The flow chart for SMS sending to an external extension is included in Annex 3. The procedure of forwarding of SMS received by the external extension user is shown in Annex 4.
Appendix
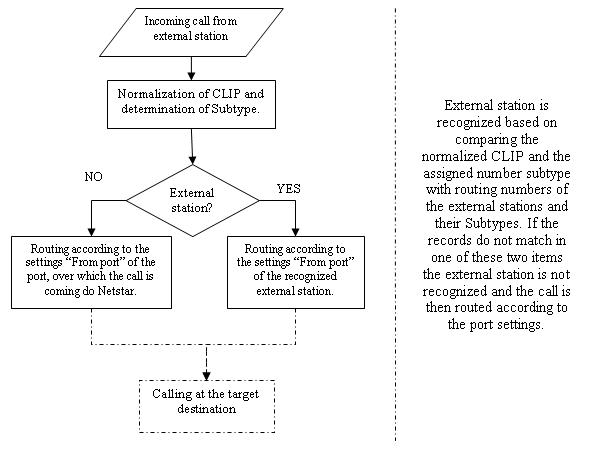 |
Annex 1: Flow Chart Showing Processes for Incoming Call from External Extension
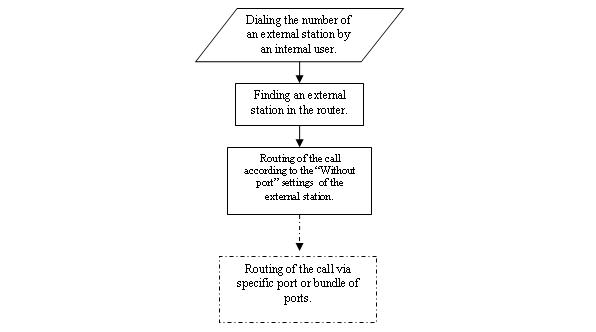 |
Annex 2: Flow Chart Showing Processes for Outgoing Call to External Extension
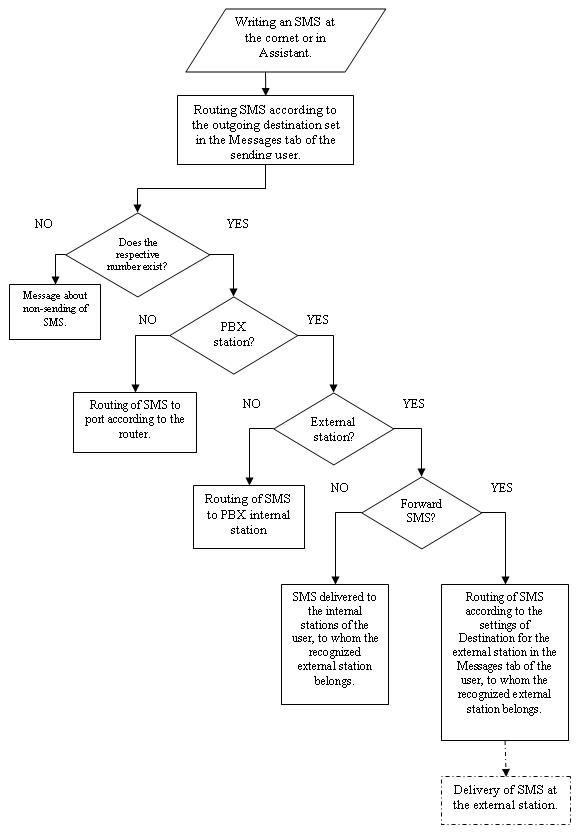 |
Annex 3: Flow Chart Showing Processes for Sending SMS to External Extension
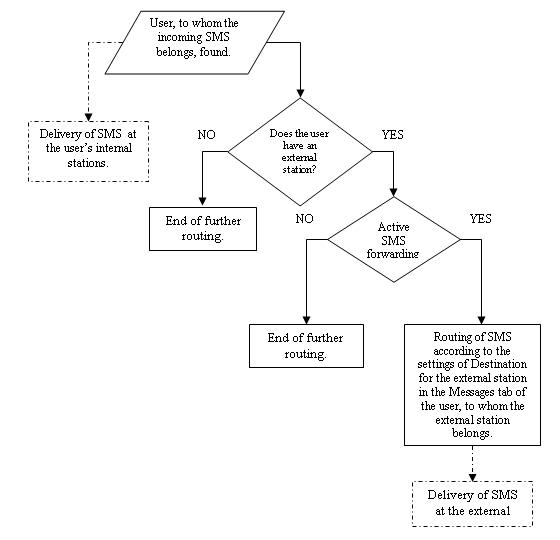 |
Annex4: Flow Chart Showing Processes for Forwarding SMS to External Extension