1.1 Connecting to PBX
The figure below presents all icons of this section.
 |
Figure: View of PBX Login Icons
Connect to PBX – use this icon to connect the configuration tool to the PBX via a selected connection.Icon meanings from the left:
- Create group – create a group of PBXs on the same level as the selected object or nested into the existing group.
- Create PBX – create a PBX on the same level as the selected object or nested into the existing group.
- Create connection – create a connection to the selected PBX.
- Properties – set or change the properties of a selected object. A name is only assigned to groups. For details on PBX and connection settings see below.
- Delete – sdelete a group, PBX or connection.
- Auto login – enable an automatic PBX connection via the current connection after starting the configuration tool. One automatic connection may only be active at a time. By selecting another setting you cancel the previous one.
- Cancel auto login – cancel the automatic connection without specifying any object.
In addition, the following options are available in the context menu:
- Import PBX structure – import a predefined PBX structure as described below.
- Export PBX structure – export the current PBX structure for later PC connection use.
- Import database – import the database of a selected PBX in the off-line mode only. In the on-line mode, the database is replaced with the PBX data.
- Export database – export the database of a selected PBX in the off-line mode only.
- Show versions – display the PBX database version and the version downloaded in the off-line mode. The information is shown after the first login to the PBX.
Connection Structure
In this menu you can create groups and subgroups (nested groups) and, subsequently, add PBXs to them. You can create PBXs without groups too, but this might be confusing if you use a higher number of PBXs. Then you can create connections for particular PBXs using the TCP/IP and modem protocols. The records are arranged alphabetically.
For easier administration of existing records, a record moving option using the mouse has been implemented on this screen, also designated as drag & drop.
 |
Figure: View of Possible PBX Connection Structure
To change the PBX connection settings use the Properties icon.
PBX Properties
The dialogue shown in figure below helps you create a PBX or change the properties of an existing PBX. The parameter meanings are as follows:
- Name – define the name of the PBX to be connected.
- Folder – define the path to the folder for the configuration to be saved.
- Autosave – enable automatic database saving in the off-line mode.
- Autosave database after – set the interval for automatic database backup. This function may only be used for the off-line mode.
- Delete autosave item older than – set the maximum time for keeping old database backups in the storage folder. This function can only be used in the off-line mode.
- Autosynchronisation – If this selection is active, the tool tries to synchronise the data automatically with the PBX without inquiring. This function can only be used in the off-line mode. If this selection is active, 'Loading from PBX' is performed if the off-line database is empty. 'Display changes' is performed if the database has been synchronised, the identifier matches and 'Database from Autosave' has not been selected. Otherwise, the synchronisation type dialogue is invoked. If this selection is inactive, the dialogue is invoked in all cases.
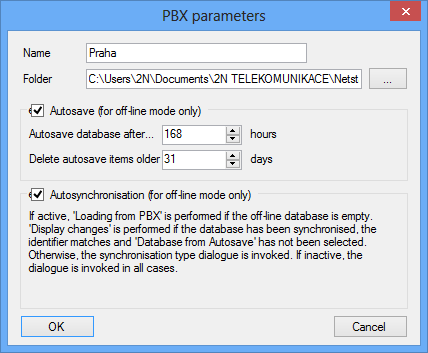 |
Figure: View of PBX Property Settings
Connection Properties
The dialogue shown in figure below helps you create a PBX connection or change the properties of an existing PBX connection. The parameter meanings are as follows:
- Connection name – enter the name of the selected connection.
- Modes – define whether the connection will support the on-line, off-line or both modes.
- Download trace – disable or restrict trace downloading from the PBX. Particularly useful for modem connections. *Any of the following modes can be selected:
- Only new – only the new trace is sent to the tool existent since the moment of PBX connection.
- Never – no trace is sent to the tool (useful for trouble making modem connections).
- Always – approximately a 300kB – 1MB trace is read out of the PBX buffer upon connection and sent to the tool. Useful for sending the trace after the PBX start up.
- Connection type – define the PBX connection type. Typically, the TCP/IP or modem connection is selected. Use the TCP/IP, enter the PBX CPU IP address and the port to be used (6992 by default). With a modem choose the one that supports the X.75 protocol.
- If unsuccessful try again – define the time interval between the PBX connection attempts in case of failure (PBX switch-off or restart).
- Connect as – define the login and password data for a secured PBX access.
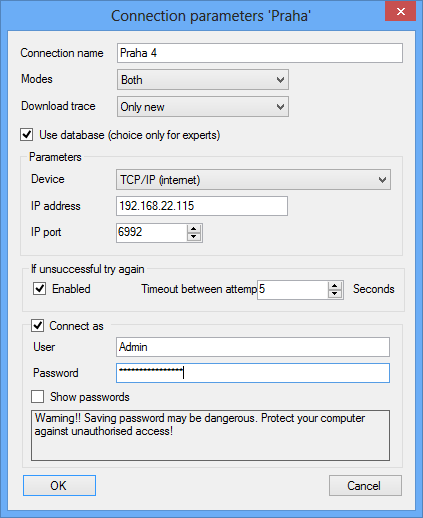 |
Figure: View of Connection Property Settings
Connecting to PBX
After an automatic or manual initiation of the PBX connection, the dialogue shown in the figure below is displayed. It provides information on the PBX to be connected, the PBX firmware version (if detected), the last known connection error and, in the case of automatic connection attempts, also the remaining time to the next attempt. To connect immediately (before the timeout), push the Try again button. The Cancel button is used for leaving the dialogue.
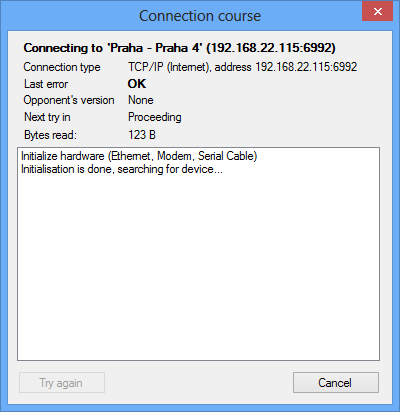 |
Figure: View of Connection Course Dialogue
If you are unable to connect to your PBX, please check whether:
- the PBX has been switched on;
- the PBX has been connected to the network;
- both sides have the same IP address and port;
- the used communication port has been opened;
- the appropriate firmware and configuration tool versions are used;
- the used communication port is not blocked by your antivirus software.