6.2 2N® NetStar Assistant Administration
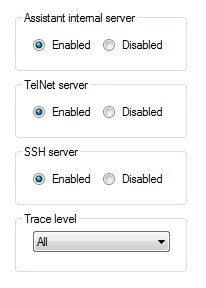
All that is mentioned in this subsection relates to your 2N® NetStar programming tool. Use the Network / Service setting / System services menu to enable/disable the internal web server for 2N® NetStar Assistant.
 |
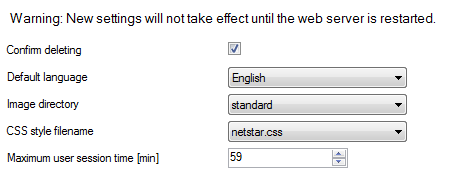 |
- Confirm deleting – use this option to enable deleting call history records. If the option is ticked off, you are invited to confirm deleting.
- Default language – set the default application language. Czech, English and Finnish are available now.
- Image directory – enable the use of one of the pre-defined image sets.
- CSS style filename – set the CSS style to be used in the application.
- Maximum user session time [min] – set the maximum time for a user session after which an idle user will be logged out.
Caution
In case you use the 2N® NetStar Assistant Server, make sure that the server installation matches the CSS style. Otherwise, display errors might occur in the application web interface. Be sure to keep the basic rules.
- Use the standard 2N® NetStar Assistant Server for Standard and Funny displays.
- Use a tailor-made installation for the customised appearance.
You will specify the global behaviour of 2N® NetStar Assistant with these settings. To set the same parameters for some users only use the same menu but from the user parameters: Users/ Users and groups / Group / User / Assistant. Create individual settings in this menu and then specify the Assistant parameters related to the user only.
Find a list of all currently connected application users in the Global data / Assistant / User sessions menu. The meanings of the columns are as follows:
- Login name – the user to which the given session corresponds.
- ID session – identification of the user session within the database.
- Last access time – time of the last user activity within the session.
 |
User rights is the last important menu. User logins have to be created to enable 2N® NetStar Assistant to be used. A role has to be assigned to each login. The following roles with different levels of authorisation are available:
- Vice Admin – is a login with all rights except for Delegate logins and Manage own group.
- SUPER – is identical with Admin as to rights.
- Vice SUPER – is a login with the same rights as are assigned to Vice Admin.
- Manager – is intended for the user that needs the right to manage logins of all the other users in the group and so has the right to delegate and manage its own group.
- Deputy Manager – this login allows the user to manage its own group.
- User – represents a general user login.
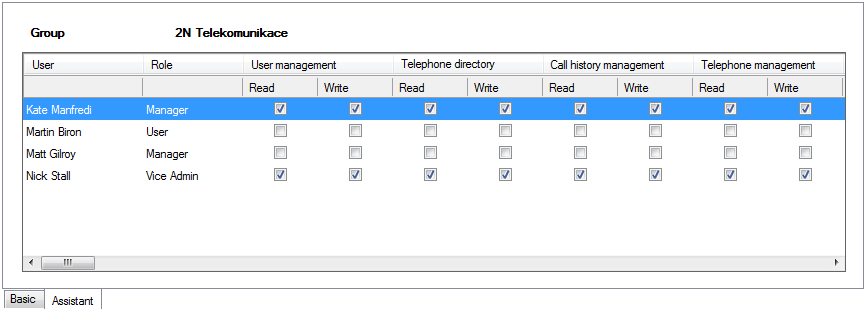 |
When a user is selected, the list of all users assigned to a group including their 2N® NetStar Assistant rights is displayed to the right of the Assistant tag. Such summary is useful for setting similar rights in user groups. The tables of rights has the following sections:
- User management – helps view and change settings of other users.
- Telephone directory management – helps view and change telephone directories of other users.
- Call history management – helps view call histories of other users.
- Telephone management – helps view and change telephone settings of other users.
- Station management – helps view and change station settings of other users.
- Global configuration management – helps view and change global configuration settings.
- Operator management – helps view and change operator settings.
- Alarm clock management – helps view and change alarm clock settings.
- SMS management – helps view and change SMS mesages of other users.
- Conference room management – helps view and change conference rooms.
- Hotel view – helps view and manage alarm clocks and emergency alerts in hotel structures.
- Recorded calls – helps view and manage user calls recorded.