2.3 System Component Installation
2N® SIM Star Step-by-Step Installation Guide
- Set the required configuration for all the GSM gateways to be connected to 2N® SIM Star.
- Set the Ethernet interface for the eCPU board and the SIM Client accordingly. Remember to install the relevant licence into the eCPU.
Connect all the CPUs and SIM Clients to the Ethernet network. It is recommended that all the components should be part of a single network segment. This version requires no profound knowledge of networks and active network element configuration.
Note
- For more information on the GSM gateway configuration refer to the respective manuals available on the 2N web sites.
- Put the SIM Board Box in operation. Insert the required SIM cards into the SIM Board, disabling the PIN request or enabling an identical PIN request for all the SIM cards in the 2N® SIM Star Server communication. If you fail to do so, your SIM card will not log in to the provider's network. Finally, insert the SIM Boards into the SIM Board Box positions.
- Set unique IP addresses for the SIM Boards using a serial console and connect the SIM Board Box into the Ethernet network by connecting the network cable into the card front panel ports.
- Install 2N® SIM Star Server as instructed in the 2N® SIM Star Server section.
- Set the time and time zone for the 2N® SIM Star Server installation site. The time zone setting procedure is part of the installation process.
- Set the 2N® SIM Star Server network interface. The DHCP is enabled by default. Connect 2N® SIM Star Server to the Ethernet network.
- Use the web interface to log in to 2N® SIM Star Server as the administrator with the highest 2N® SIM Star Server configuration rights. For the login data refer to the Login section.
- Set the appropriate IP addresses and communication for the GSM gateways, SIM Clients and SIM Boards. An automatic detection of the system components is available for easier setting as described in the Component Detection subsection.
- Review the 2N® SIM Star Server date and modify it if necessary using the Date command.
- Upload the relevant licence to 2N® SIM Star Server, including all GSM gateway serial numbers and providing the IMEI change and external API interface administration if necessary.
- Set the SIM card switching rules as described in the Rules subsection.
2N® SIM Star SIM Board Installation
First, insert the SIM cards with the PIN request disable or identical PIN enable in the SIM Board. For the SIM card holder positions refer to the System Component Description subsection. Now insert the SIM Board in one of the eighteen SIM Board Box slots (positions). Each SIM Board must have a unique IP address. To view the IP address, use the console menu. After SIM Board connection, connect the standard full crossed serial cable to the serial interface. For the connection parameters see below.
Serial Console Access
The console system is arranged as a set of nested menus. By selecting a menu item you either get into a submenu, or have the required operation executed, or set the selected parameter.
Serial Link Settings
Default parameters of the SIM Board serial connection:
- Baud rate – 115,200bps
- Bits – 8
- Parity – None
- Stop-bits – 1
- Flow control – None
Serial Console
If the SIM Board is working properly, the main console menu gets displayed after the terminal is connected. To enter the main menu, push  .
.
 |
If you select a submenu, the submenu gets displayed. Now you can select items from the selected submenu or push for return.
The console menu is arranged as follows:
- Main menu – The main menu is displayed after the cable is connected to the serial interface of the board. The main menu includes the following items:
- Configuration menu – A menu for Ethernet interface, serial console and other parameter settings:
- Network – use this item to configure the SIM Board Ethernet interface. Set a static IP address or enable the DHCP support.
- Date and Time – set the date, time and NTP server address for the selected SIM Board.
- SIM Star – set the username and password for the SIM Board login, the AT port for the 2N® SIM Star Server communication and the basic port for the SIM card communication ports.
- Console – define the basic serial interface parameters.
- Reset settings – reset the SIM Board default values.
- Update password – set the SIM Board firmware update password.
- Privilege – Use this option to define the user rights (Write/Read only).
- Help – This item displays the Help.
2N® SIM Star SIM Board Box Installation
The SIM Board Box requires no special installation. All you have to do is connect the power supply and Ethernet network cable to the front panel. The remaining positions are designed for the SIM Boards.
2N® SIM Star SIM Client Installation
2N® PRIGateway (eCPU) Solution
A proper eCPU web interface configuration is necessary for connection to the eCPU web interface. For the steps refer to the 2N® StarGate / BlueStar / BlueTower User Manual.
After the basic configuration, enable the SIM Client process in the Management menu if licensed. Complete the Settings for the SIM Client configuration.
- Username and Password Enter the username and password to be used by 2N® SIM Star Server for the SIM Client communication. The default value is 2n in either case.
- AT port Set the AT port to be used for the 2N® SIM Star Server – SIM Client communication. The default value is 1500.
2N® StarGate / BlueTower (latest CPU 2013) and 2N® VoiceBlue Lite / Next / MAX Solution
Set the gateway IP address for connection to the gateway configuration interface. For the gateway configuration steps refer to the gateway User Manual. The GSM gateway SIM Client is part of the gateway firmware and is always active.
Note
- For more information on the GSM gateway configuration refer to the respective manuals available on the 2N web sites.
2N® SIM Star GSM/UMTS Board Installation
One or four SIM cards can be assigned to each module and used whenever the 2N® SIM Star Server connection gets lost. Disable the PIN request or enable an identical PIN for the SIM cards as configured in the gateway. Each module is equipped with an SMA connector for antenna connection. The antenna should be connected before the SIM card is inserted.
Warning
- Do not operate the module without connecting an antenna to avoid the module damage.
Tip
- You are recommended to use an antenna splitter while connecting multiple antennas under good signal conditions (refer to the 2N® StarGate / BlueStar / BlueTower User Manual).
2N® SIM Star Server Installation
PC Requirements
2N® SIM Star Server can be operated through a rack-mounted (or standard) PC with the minimum configuration requirements as shown in the Server Requirements table. The hardware requirements depend on the projected count of the SIM cards and GSM gateways. A 2GB RAM operational memory is.
A monitor and a keyboard have to be connected to the PC for primary installation. Before installing the system (inserting the CD), set the CD booting option in the PC BIOS (change the sequence of the devices from which the system boots data). After installation, re-enable hard disk booting as the primary booting method to accelerate the system booting process.
Tip
- You can enter the BIOS during the POST detection within a few seconds after the PC power on. To do so, use the
 or
or  key, or a combination of the
  +
+ +keys.
OS Linux Installation
Warning
- By using the 2N installation CD you remove all data from the PC hard disk!
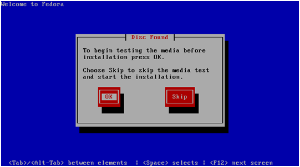
You are advised to download the latest CD image from the 2N web sites before installation, which, in addition to the 2N® SIM Star Server RPM package, includes a complete Linux installation program. Burn out the CD image onto a suitable disk. If you have set the CD booting method, insert the CD into the drive and power on/restart the PC to launch the process automatically. You will get the following screen:
 |
 |
 |
- Local host login – Password
- Admin – 2n
After login, the system setting wizard is launched as described below.
System Settings
Upon the primary login, you can set the time zone and 2N® SIM Star Server network interface using the wizard. Assign the static IP address including the network mask and the default gateway to the selected network interface, or enable the IP address obtaining from your network DHCP (default setting). If necessary, you can also use the wizard for setting the DNS parameters for your network. Having set all the required parameters, click on Save & Quit to quit the wizard.
Now the network interface setting and database initialising processes follow. Do not interrupt the database initialising process to avoid database error and potential re-installation.
2N® SIM Star Server Installation
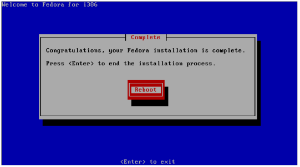
The installation process is launched automatically after the system setting and database initialisation processes are completed. The system will automatically install:
- 2N® SIM Star Server
- 2N® External Routing Machine
Note
- For more information on 2N® External Routing Machine refer to the 2N® StarGate / BlueStar / BlueTower User Manual available on the 2N web sites.
Now you can enter the 2N® SIM Star Server IP address into your web browser and display the web configuration login dialogue. For more information on the system configuration refer to the 2N® SIM Star Server Configuration section.
2N® SIM Star Server Firmware Upgrade
You are advised to upgrade your system periodically to make the most of the system capabilities. For the 2N® SIM Star Server firmware upgrade procedure see below.
Caution
- For the latest 2N® SIM Star Server firmware and User Manual versions refer to the 2N web sites.
- Use only the installation files certified by 2N to avoid lower functionality or even malfunction of the system!
Upgrade via Web Interface
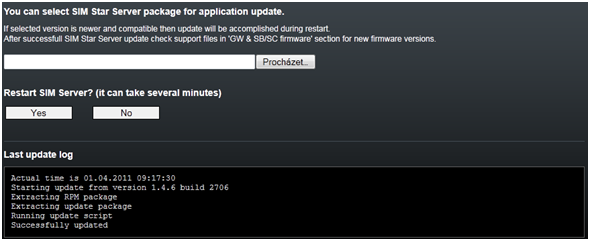
Follow the steps below to upgrade 2N® SIM Star Server via a web interface.
- Prepare a RPM package with a new 2N® SIM Star Server version (SimStar–Server–x.x.x–xxxx.i386.rpm).
- Login as a user with Admin rights.
- Click on the SIM Server Management icon.
- Click on Restart in the left menu.
- Select the prepared RPM package using the Browse button and click on Restart.
- Wait for the automatic upgrade for a few minutes and then relog in.
 |
Caution
- 2N® SIM Star Server will be deactivated during upgrade!
- Remember to upgrade the back-up 2N® SIM Star Server version if available!
- Use only the installation files certified by 2N to avoid lower functionality or even malfunction of the system!
- In case of installation SSS in Hot backup mode – two running SSS – you have to make update both of SSS!
Upgrade via SSH Interface
Caution
- Use the SSH interface upgrade only in case the web interface method is not applicable!
Upload the new firmware package to 2N® SIM Star Server using the WinSCP or a similar SFTP-based program. The transfer takes place through the SSH protocol. Run the program on your PC and log in to 2N® SIM Star Server through its IP address and port 22 using the following login data:
- Username – Admin
- Password – 2n
Copy the firmware package into the /home/admin directory. Now move to 2N® SIM Star Server or get connected to it using the PuTTY or some other SSH client software. Enter the ls command to write out the current directory files, including your new firmware package. If the firmware package is not available, check whether you are in the correct directory and, if not, move to the correct one using the following command:
cd /home/admin
Enter the following command to open the package:
rpm –Uvh file_name
Now confirm the installation. Enter  and click on. After the first firmware installation part, you will be asked whether you want to re-initialise the database. Think twice before doing so, because re-initialisation deletes the database completely. On the other hand, some system parts may be inoperative without database re-initialisation. After the whole installation process is completed, you will be asked whether or not to launch 2N® SIM Star Server. Enter and click on. A new firmware version has been installed successfully and you can get connected to 2N® SIM Star Server from your web browser again.
Caution
- The database structure may be modified or configuration deleted during the 2N® SIM Star Server firmware upgrade and so re-create the database including all settings.
- The firmware upgrade results in a restart of all current SIM card – GSM module connections and may lead to a temporary system malfunction!
- The upgrade system is only allowed, downgrade will not be executed!
Upgrade of Other 2N® SIM Star Components
It may be necessary to upgrade other components of the 2N® SIM Star system too during the 2N® SIM Star Server upgrade process. This process does not run automatically for security reasons – must be initiated by the user.
2N® SIM Star Server automatically prepares the recommended firmware versions for other system components designed for the current 2N® SIM Star Server version. Download the files in the SIM Server Management / GW & SB/SC firmware / Support files folder. The folder also contains current versions of the User Manual and other useful utilities.
 |
Copy the system components into the preceding Firmware tag to execute the automatic upgrade. Refer to 2N® SIM Star Server Management Subs. 3.3 – GW & SB Firmware for details.
Caution
- The count of available system voice channels will be limited during the upgrade process!