5.3 Use
Upon the application launch, you get to the Configuration main menu and then the Parameters / Basic menu, where you can find almost all the 2N Lift1 settings. You are in the offline configuration, which you can modify, prepare for download to a 2N Lift1 audio unit or save into a file for later download. The offline mode helps you view the settings. The user has only access to the Configuration menu. The other menus are meaningful only if the audio unit is connected. The meaning and description of the parameters and controls are the same as in the online mode (i.e. with the CU connected); see below for details. Follow the CU login instructions in Subs. 5.1. Now let us explain what the menus are used for.
Configuration
Parameters
Having logged in to the CU as described in the preceding subsection, you get into the Configuration main menu. The Parameters / Basic menu includes the table of all
the 2N Lift1 parameters including their codes. Refer to Subs. 3.2. for the list of parameters and their meanings. All the parameters are arranged in associated groups for convenience. Moreover, each table row is equipped with a hint, which describes the parameter purpose and setting options. The table includes the following items: Code matches the parameter number in the voice menu, Name displays the parameter name, Value shows the currently set parameter value and Unit specifies the parameter unit (if no unit is specified in this column, the value is just a number). Maximum and Minimum define the permitted range of the values to be set. Default value displays the factory value of the parameter, which also appears after the factory reset. Click this value to add it to the Value column.
 |
Configuration / Parameters Menu
The menu also includes the Expand groups / Collapse groups buttons for you to expand the sections and display all the required parameters quickly. Click the Favorites next to the Collapse groups button to display your favourite items in the table. Click on the empty star symbol behind a parameter in the Favorites column to select a new favourite item. Similarly, c lick on a filled-in star symbol to unselect a favourite item. Group expanding/collapsing and filtration are also useful for viewing favourite items. A yellow-to-orange colour change of the Favorites button means that the favourite items are only active. Click New set to overwrite the current settings with default values. Click Save to file to back up data into your PC disk. Push Open from file to read the back-up data. The Read from device button helps you read the current set of parameters from the CU. Finally, click Save to device to save the changes into the CU memory. Filtration is a convenient searching tool. Set the filter for each column separately and combine the filters to find the required data as quickly as possible. Click the funnel symbol in the selected column to activate the filter. Activation is indicated by a colour change of the funnel symbol; see the figure below.

Left – Inactive Filter, Right – Active Filter
Each column with the funnel symbol includes own filter settings; see the figure below. The Contains function finds the searched string in all the column items and returns all the occurrences. Enter a text into the string field and click Filter to activate the filter and display all the searched items in the column. Use another filter in another column to make your search more precise and efficient. Having completed filtering, click Delete filter in the used columns or using the Alt+R keyboard shortcut to delete all the active filters. If you do not delete the setting, the filtration settings keep active even upon the 2N Lift1 logout and you would obtain filtration results again instead of complete information in your next search.
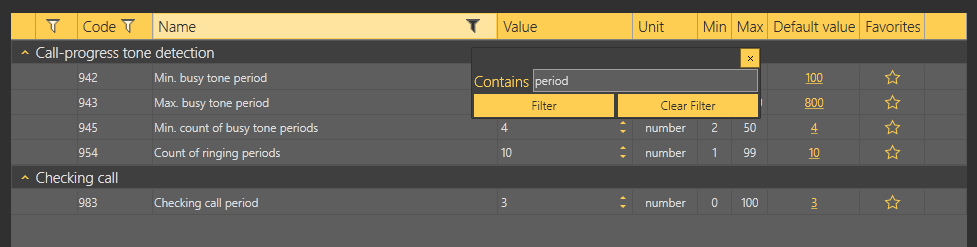
Filtration Setting Result
Tip
- Use the context menu opened by clicking anywhere in the table or the Alt+R keyboard shortcut to delete the set filters.
- Each table row is equipped with a hint including parameter description for convenience.
User Messages
User messages helps you replace the default system messages with messages of your own. Load the messages from a file or via the 2N Lift1 Service Tool in the correct format. Use a microphone connected to your PC for recording.
Messages
The Messages menu displays the User message playlist including messages to be loaded into the device if necessary. When you enter the menu, the list is empty. Choose one of the following three adding options: click New to add a message to the list. The message is empty and you can replace it with a file of your own. Or, use the Read from device option to load the current voice message from the 2N Lift1 audio unit connected. Or, click Load from directory to import a message saved on your disk. Select the folder with the message and confirm your selection. The selected voice message will be loaded to the application.
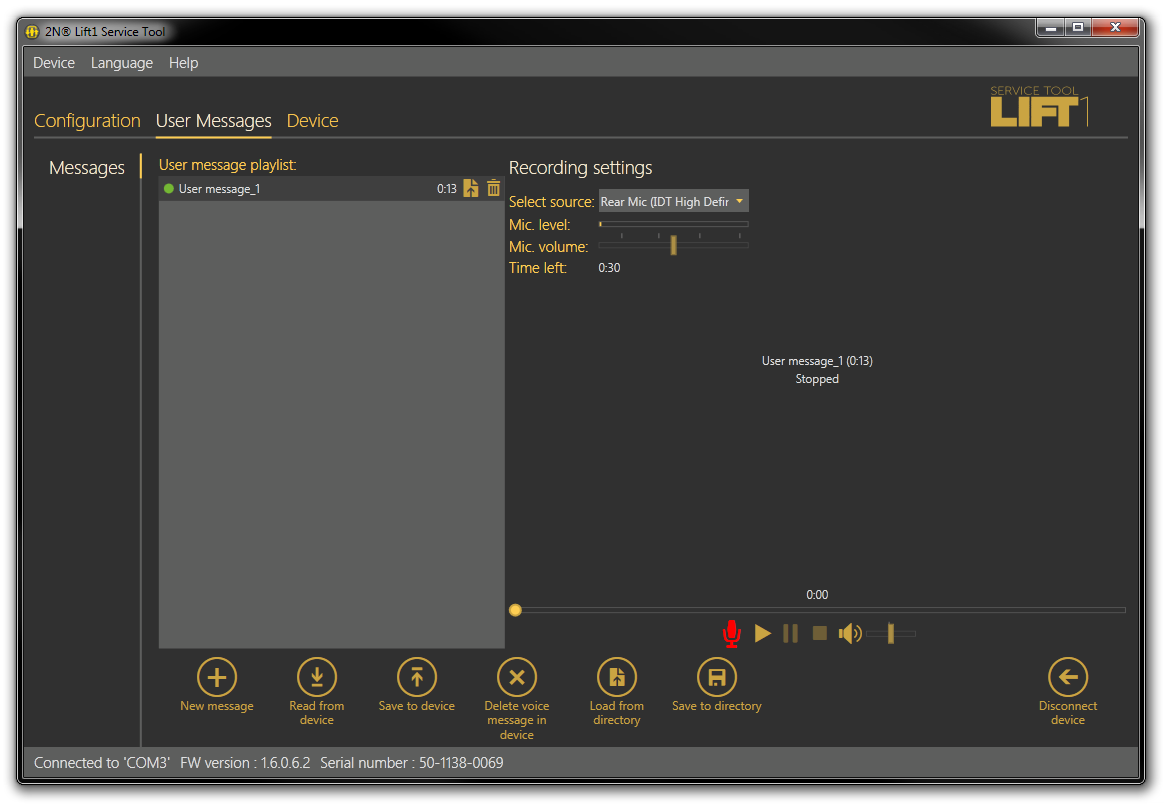
User Messages – Messages Menu
The User message playlist displays the message time and two buttons: Load message from file and Delete. If the message is not recorded, the total time is 0:00. Once you record a message, the total time will be displayed. Click this import button to open the disk file viewer for you to replace the message with another, correctly formatted file. If you just select a message, the message recorder will become available to the right for you to record a message. Standard recording functions are available: Play a message and select a Source. When the microphone icon goes red, start recording a new message while automatically deleting the preceding one.
Note
- The maximum message time is 30 s.
- The correct message format is .WAV (8-bit unsigned PCM). No other files can be imported.
- Do not record a message until you select the input source in the Recording settings.
The menu is faded while a new message is being recorded. The recorder displays the message name, total time and current state to signal active recording, play or stop. Click the Stop icon to stop recording. Click Play to check the currently recorded or imported voice message. Adjust the input source volume to slightly increase the volume of the message to be recorded, or use another source if the volume is still insufficient. Having completed editing, click Write to device to load the message into the 2N Lift1 audio unit connected. Click Save to directory to save the current file onto your PC disk. To delete a message, select the message and click on the Trash icon.
Caution
- The application output volume setting does not affect the master volume of the voice message recorded. If the record volume is too low, repeat recording with a higher volume level.
Tip
- Use high-quality microphones and noise controlled rooms with good acoustic properties for recording only to avoid poor recording quality and interference.
Recording Settings
The Recording settings in the left-hand upper corner of the screen helps you select the input source and control the microphone volume. Select an item in the source list: integrated/external microphone or line input. Set the Mic. level and Mic. volume for the input source. The total time for a message to be imported to 2N Lift1 is 30 seconds. Refer to the Time left parameter for the remaining message editing time.
Note
- If the microphone input is overexcited during recording, turn the Mic. volume down. If the message is too quiet, turn the volume up.
- In case the volume setting is not sufficient, use the system drivers or an external amplifier.
Device
The Device menu provides information on the 2N Lift1 audio unit connected: basic parameters and, last but not least, firmware, bootloader and voice menu upgrading options.
Info
The Info menu provides basic information on the state of the device connected: audio unit firmware version, serial number and voice menu language and version, for example. The Time in device parameter displays the current time read from
the 2N Lift1 audio unit. This parameter is not read online and has to be updated using the Read from device button. Set time in device helps you record a time setting of your own. Click on the calendar to set the date/time in hours manually. You can overwrite the setting and set a different time value for a different time zone. Click Confirm to confirm the new setting. Click Save current time from PC to device to synchronise the audio unit time with your PC time value and load the new setting into the audio unit automatically.
 |
Device / Info Menu
Note
- As the 2N Lift1 time is not backed up, the time setting will be lost in the case of power outage.
Upgrade
The Upgrade menu helps you upgrade the firmware, bootloader and voice menu. Select the file to be loaded in the File name section for the program to automatically read the type from the file header and display it as the file type: Firmware, Bootloader or Voice menu. Click Select to select a file and press Upgrade to make 2N Lift1 Service Tool upload the new Firmware, Bootloader or Voice menu version into the audio unit.
 |
Device / Upgrade Menu
Activate the Use factory configuration checkbox to delete all user-changed values and use factory configuration. Select this option and click Upgrade to reset the factory values upon upgrade. This action is always accompanied by loading of a new FW, Bootloader or voice menu version to the audio unit. To set the default values only, use the Configuration menu.
Caution
- After the firmware, bootloader or voice menu upgrade, the audio unit will be restarted automatically and the application will be disconnected. Reconnection will not be possible until the audio unit has executed upgrade and restart.