3.1 Configuration
Configuration takes place typically via a web interface. Alternatively, configuration is possible using the 2N® Access Commander software or the My2N service.
Configure 2N® IP Style using your PC equipped with any Internet browser:
- Launch your Internet browser (Chrome, Firefox, Internet Explorer, etc.).
- Enter the IP address of your intercom (http://192.168.1.100/, e.g.).
- Log in using the username Admin and password 2n.
You have to know the IP address of your device to log in to the integrated web server. Upon purchase, 2N® IP Style is set to the dynamic IP address mode – it retrieves the IP address automatically if there is a properly configured DHCP server in the LAN. If no DHCP is available, 2N® IP Style can be operated in the static IP address mode. Refer to the Configuration Manual for 2N IP Intercoms for the 2N® IP Style configuration details.
If your device remains inaccessible (you have forgotten the IP address or the LAN configuration has changed, for example), change the LAN settings using the hidden menu on the device.
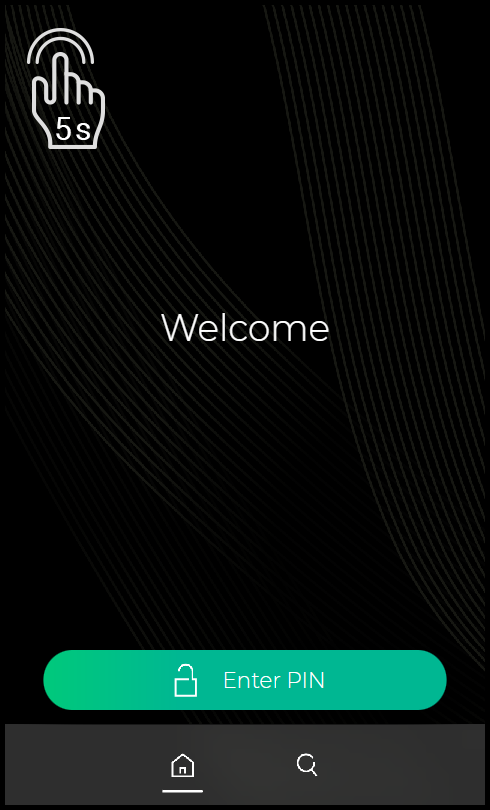
Hidden Menu Launch
Wait until the end of the introductory animation on the display after starting/restarting the device. The moment the home screen appears (after approx. 20 s), place your finger in the left-hand upper corner of the display for approx. 5 s.
 |
IP Address Retrieval
The IP address of the device will be shown in the hidden menu. The menu contains the network mask, default gateway address and DHCP switch among others.
Tip
- To retrieve the device IP address you can also use 2N® Network Scanner, which can be freely downloaded from www.2n.com.
If the address is 0.0.0.0, then the device did not get the IP address from the DHCP server and the static IP address (DHCP OFF) has to be used. If DHCP OFF is set, the device static address is 192.168.1.100.
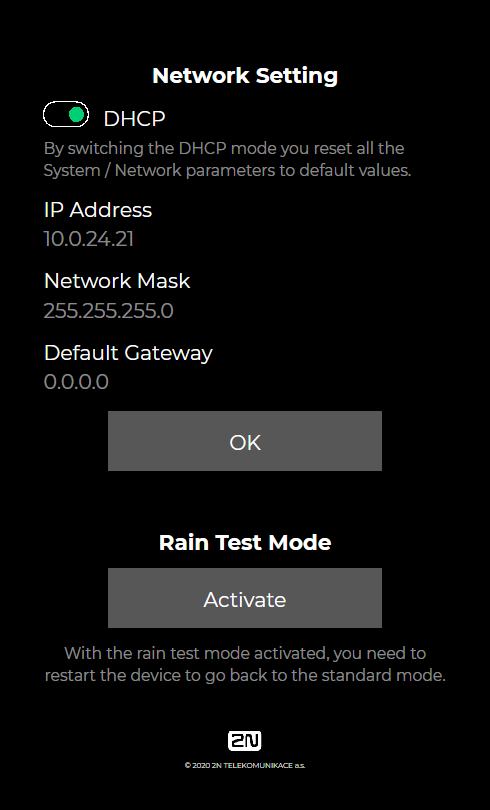 |
Rain Test Mode
The rain test mode shows where the presence of water has been detected on the display. Once the mode is activated, a black screen is displayed showing the water contact spots. Tap quickly three times on any display spot to delete the impact records.
2N® IP Style does not support the intercom functions (e.g. calls cannot be made, cards cannot be read on the device) during the test. Restart the device to quit the rain test mode and return to the standard mode.
Device Restart
To restart the device, disconnect the device from the power supply or use the web interface in the System / Maintenance section. No configuration change appears after the restart.
Caution
- Do not touch the display during restart, it is being calibrated.
Factory Default Reset
Located among the main unit connectors, the CONTROL button helps you reset the factory default values.
Follow the instructions below to reset the factory default values:
- Disconnect the device from the power supply.
- Press and hold the CONTROL button.
- Connect the device to the power supply.
- Keep holding the button for a few seconds and then release it.
Caution
- If 2N® IP Style is supplied from an external power source using terminals, the factory reset is performed only if the device is disconnected from the LAN too.
Firmware Upgrade
Use the device web interface in the System / Maintenance / System configuration section for firmware upgrade. Refer to 2n.com for the latest firmware version. The 2N® IP Style firmware also includes the up-to-date touch display controller. The display touch layer showing the ongoing upgrade notification does not respond during the upgrade. The device restarts automatically after the upgrade is completed successfully. The whole process takes almost one minute.
Warning
- Firmware downgrade in Artpec equipped devices results in factory reset and loss of the whole configuration including the license keys. Therefore, we recommend that you back up the configuration and save the valid license key before such downgrade.