2. 2N® IP Automation Configuration
2N IP intercoms provide flexible setting options depending on the user's requirements. If the standard setting options (switch/call settings, e.g.) are insufficient for the intended use, apply a special programmable interface – Automation. Typically, Automation is helpful for applications that require rather complex interconnection with the third parties' systems.
Note
- Automation works only with a valid Enhanced Integration or Gold licence key.
Some 2N IP intercom models are equipped with a number of digital inputs and outputs, most of which can be configured like standard 2N IP intercom switches (refer to the Switches subsection). You can make use of all of these Automation inputs and outputs in variable combinations.
Automation helps you combine the Events arising in the system (such as key pressing, RFID card use, digital input status change, etc.) with specific Actions (such as digital output activation, user sound playing, call, etc.) as necessary. Moreover, the execution of actions can be bound by selected Conditions (time profile state, logic input state, e.g.).
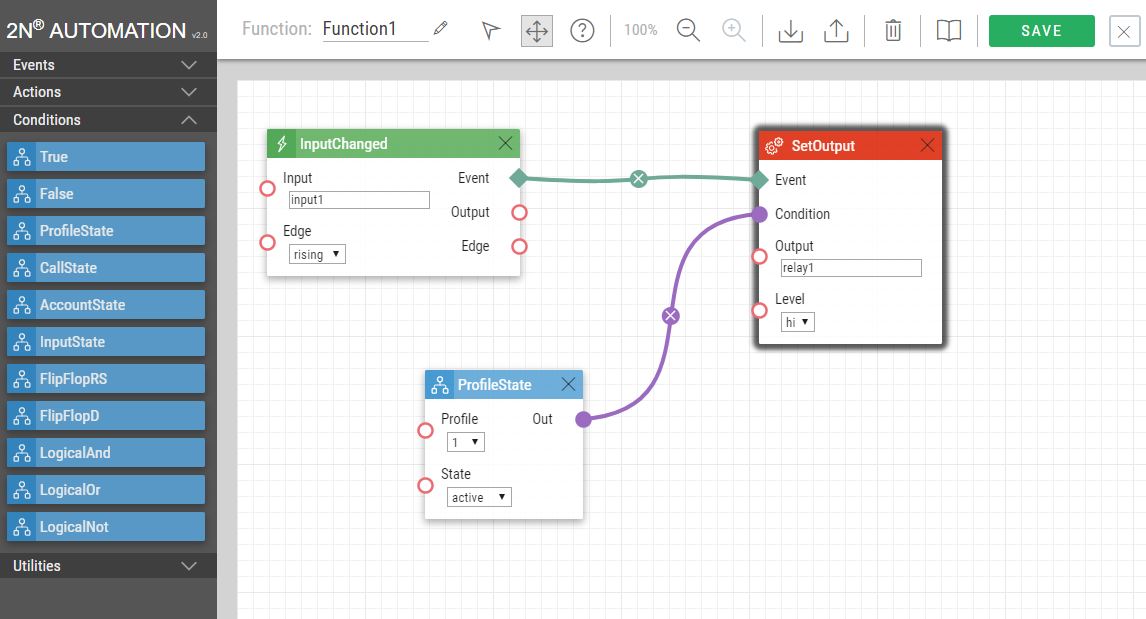 |
The example shown in the figure above can be interpreted as follows: The SetOutput action (digital output setting) is executed if the InputChanged event (logic input1 change from log 0 to log 1) arises and the Profile (active profile 1) condition is met.
Automation Control
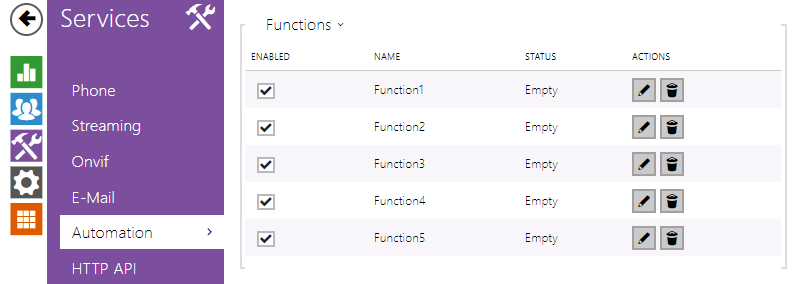
- Bookmark Function – 2N IP intercom allows up to 30 blocks at 5 independent pages to be created and interconnected (regardless of the block type – events, actions and conditions). Multiple actions can be assigned to an event or condition. Thus, you can create 15 actions and assign them to 15 events or create 29 actions and assign them to 1 event, for example.
- Enabled – function enable
- Name – function name
- State – function state: Started/Stopped/Empty/Error
- Action – click
 to set the function and
  to delete the function.
Automation Controls
Refer to the figure below for an empty Automation function.
Function block column – includes four groups of function blocks: Events, Actions, Conditions, Utilities. Drag and drop the items to the desktop.
Toolbar – includes function controls
Pictogram Description 
function name 
function editing mode 
function block moving mode 
help mode for function blocks. Click a block to display the block help. 
magnification 
zoom out/in 
import/export 
block deletion 
Automation manual reference 
save 
quit function editing The desktop helps you place and interconnect the function blocks.
Block Parameter Settings
Select the required Event (Event.xxx), Action (Action.xxx) or Condition (Condition.xxx) in the Object type column. Set one or more parameters for the blocks in the respective row of the Parameters column – refer to the block describing subsections below for the supported parameters. Enter the block parameter value into the appropriate field below the parameter name.
The changes will not be executed until you press the Save button in the right-hand upper corner of the page.
Click Save to save the changes. If the function setting is correct, the information is displayed in a green field. If incorrect (invalid name/value or missing mandatory parameter), error information is displayed in a red field. Wrong values are marked with  and the parameter name is red. Automation works only if all the available blocks are configured properly. If not, Automation is in the Error state.
Most of the blocks include parameters (Event, Condition, StartEvent, e.g.) that refer to other blocks. To interconnect the blocks, click on the output of one block and drag and drop it to the input of another.
Tip
- The Upper-Lower case need not be respected in the parameter names.
- Some block parameters are optional. If you do not enter an optional parameter in the block definition, the default value will be applied.
Use of Output parametres
The event block output parameters help transfer additional information between blocks – send the detected card ID via HTTP to another device, use the parameters received via HTTP for setting parameters of a tied action and so on. Use Formatter for this purpose. The output parametres values are updated whenever an event is generated. A value can be used for other blocks too thanks to interconnection.
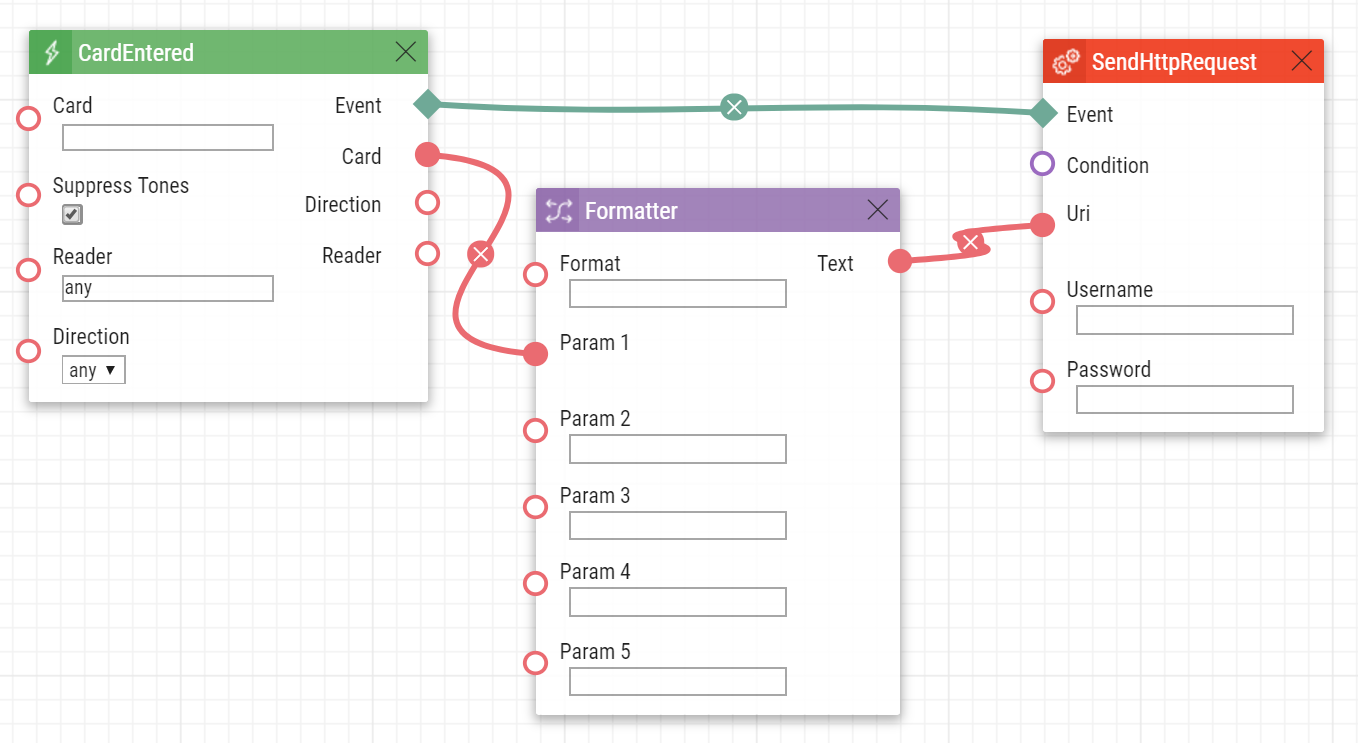 |
To move an output parametr from Events to Formatter, connect the output parameter with Param1. This output parameter is only available via addressing in the Format field {outputparameter_number} .
- Example of Formatter use for ID card transfer:
- Format: http://1.1.1.1./card={1}
- Param1: connected to CardEntered card block output
- Text: connected to SendHttpRequest Uri block input
Every event defines the TimeStamp and Count output parameters.
TimeStamp contains encoded date and time of the last event generation in the Unix Time format (second count from 00:00:00 1.1.1970).
Count contains the count of event generations after the device start or last block configuration change. The output parameter increases by 1 after each event generation.
Refer to the following subsections for more output parameters with specific functions.
Tip
- The Upper/Lower case is not be respected in the output parameters names.
Caution
- You cannot use the output parameters in the block relation defining parameters, i.e. Event, Condition, etc.
Caution
Warning
In order to ensure the full functionality and guaranteed performance, we strongly recommend that the topicality of the product / device version in use be verified as early as in the installation process. The customer hereby acknowledges that the product / device can achieve the guaranteed performance and full functionality pursuant to the manufacturer’s instructions only if the latest product / device version is used after having been tested for full interoperability and not having been determined by the manufacturer as incompatible with certain versions of other products, and only in conformity with the manufacturer’s instructions, guidelines or recommendations and in conjunction with suitable products and devices of other suppliers. The latest versions are available at https://www.2n.com/cs_CZ/ or can be updated via the configuration interface if the devices are adequately technically equipped. Should the customer use a product / device version other than the latest one or a version determined by the manufacturer as incompatible with certain versions of other products, or should the customer use the product / device in contradiction to the manufacturer’s instructions, guidelines or recommendations or in conjunction with unsuitable products / devices of other suppliers, the customer is aware of and agrees with all functionality limitations of such a product / device if any as well as with all consequences incurred as a result thereof. Using a product / device version other than the latest one or a version determined by the manufacturer as incompatible with certain versions of other products, or using the product / device in contradiction to the manufacturer’s instructions, guidelines or recommendations or in conjunction with unsuitable products / devices of other suppliers, the customer agrees that the 2N TELEKOMUNIKACE a.s. company shall not be held liable for any functionality limitation of such a product or any damage, loss or injury related to this potential functionality limitation.