3CX Phone System
Content
About
3CX is an open-platform, VoIP phone system that works with popular IP Phones and SIP trunks whether on-premise or in the cloud. Simple, affordable and flexible, 3CX eliminates the cost and management headaches of outdated, traditional phone systems or the limitations of shared cloud PBXs.
A software-based IP PBX / PABX offers many benefits:
- Easier to install & manage via web-based configuration interface
- Far less expensive to purchase and expand than a hardware-based PBX / PABX
- Improves productivity with presence, desktop based call control and extension management
- No need for separate phone wiring – phones use computer network, easy hot desking!
- Deliver mobility by allowing employees to work from home using a remote extension
- Choose between popular IP hardware phones or softphones – no vendor lock in
- Receive & make calls via the standard PSTN using VoIP Gateways or cards
- Save on monthly call costs using SIP trunks, VoIP providers or Skype Connect
Version 18
Tested with
| 3CX Phone System | 2N IP Intercom | Registrations | Calls | Secure RTP (SRTP) |
|---|---|---|---|---|
| 18 | 2.32 |
License
- Enhanced Security
Settings
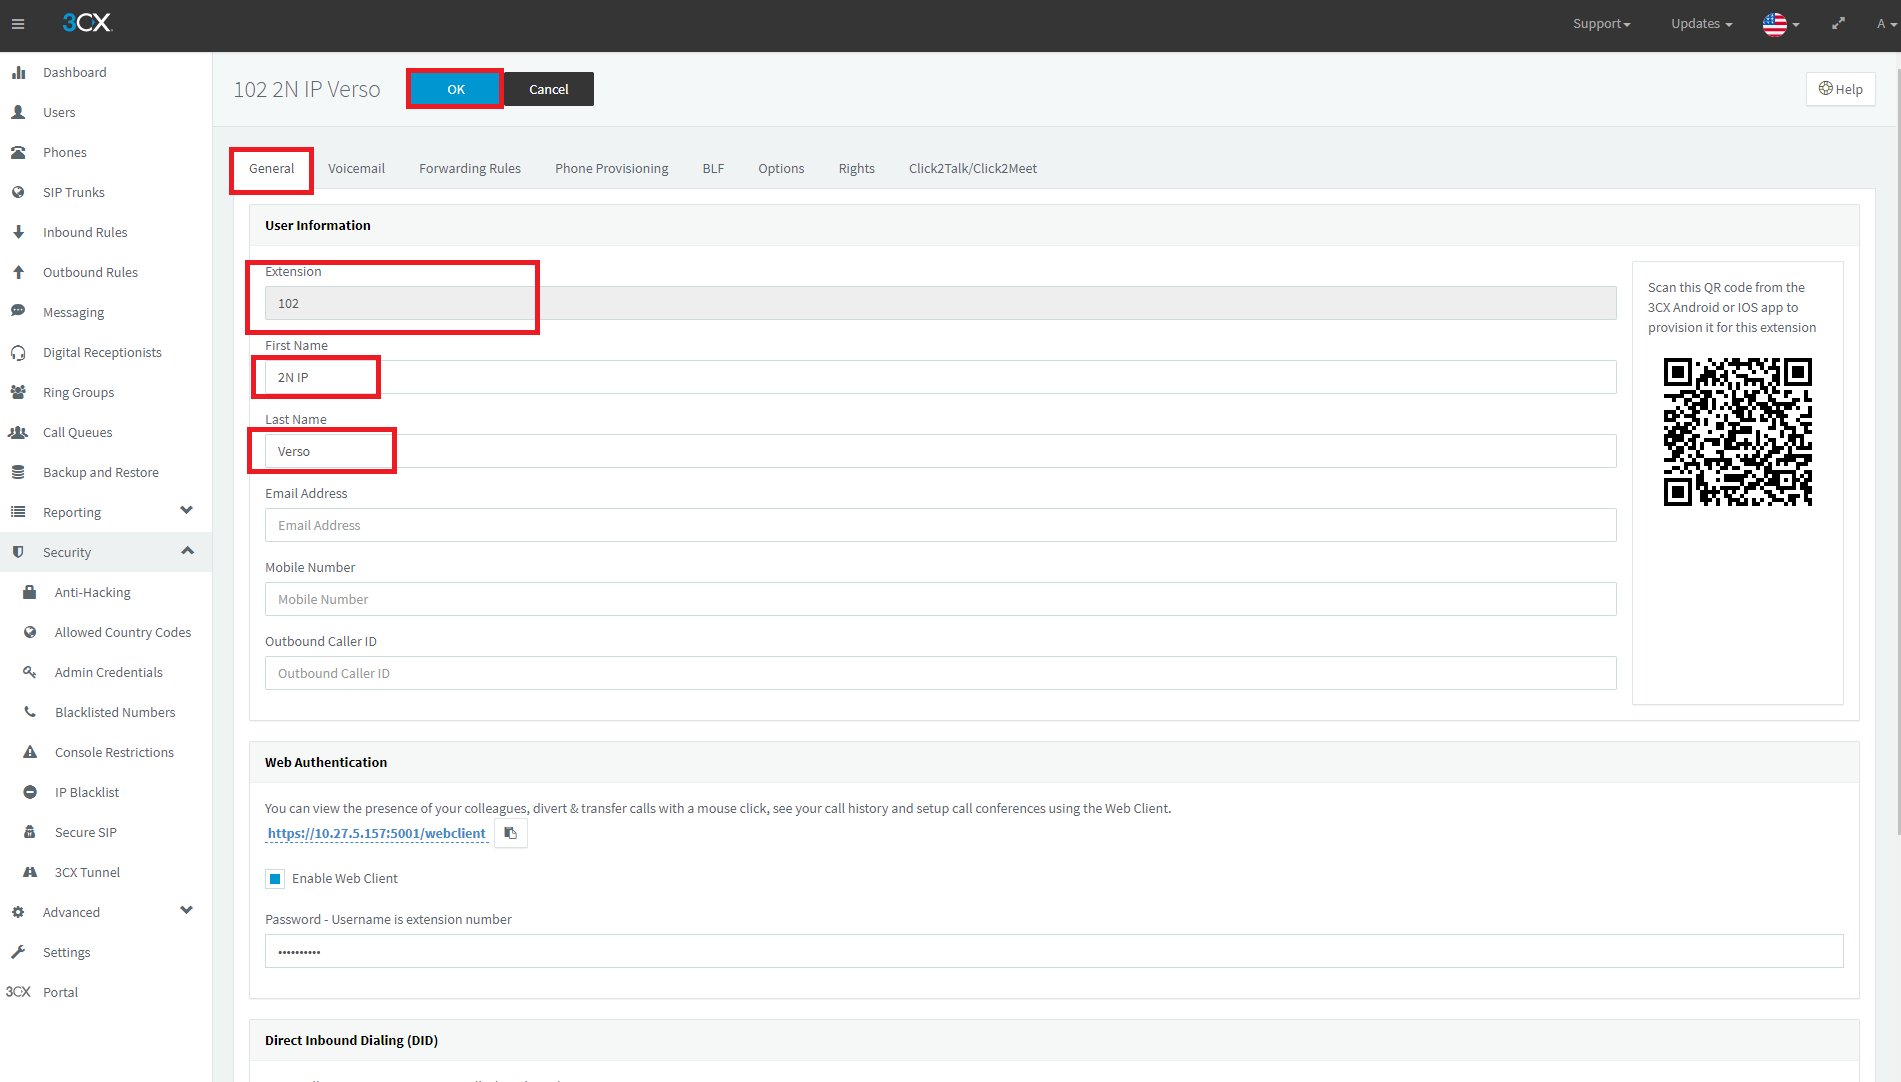
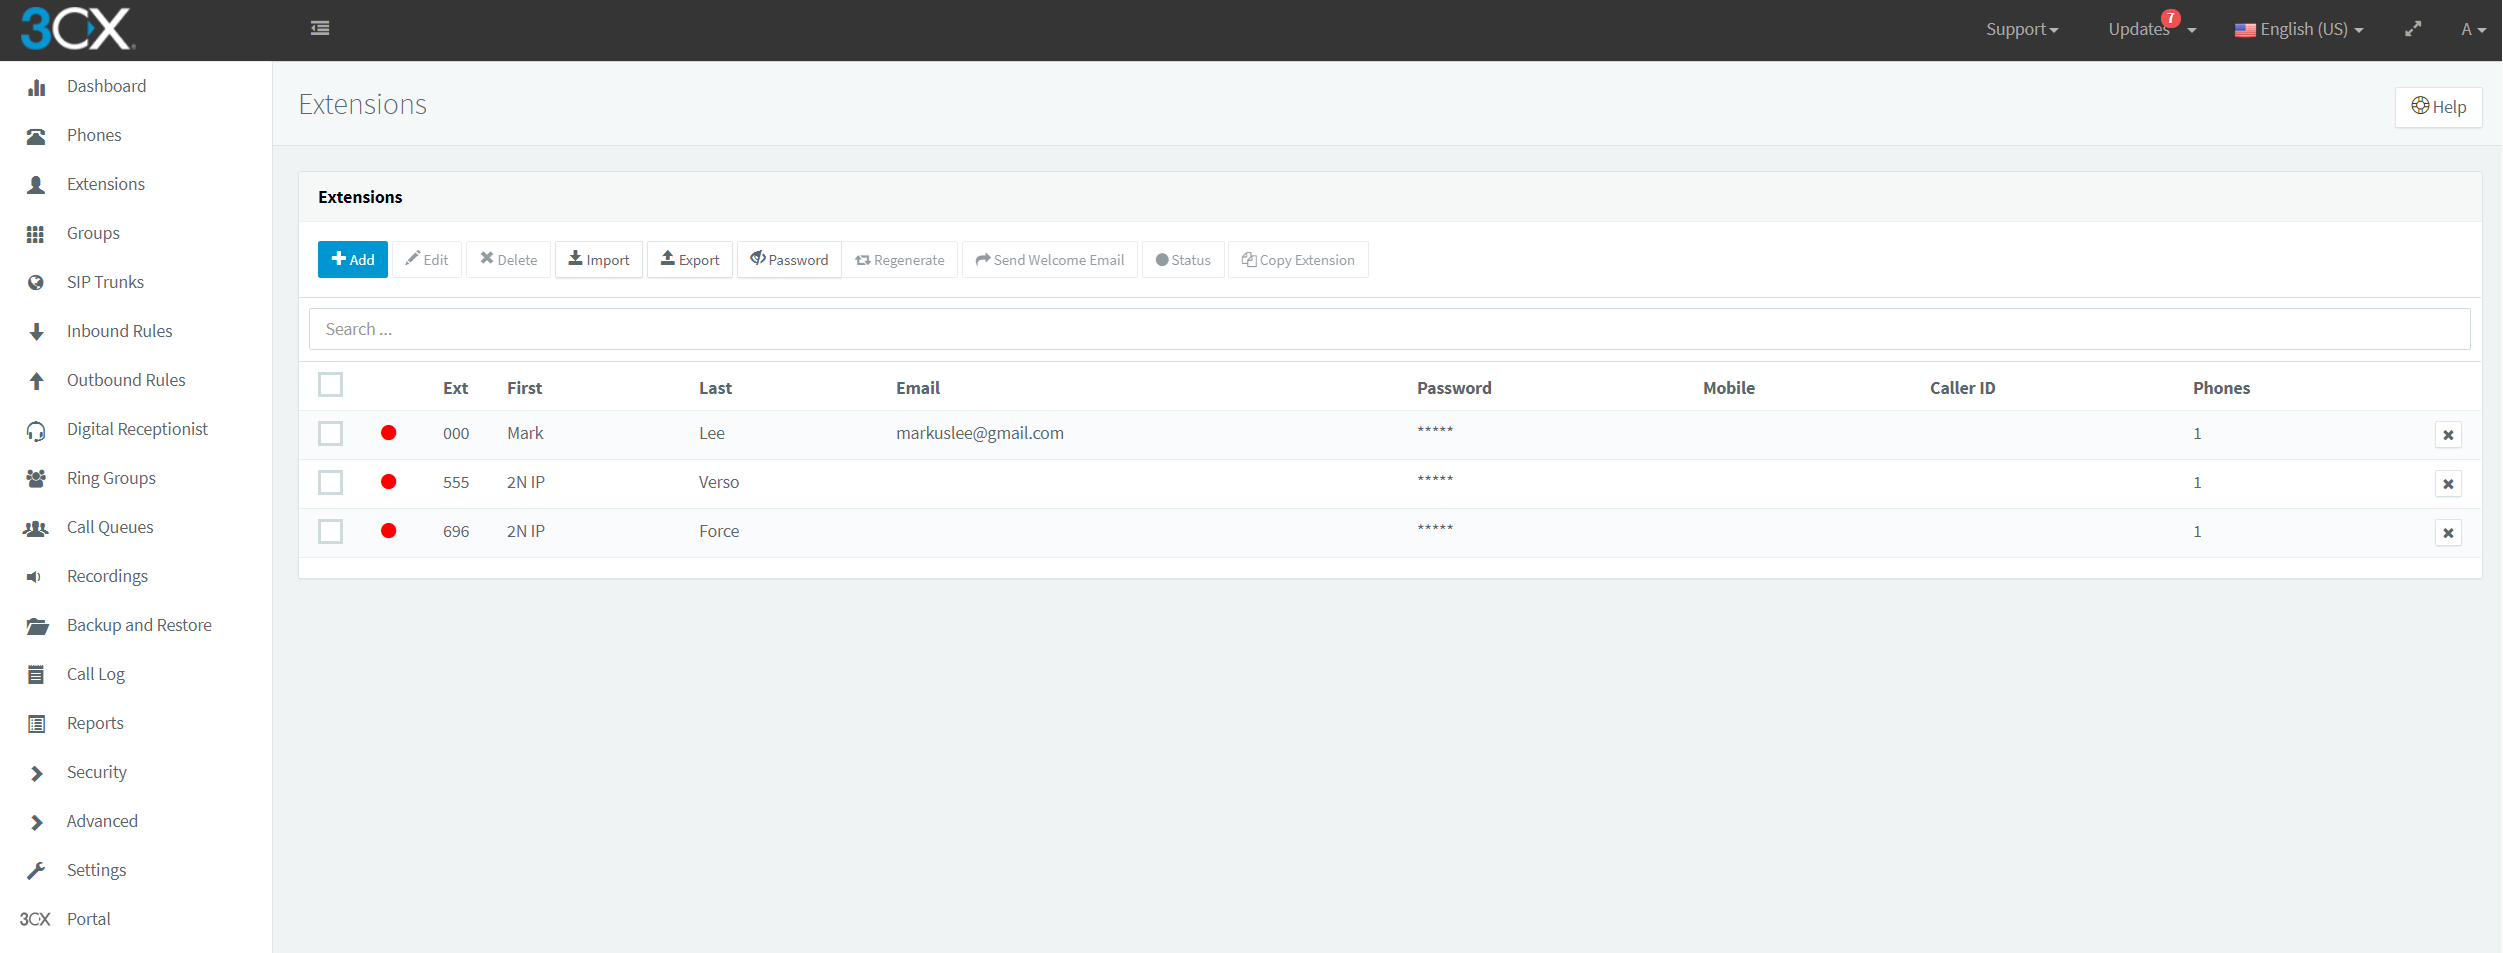
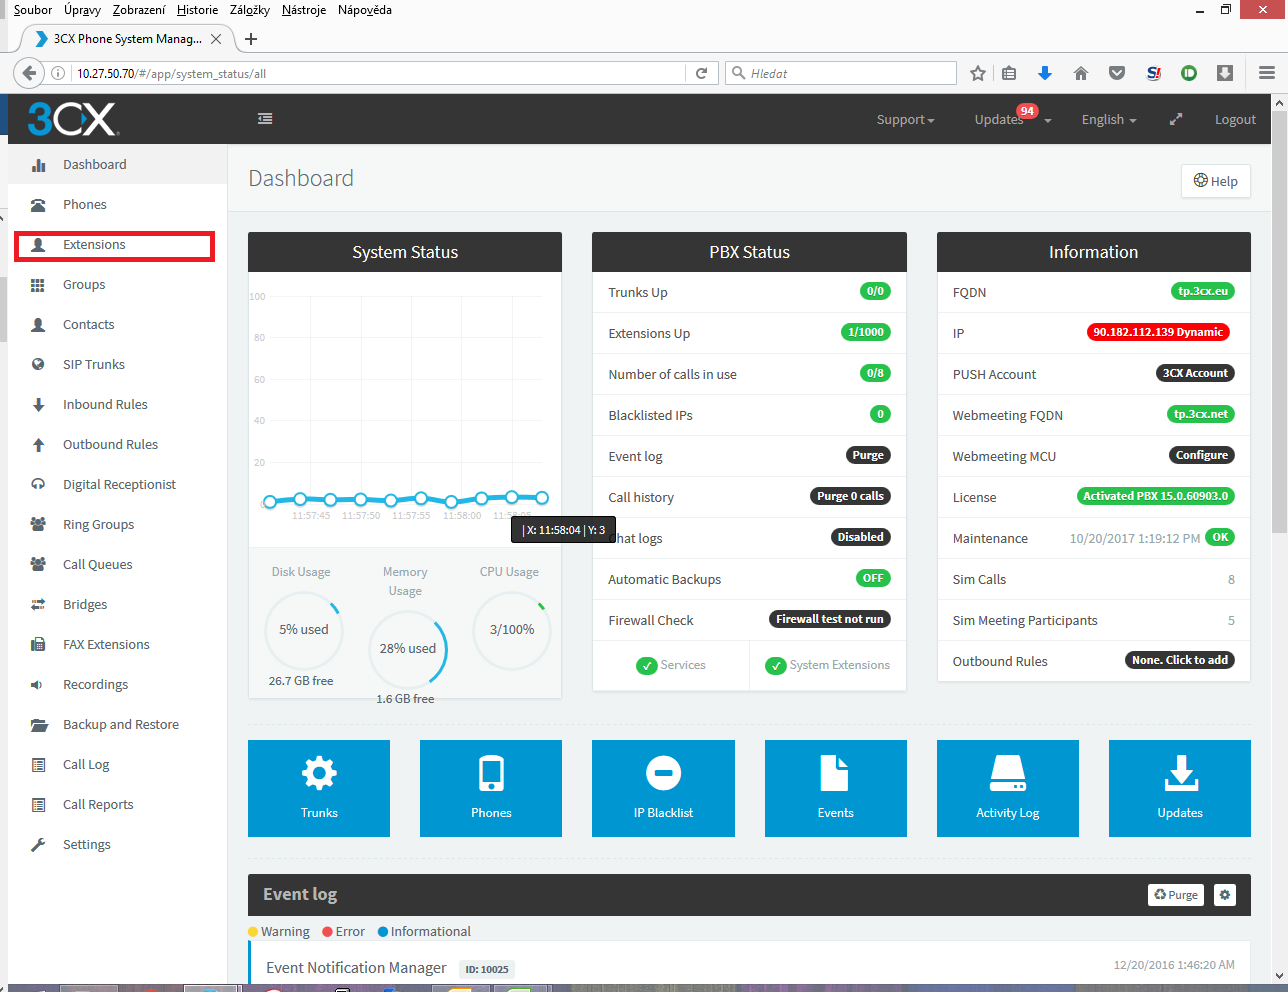
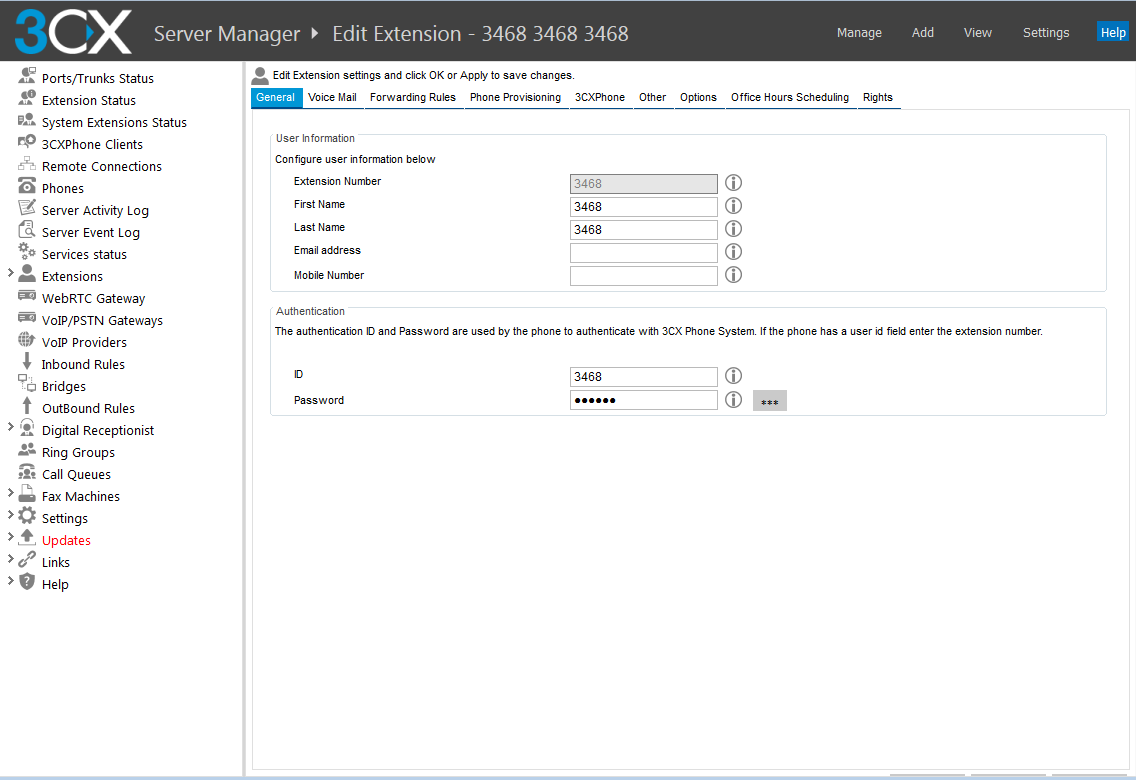
To create new Extension for 2N IP Intercom Devices, 3CX Web Configuration go to Users. In Users menu click on "+Add" to create new user.
 |
 |
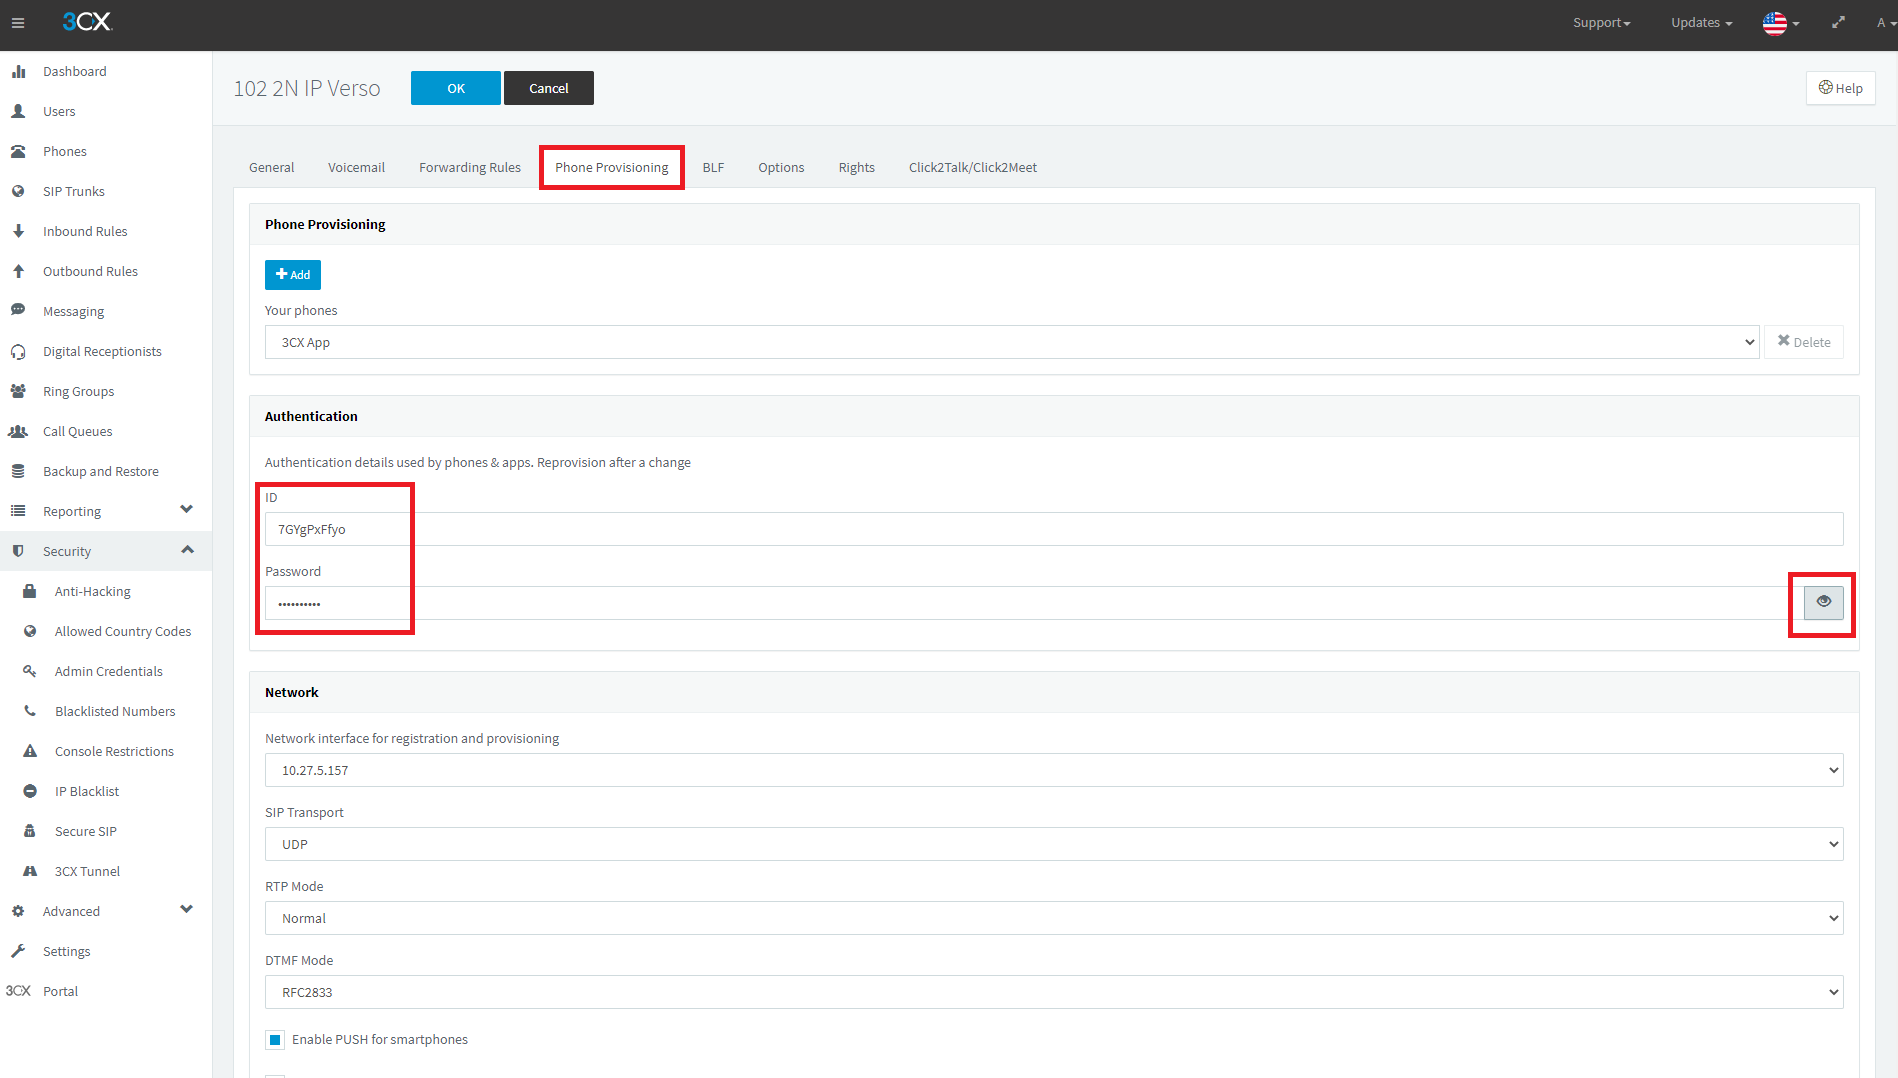 |
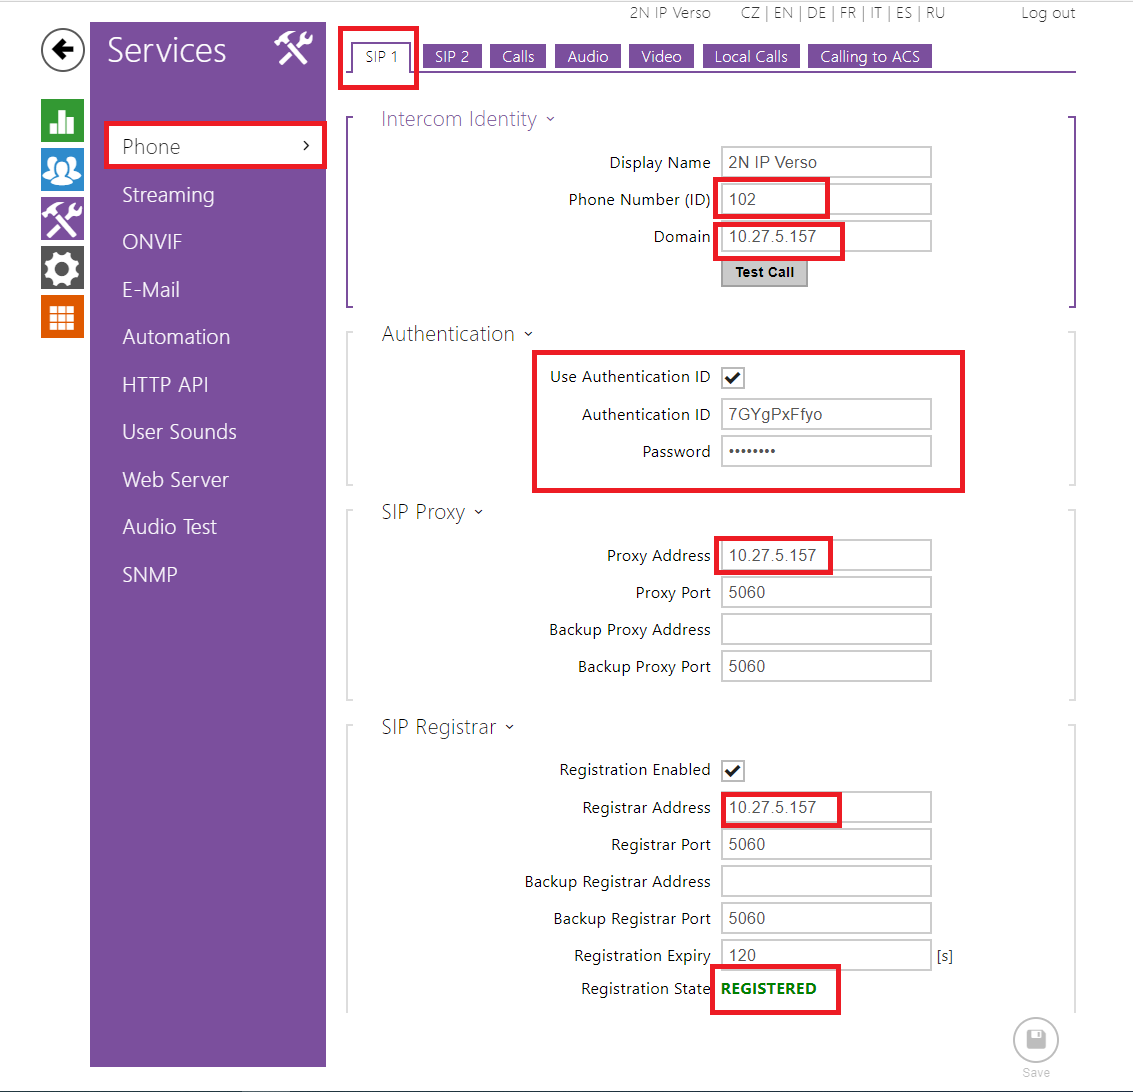
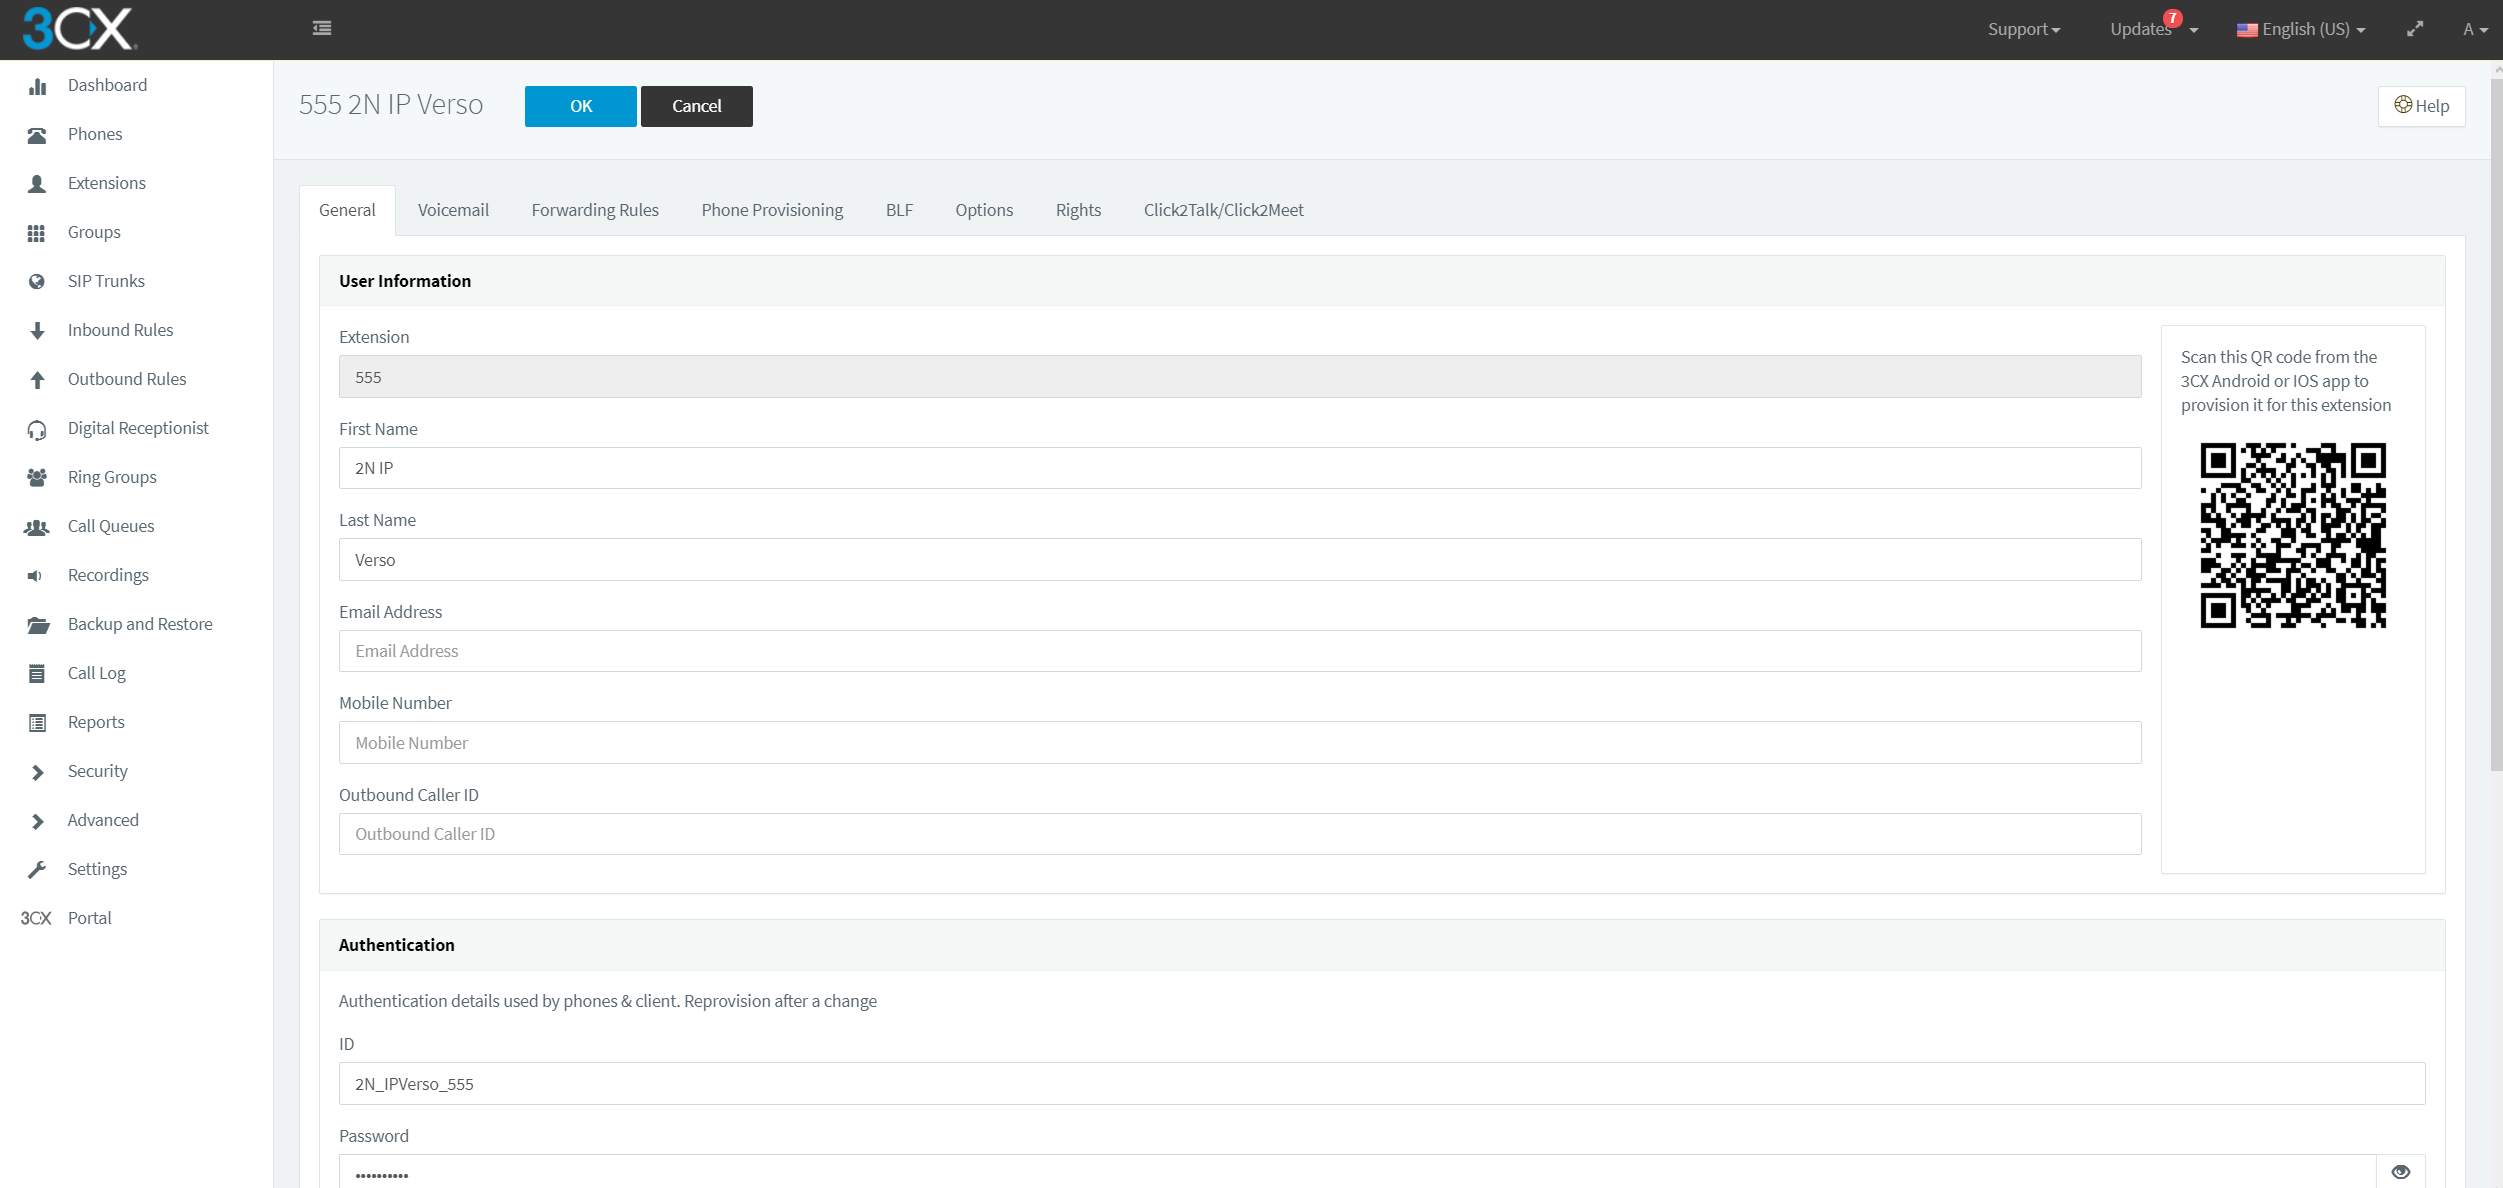
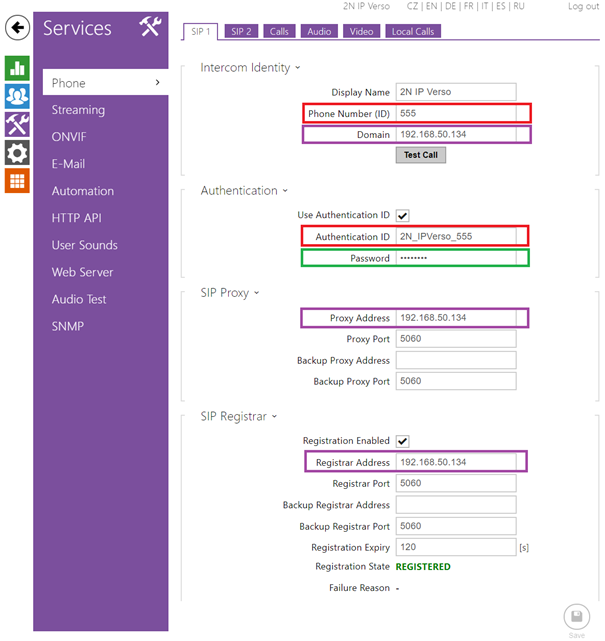
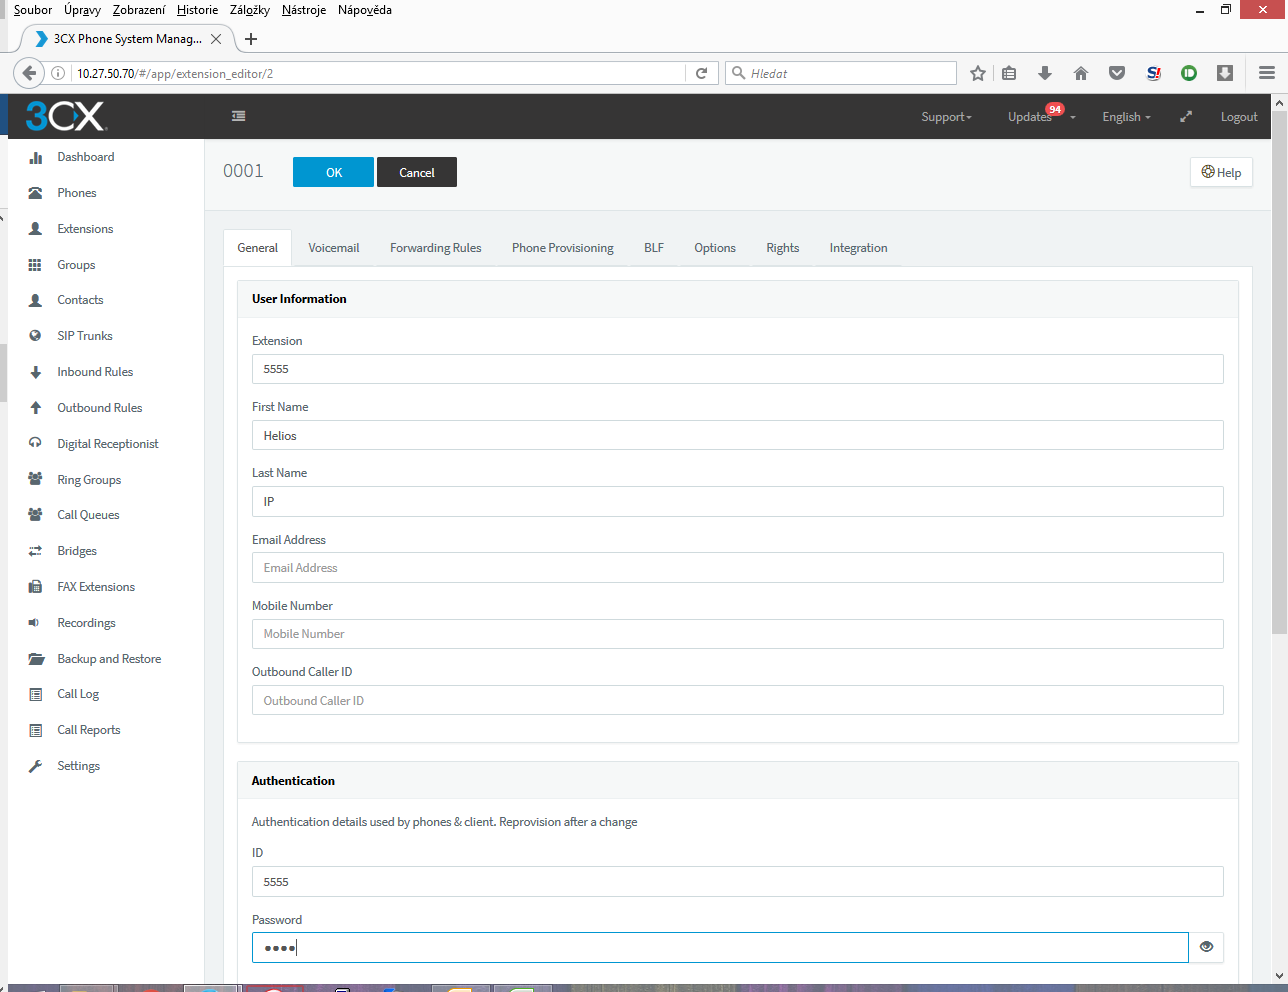
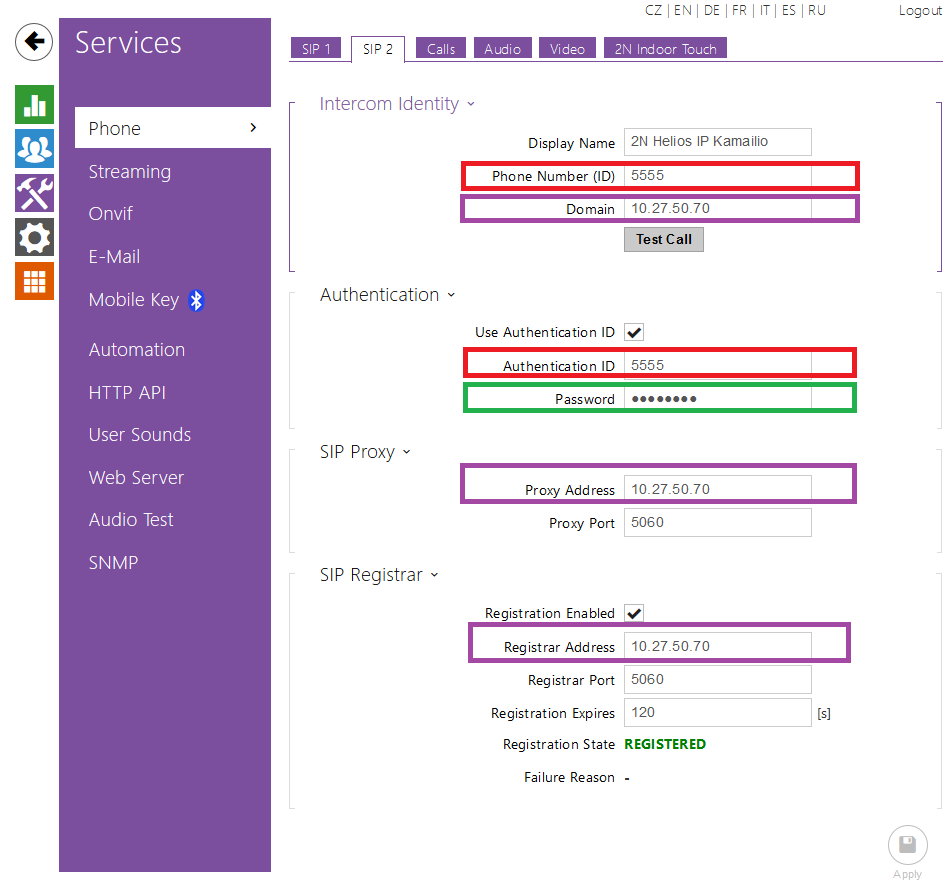
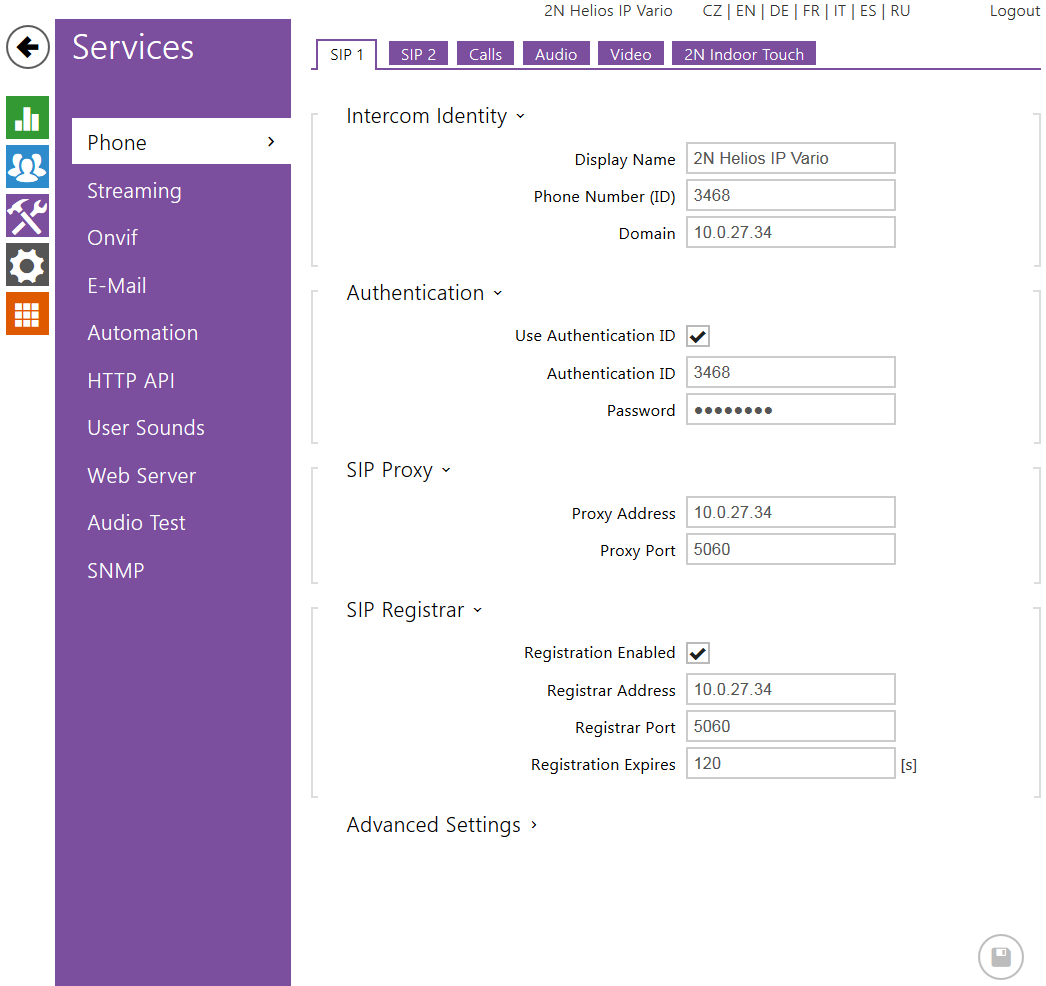
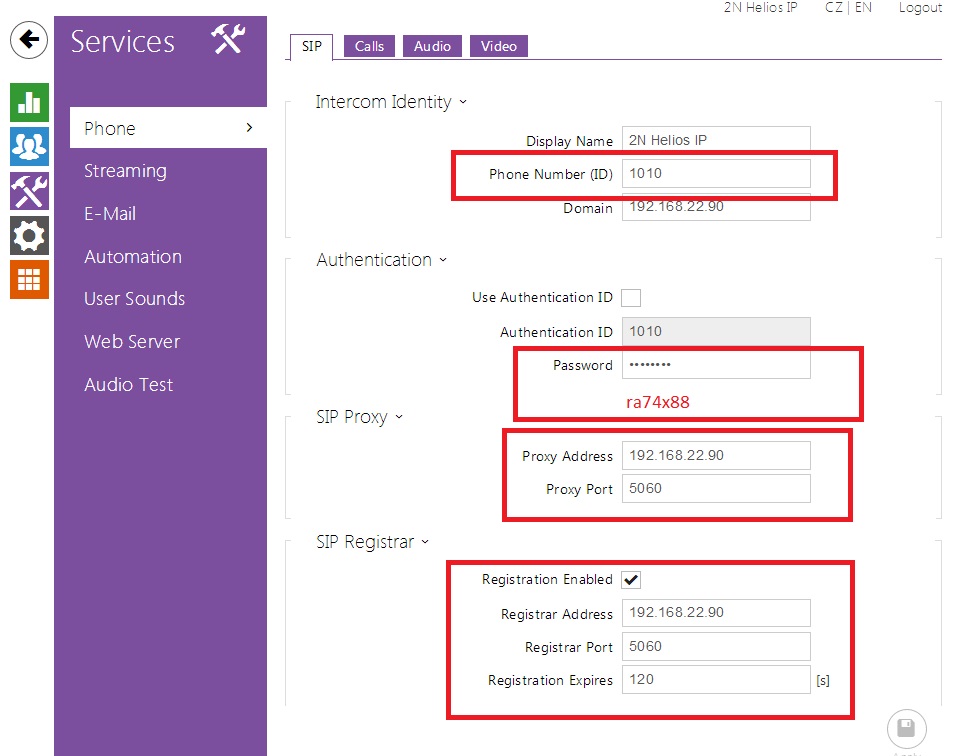
In Web configuration of your 2N IP Intercom fill in credentials created in 3CX Phone System Configuration
Fill in Extension number in Phone (ID) and Authentication Credentials from „Phone Provisioning“ section. Fill in the IP address to 3CX Phone System in to Domain, Proxy Address and Registrar address boxes.
 |
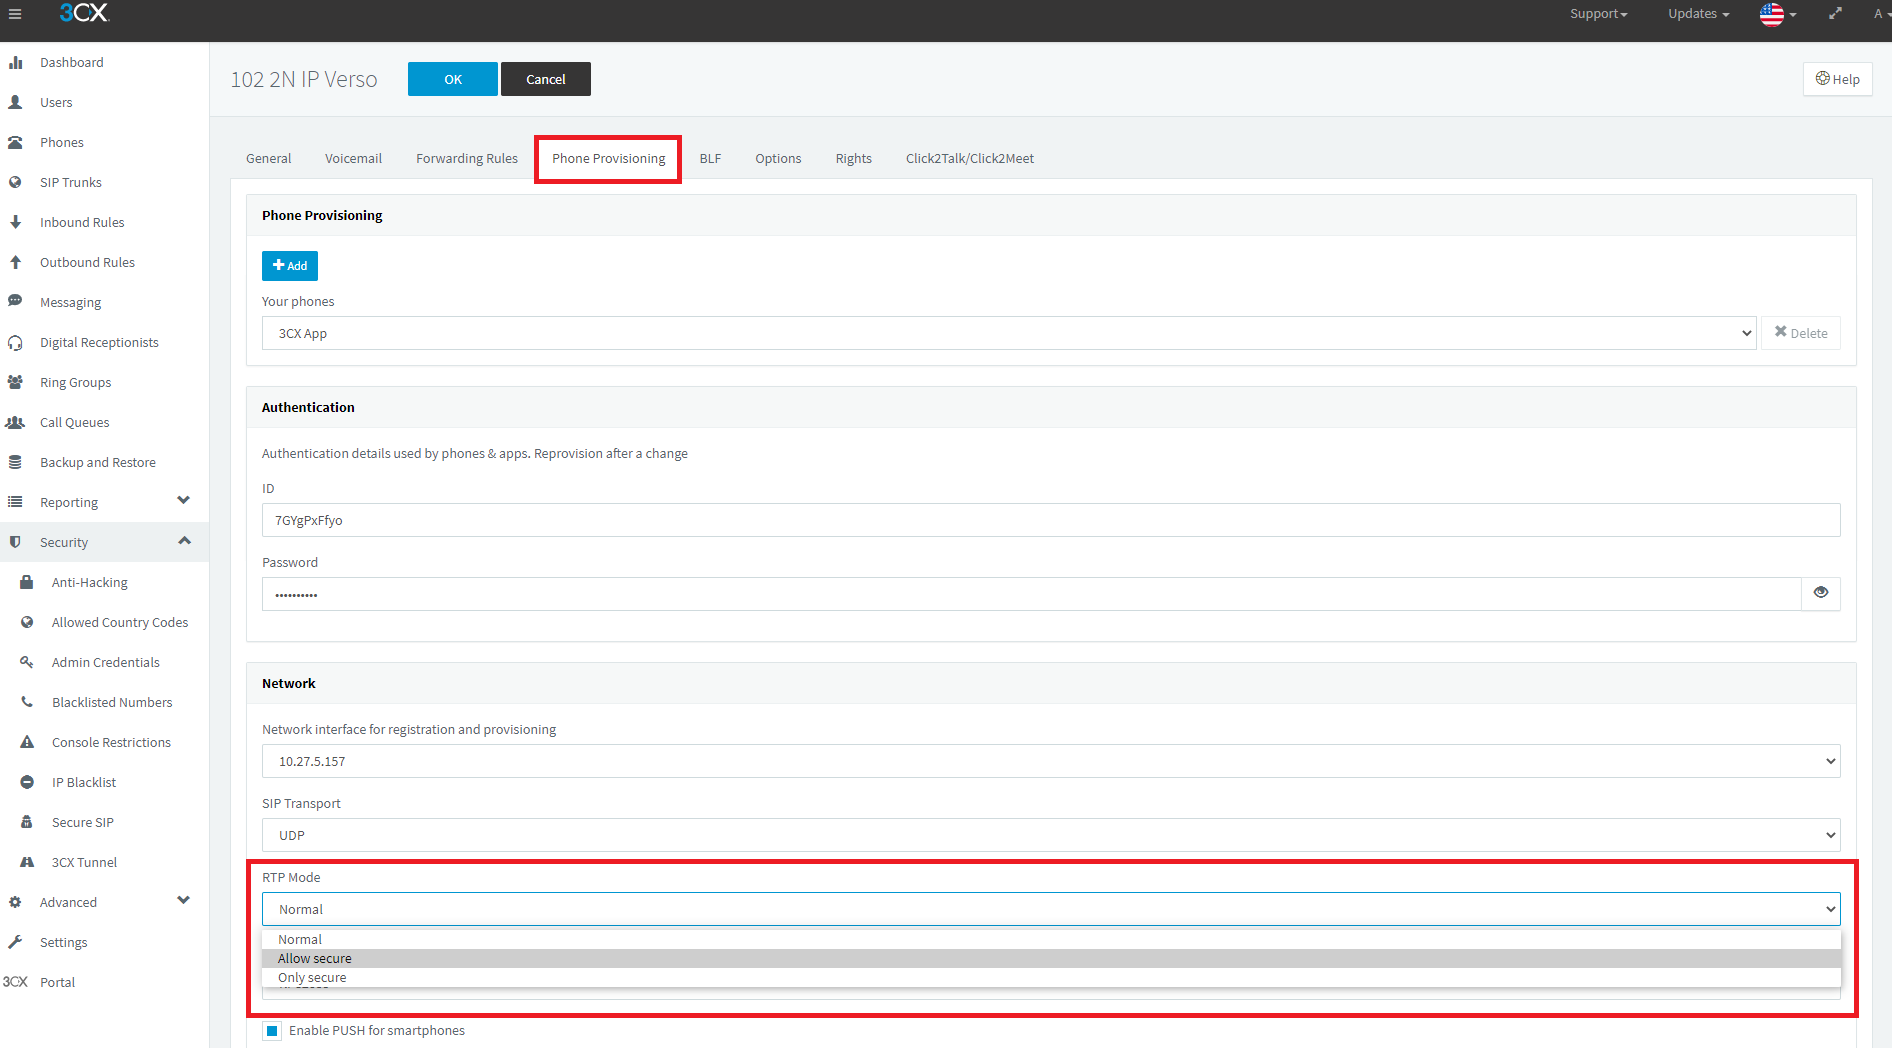
SRTP on 3CX Phone System
In „Phone Provisioning“ section you choose Allow Secure or Only Secure in RTP mode menu. Confirm by blue OK button on top of the screen.
 |
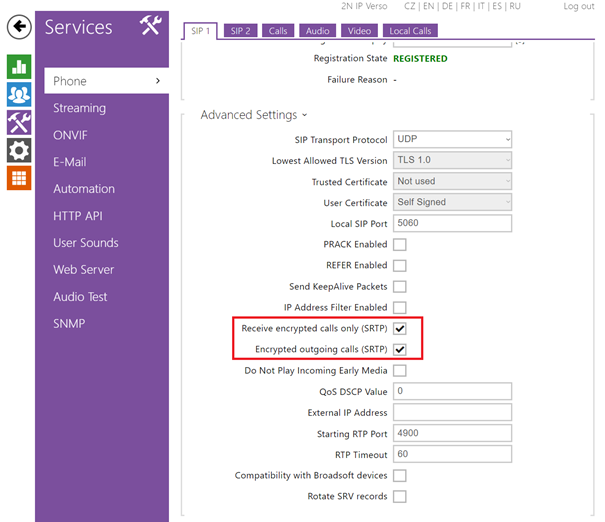
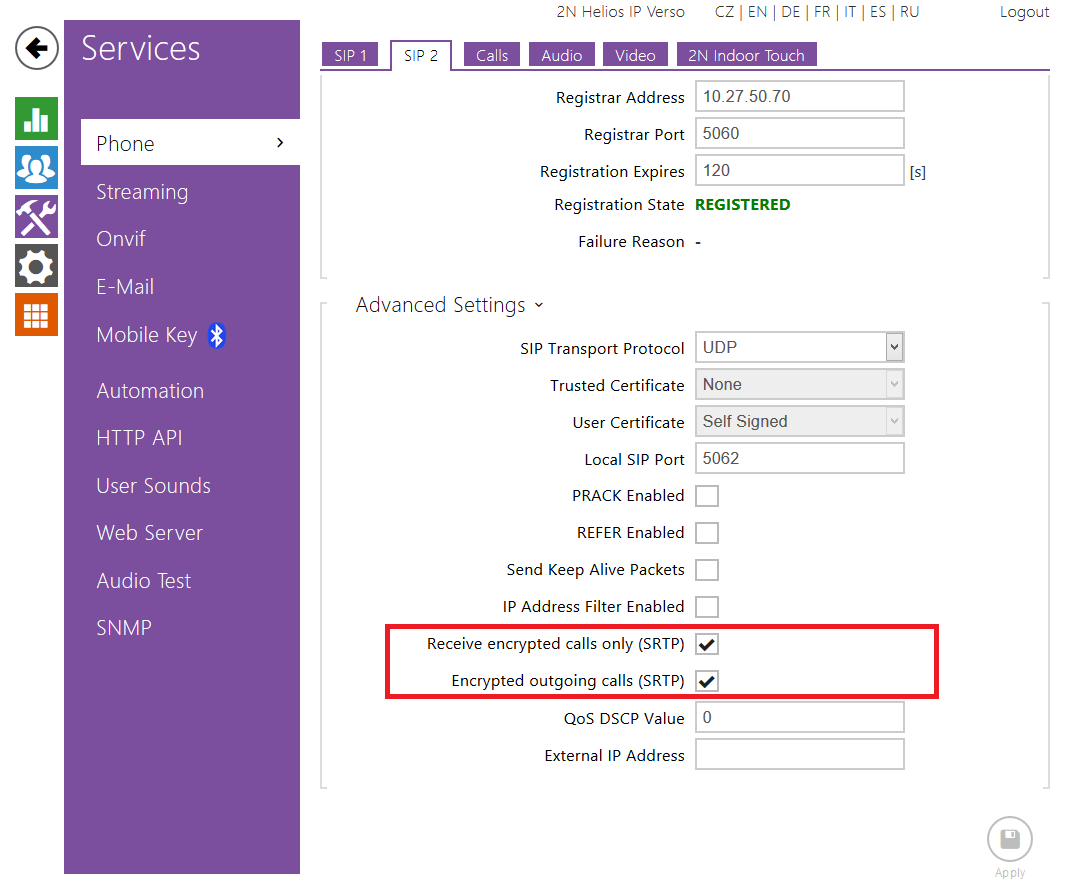
SRTP on 2N IP Intercom
Go to SIP settings in Services and in Advanced settings enable recieving and transmitting of SRTP calls.
 |
Version 16
Tested with
| 3CX Phone System | 2N IP Intercom | Registrations | Calls | Secure RTP (SRTP) |
|---|---|---|---|---|
| 16 | 2.30 |
License
- Enhanced Security (Part No. 9137908, Axis Part No. 01379-001)
Settings
To create new Extension for 2N IP Intercom Devices, 3CX Web Configuration go to Extensions.
 |
 |
 |
In Web configuration of your fill in credentials created in 3CX Phone System Configuration
Fill in Extension number in Phone (ID) and Authentication ID from 3CX PBX to Authentication ID.
Fill in the IP address to 3CX Phone System in to Domain, Proxy Address and Registrar address boxes.
Fill in your Authentication password in to the corresponding box.
 |
SRTP on 3CX Phone System
No special settings are required to be made in 3CX Phone System.
SRTP on 2N IP Intercom
Go to SIP settings in Services and in Advanced settings enable recieving and transmitting of SRTP calls.
|
Version 15
Tested with
| 3CX Phone System | 2N IP Intercom | Registrations | Calls | Secure RTP (SRTP | Video Preview |
|---|---|---|---|---|---|
15.5.6354.2 | 2.31.0.40.5 | ||||
| 15.0.60903.0 | 2.18.0.27.5 | not tested |
Settings
To create new Extension for 2N IP Intercom Devices, 3CX Web Configuration go to Extensions.
 |
 |
 |
In Web configuration of your fill in credentials created in 3CX Phone System Configuration
- Fill in Extension number in Phone (ID) and Authentication ID from 3CX PBX to Authentication ID.
- Fill in the IP address to 3CX Phone System in to Domain, Proxy Address and Registrar address boxes.
- Fill in your Authentication password in to the corresponding box.
 |
SRTP on 3CX Phone System
No special settings are required to be made in 3CX Phone System.
SRTP on 2N IP Intercom
Go to SIP settings in Services and in Advanced settings enable recieving and transmitting of SRTP calls.
 |
Required licenses
- Enhanced Security for SRTP
Version 12
Tested with
| 3CX Phone System | 2N IP Intercom | Registrations | Calls | Secure RTP (SRTP) |
|---|---|---|---|---|
| 12.5.39117.982 | 2.12.1.21.5 | Un-Tested |
Settings
 |
 |
 |
Version 11
Tested with
| 3CX Phone System | 2N IP intercom | Registrations | Calls |
|---|---|---|---|
| 11 | 2.1.0.3.13 |
Settings
3CX VoIP server version 11 - How to configure it with 2N IP Intercom?
The 2N IP intercom can be integrated into a 3CX VoIP server version 11, which is a SIP Protocol based IP PBX. 2N IP intercom operates as an SIP subscriber and can stream its video to the IP telephone. For full integration of the door intercom in the telecom system no additional equipment is needed.
Compatibility test:
- Audio call
- Video call
- DTMF transfer
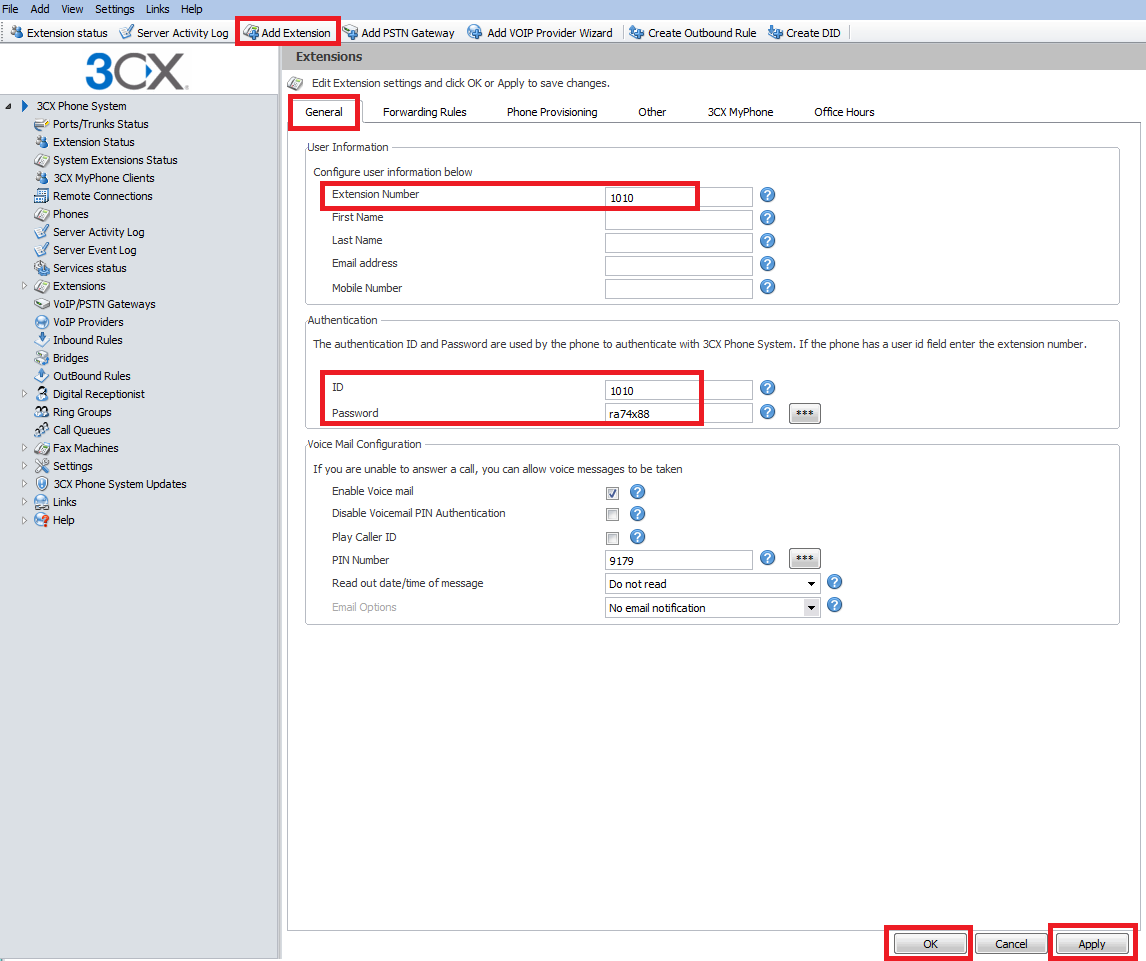
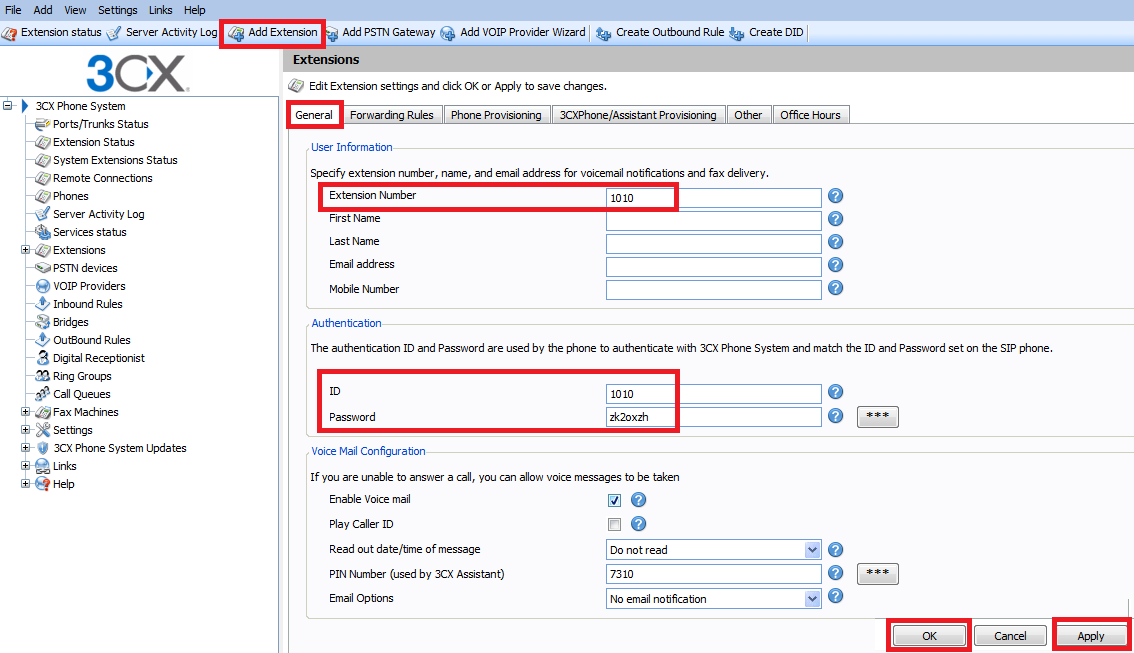
1. As very first step configure new client in a 3CX VoIP server. Follow the steps from (Pic. 1). Go to the section "Add Extension" and tab "General" over there you need to fill "Extension Number". In the "Authentication" part fill in "ID" and "Password". You can keep the one which was automatically generated. Click "OK" or "Apply" to save changes.
 |
 |
 |
4. To verify that you successfully register 2N IP intercom terminal into the 3CX virtual PBX version 11. Go to the section "Information" in the 2N IP intercom or section "Extension Status" in the 3CX VoIP server.
Version 9
Tested with
| 3CX Phone System | 2N IP intercom | Registrations | Calls |
|---|---|---|---|
| 9 | 2.1.0.3.13 |
Settings
The 2N IP intercom can be integrated into a 3CX VoIP server version 9 which is a SIP Protocol based IP PBX. 2N IP intercom operates as an SIP subscriber and can stream its video to the IP telephone. For full integration of the door intercom in the telecom system is no additional equipment needed.
Compatibility test:
- Audio call
- Video call
- DTMF transfer
1. As a very first step configure new client in a 3CX VoIP server. Follow the steps from (Pic. 1). Go to section "Add Extension" and tab "General" over there, you need to fill "Extension Number". In the "Authentication" part fill in "ID" and "Password". You can keep the one which was automatically generated. Click "OK" or "Apply" to save changes.
 |
 |
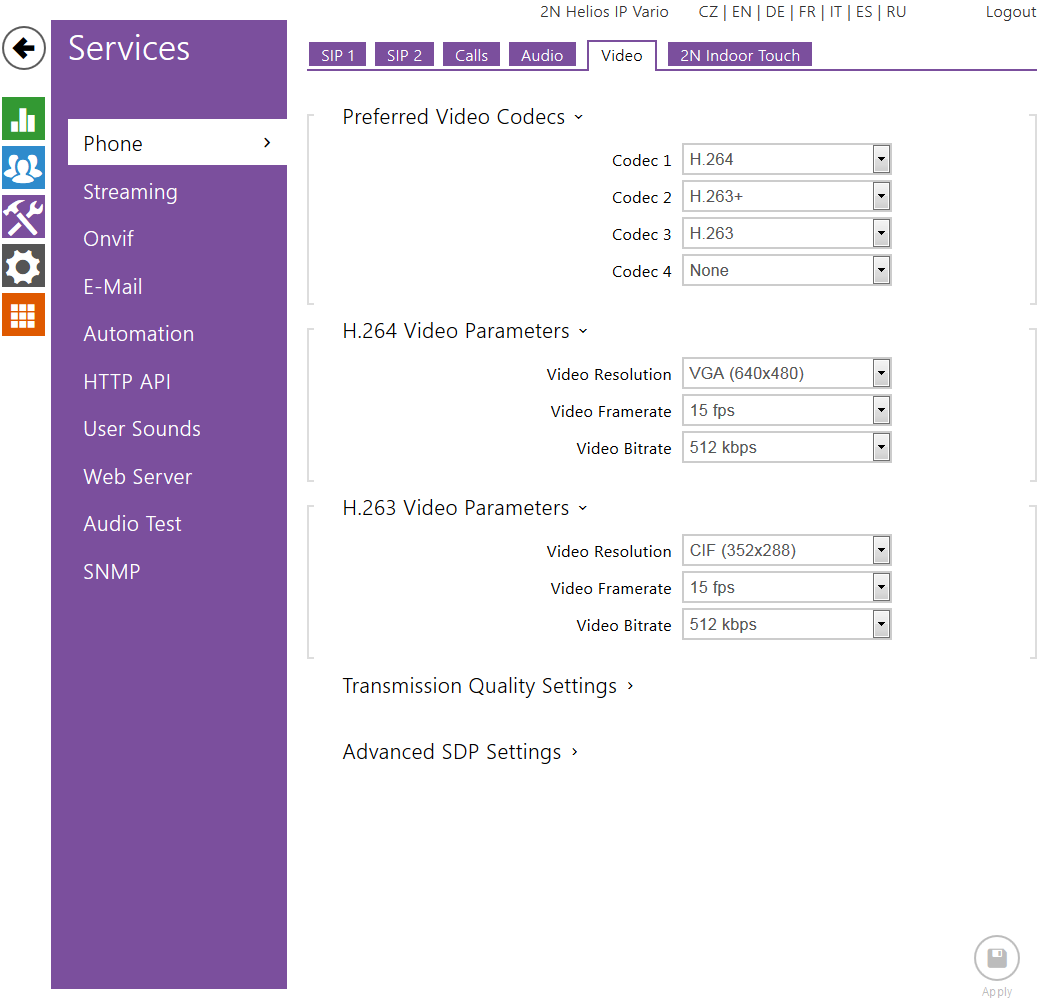
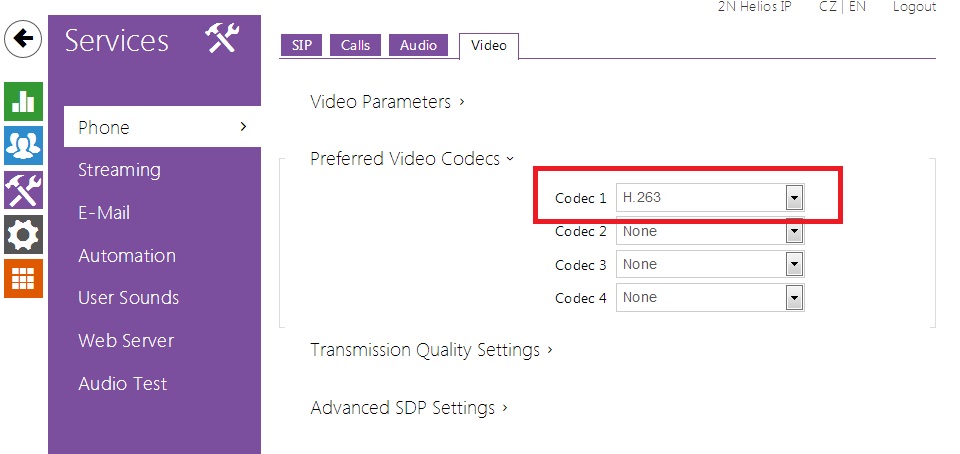
3. To enable the video go to the section "Advanced Settings", tab "Video Codecs" over there you have to allow codec H.263 on the first position and disable the rest, see (Pic. 3).
|
4. In order to verify that you have successfully registered 2N IP intercom terminal into the 3CX virtual PBX version 9, go to the section "Information" in the 2N IP intercom or section "Extension Status" in the 3CX VoIP server.
For the FW version 2.6 and higher you can find this in Menu Status-Services-Phone status.
Used Symbols
![]() - Verified with video
- Verified with video
![]() - Verified with audio only
- Verified with audio only
![]() - Work with limitation
- Work with limitation
![]() - Incompatible
- Incompatible