1.3 Use
The 2N® Call Center – Communicator application is used by dispatchers and technicians for intercom and CU communication. Every user with a login and SIP line created in the 2N® Call Center – Control Panel may log in to the application. If the user SIP line is not registered, the user will not be able to log in.
Application Language Change
The currently used language abbreviation is shown on a grey bar in the application upper corner. Put the mouse cursor on the abbreviation to open the menu of all supported languages. Before changing the language decide whether to apply the change immediately making the application restart automatically and having to relog in, or apply the change after quitting the application and relogging in.
Caution
- Telephoning is the main function of the application. If the user SIP line cannot be registered, the user will not be able to log in. In that case, ask your system administrator to check the SIP line settings in the 2N® Call Center – Control Panel or SIP Proxy, your LAN settings and your PC firewall if necessary.
Note
- Every user may process any incoming call to its line but make outgoing calls only to the intercom/technician numbers included in the database.
Application at Relax
When the user logs in the application is at relax and in the case of an incoming/outgoing call it gets into one of the other two states. You return to this window whenever you terminate the call with the Save button.
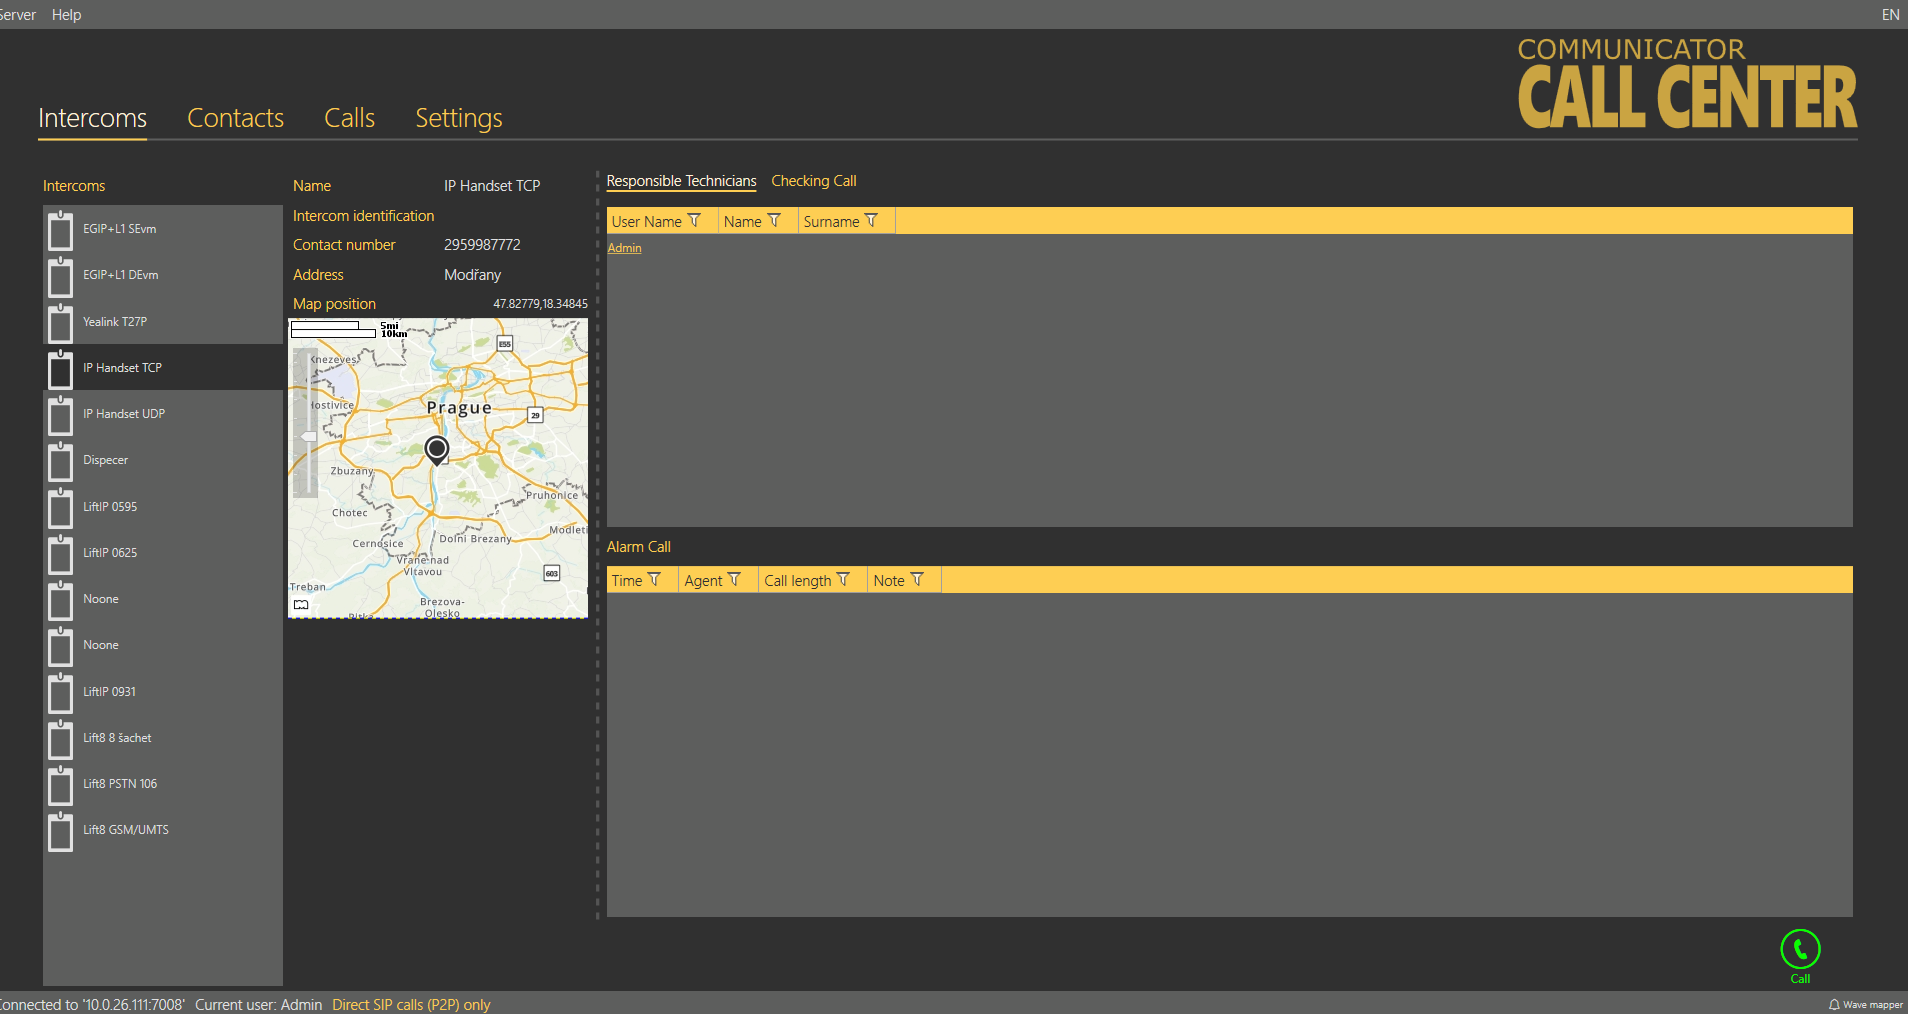
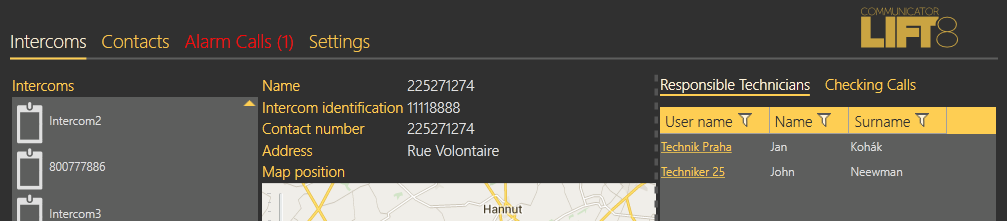
Intercoms
The left section of the Intercoms menu provides a list of all the intercoms that are assigned for administration to the currently logged-in Dispatcher or Technician by the Administrator. The field above the list helps you search the intercom name or contact number. The search is lower/upper case insensitive and takes place already during typing. Press Esc to delete the text and/or cancel the filter. Use the Alt+I shortcut (I means the first letter in Intercom) to move to the search field quickly. Click on the intercom name to display more information: Name, Intercom identification, Contact number and Address if available. If the address is completed, the intercom Location on map is displayed too. Display the position in the plan if available the selected intercom for more precise building position details. Activate/deactivate the map/plan display function in the 2N® Call Center – Control Panel intercom settings. Use the slider in the left-hand upper corner of the map to zoom in/out. Click Call to call any intercom on the list. You will be forwarded to the Outgoing call window.
 |
Intercoms Menu
There are three tables to the right. Two of them are directly visible, the third has to be switched on by clicking the Checking call heading. Filtration in columns works in all of the tables; refer to the Calls below. The Responsible technicians table displays the technicians responsible for the intercom administration and helps quickly select and send the appropriate technician.
Tip
- Each technician is displayed as a link for simplification. Click on the link to get to the Contacts menu and call the technician immediately.
Caution
- For the purpose hereof, Technician means the 2N® Lift8 user that is assigned the Technician user role. The other users (Admin, Operator or Own role) are not displayed in this table.
The Alarm calls table displays a list of alarm calls from the given intercom including the call date/time (Timestamp), call-processing Agent and Note added during the alarm call. The Checking call table shows all check calls from the given intercom since intercom addition to the database according to the server archives deletion setting. Each record includes its date/time and result.
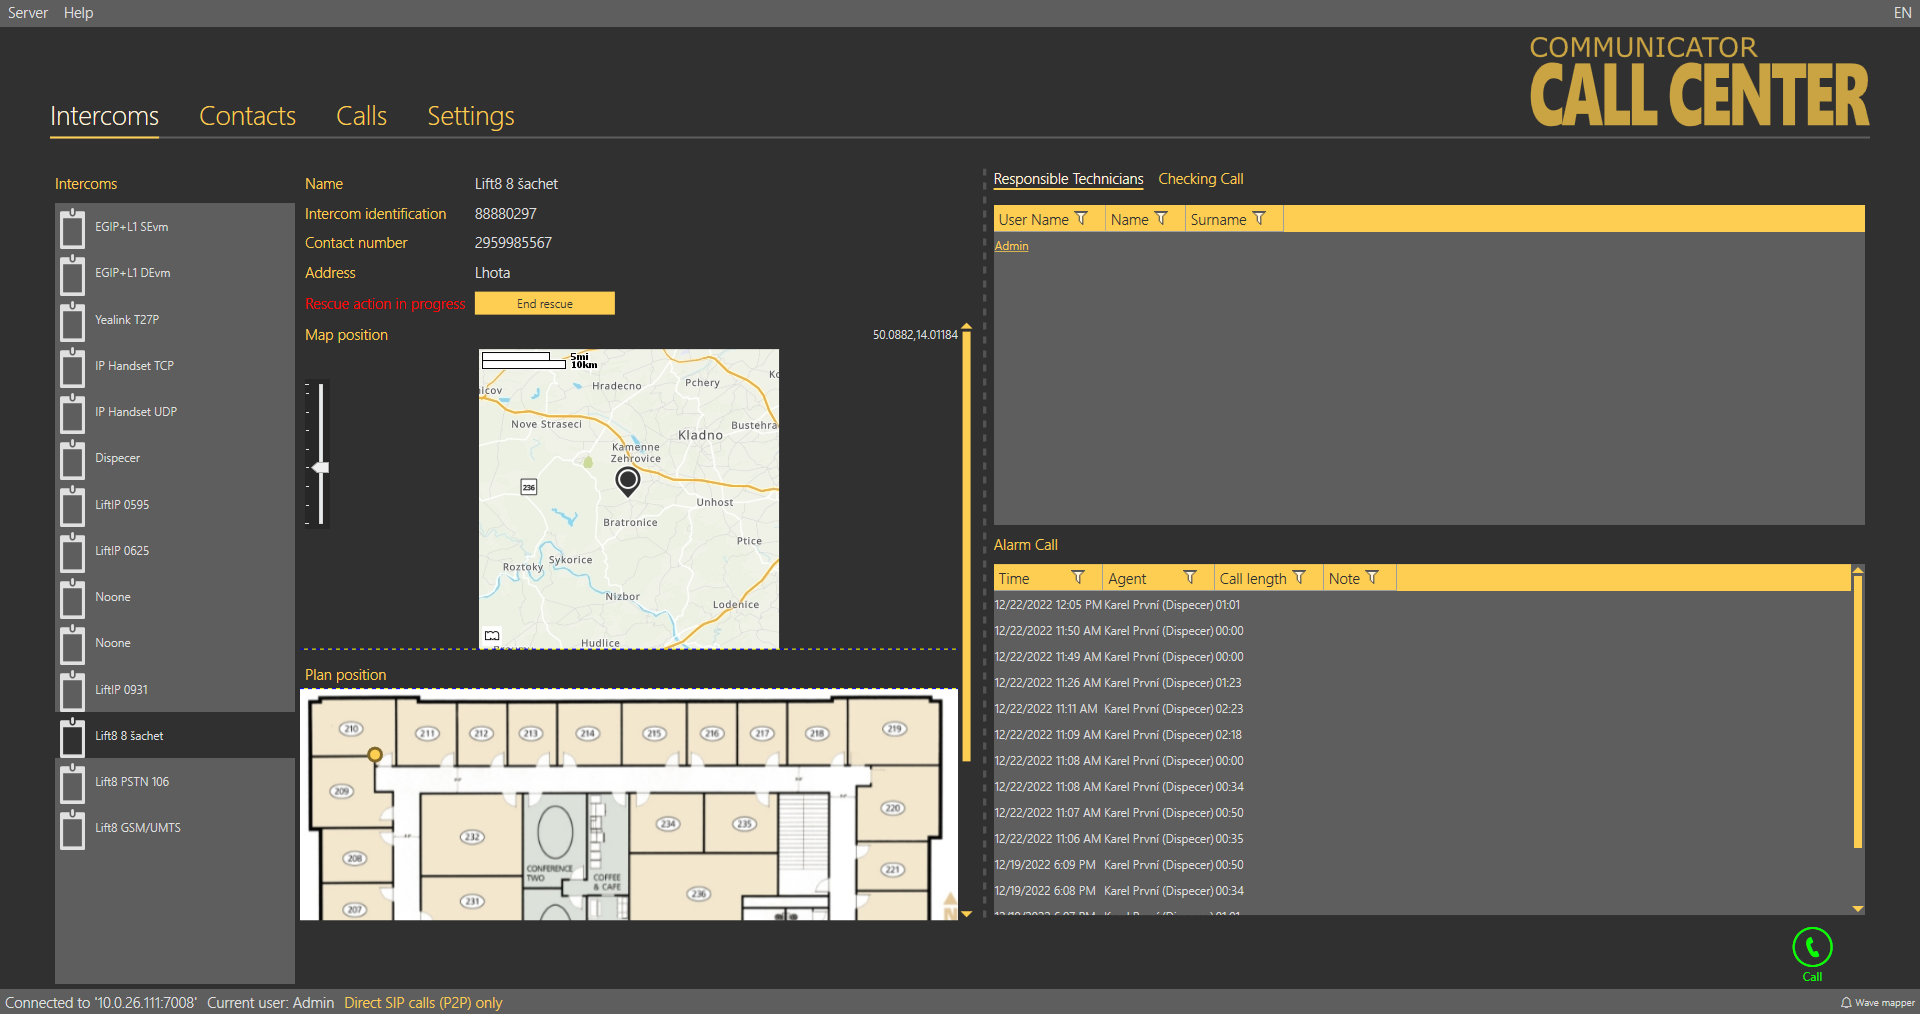
Error states detected by the server can be displayed in the middle section depending on the intercom configuration: rescue modes, battery error states, jammed button or audio test failures. If so, the intercom display will be as follows.
 |
Intercoms Menu – Intercom Error State
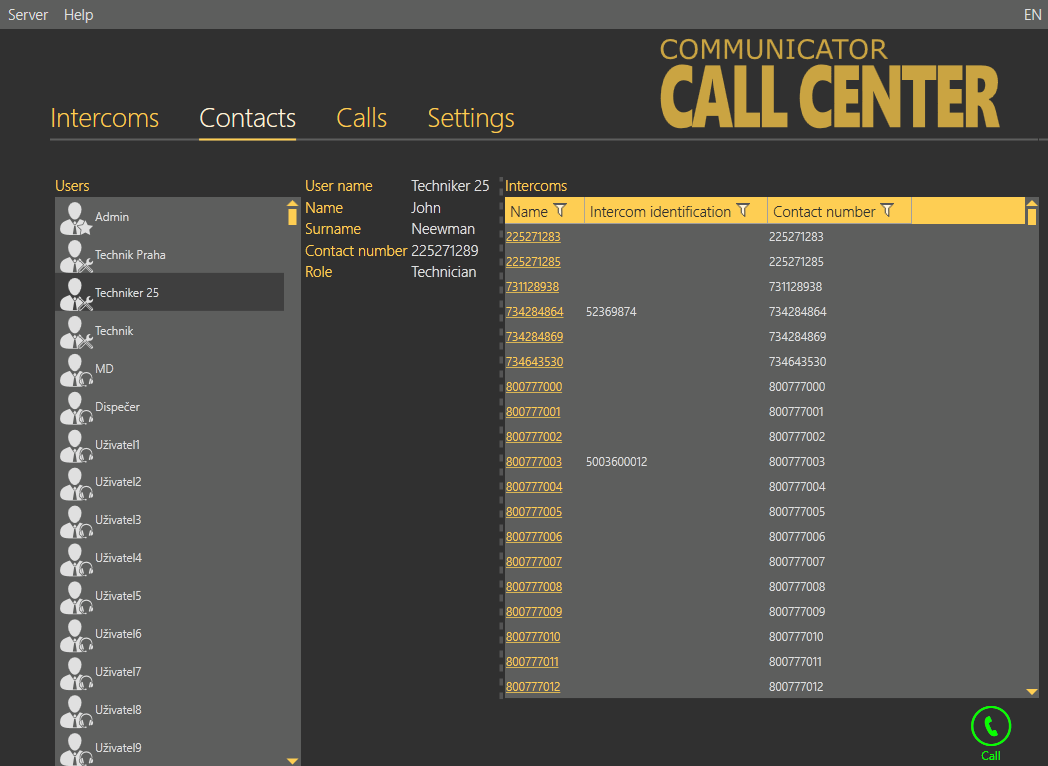
Contacts
The left section of the Contacts menu displays a list of all users configured in the 2N® Lift8 system. Click a user to open its card. The following information is displayed in the middle of the window: Username, Firstname, Surname, Contact number and Role, which helps you identify the contact: Dispatcher or Technician. If the user is assigned a contact number, just click Call to set up a call to this user. This opens the Outgoing call window and the call will be made. See below for details on outgoing calls. If the call cannot be set up, you will get a voice message.
 |
Contacts Menu
There is an Intercoms table to the right. The table displays a list of all intercoms assigned to the given user (Dispatcher/Technician/Admin/Own) and includes Name, Intercom identification and Contact number for each intercom assigned. Use filtration for convenient searching; see below.
Tip
- Each intercom is displayed as a link for simplification. Click on the link to get to the Intercoms menu and call the intercom immediately, view the check and alarm call history and locate the intercom if necessary.
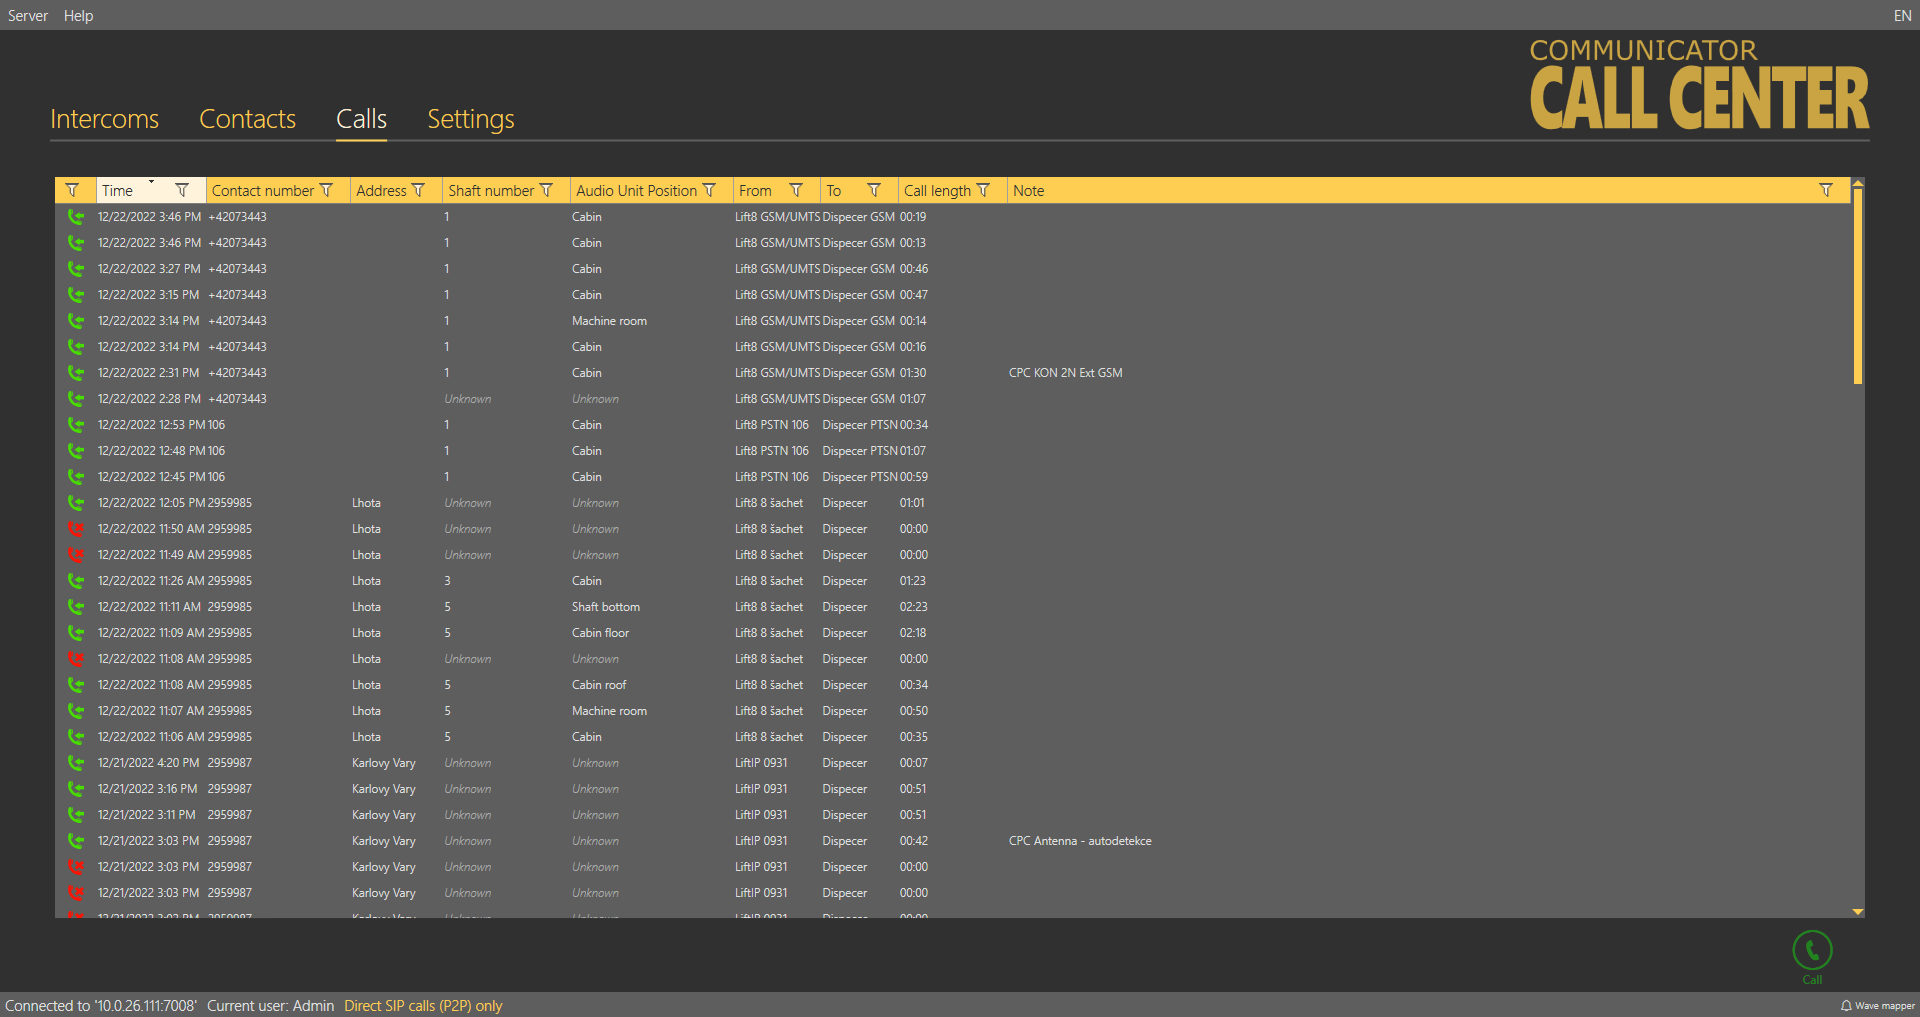
Calls
The Calls menu provides a table of all alarm, incoming, missed and outgoing calls from all the intercoms and users configured in the 2N® Lift8 system received by the 2N® Call Center – Server from intercom addition until now according to the server archives deletion setting. Click the filter button at each column to use filtration for call history search. See below for details. The first column or icon defines the call state. Let us explain this function using the filtration settings where you can choose the call state to be displayed.
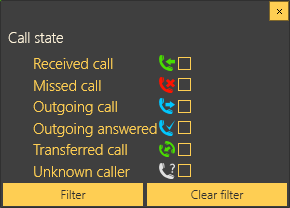 |
Call State Filtration
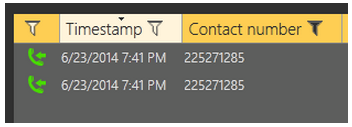
From left to right: The first icon symbols a processed incoming alarm call. The second icon indicates a missed call, which occurs whenever the dispatcher fails, for any reasons, to answer an incoming call in time and ringing was terminated. The third icon signals an outgoing call to another dispatcher, technician or intercom from which, however, the last missed call did not come. The fourth icon symbols an outgoing call to upon a missed call, which occurs whenever the dispatcher fails, for any reason, to answer an incoming call in time and ringing is terminated. The dispatcher is notified and calls the intercom (Audio Unit) that initiated the alarm call. Such a call is then considered a correctly processed alarm call. The next icon, Transferred call, is recorded whenever the dispatcher transfers a confirmed alarm call to another dispatcher or technician. The last icon, Unknown caller, gets displayed whenever the dispatcher is called from a number that is not included in the 2N® Lift8 system: unknown call, telemarketing, automatic call, error call, etc.
Furthermore, the table includes the Timestamp, Contact number, intercom Address, Shaft number, Audio unit position, call-processing Agent/Dispatcher and Note added during the call.
 |
Calls Menu
Click the filter button at each column to use filtration for call search and combine the filters to find the required data quickly. Click the funnel symbol in the selected column to activate the filter. Activation is indicated by a colour change of the funnel symbol; see the figure below.
 |
Left – Inactive Filter, Right – Active Filter
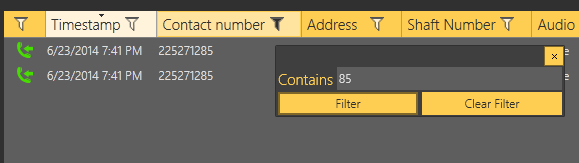
Each column with the funnel symbol includes filter settings; see the figure below. The Contains function finds the searched string in all the column items and returns all the occurrences. Enter a text into the string field and click Filter to activate the filter and find all the searched items in the column. Use another filter to make your search more precise and efficient. Having completed filtering, click Delete filter in the used columns to delete all the active filters. If you did not delete the setting, the filtration settings would keep active even upon the CU logout and you would obtain filtration results instead of complete information in your next search.
Tip
- You can also delete the configured filters via the context menu under the right mouse button or by clicking "Alt + r".
 |
Filtration Setting Result
If the Dispatcher fails to answer or process an incoming call in time, the queued call is terminated but will not get lost. The user is notified as follows: the call is logged as a missed call and the Calls menu changes into Alarm calls in the main menu and the count of missed (non-processed) calls is included in the brackets. See the figure below,
 |
Display of Missed Alarm Calls
Keyboard Shortcuts
2N® Call Center – Communicator supports keyboard shortcuts for some actions. Refer to the table below for a list of actions triggered by keyboard shortcuts:
| Keyboard Shortcuts | ||
|---|---|---|
| Action | Shortcut | Description |
| Pick up incoming call | Alt-A | Pick up an incoming call. |
| Create call | Alt-C | Set up a call to the selected intercom on the list. |
| End call | Alt-H | End the active call. |
| Save call | Alt-S | Save the call log. |
| End rescue | Alt-P | If the rescue function is active on the intercom, use the shortcut to terminate the active rescue process after the alarm call. |
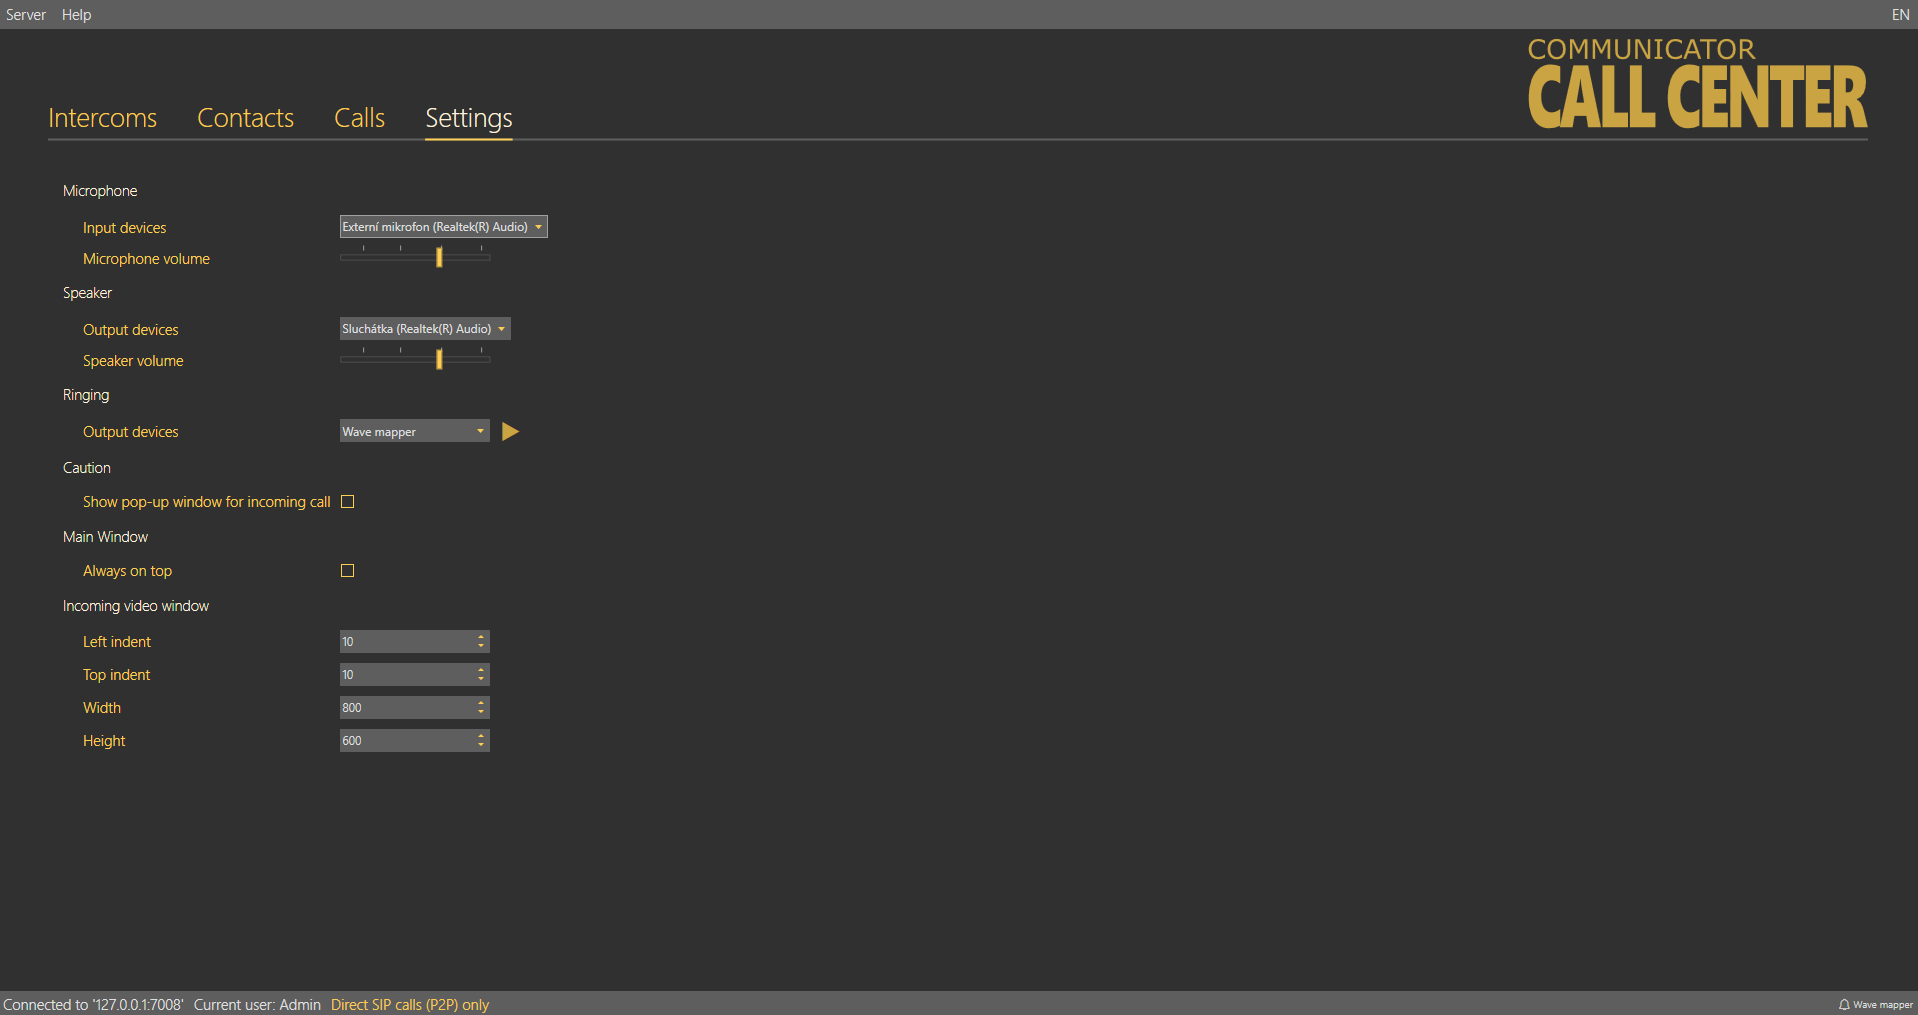
Settings
The Settings menu helps optimise the intensity of the received/transmitted audio signal. Although your operating system settings should be sufficient for a smooth function of the application, you can make additional microphone and speaker settings here if necessary. Select an input or output device in your PC in a pop-up menu and set the required volume using a slider.
 |
Settings Menu
Ringing – select an audio device on the output: headphones/speakers. Whenever the audio device is diosconnected, ringing is activated to the Wave mapper.
The selected audio device is shown on the bar in the right-hand bottom corner of the Communicator interface.
The checkbox in the Notifications section enables/disables the display of automatic information balloon notifying an incoming call. If you do not want to use the information balloon, disable it here or using a checkbox in the balloon.
The checkbox in the Window section allows you to display the active 2N® Call Center – Communicator window above the other applications running on the PC monitor all the time. The application can be minimized or reduced but will always be displayed above all the other applications or open Internet folders after its full recovery.
The Incoming video window section helps you set the incoming video display position and window size in the application.
Incoming/Outgoing Calls
Every incoming call to a dispatcher/technician number is signalled with an automatic switch to the Incoming calls window and pop-up of an Incoming call window in the left-hand bottom corner of the screen. This is useful when the 2N® Call Center – Communicator display is hidden under another application as the Incoming call window is always on the top. An incoming call from an intercom is also signalled acoustically by a ringing tone in the speakers/headsets. Press Pick up to answer the call or Hang up to reject the call. Use the checkbox to disable the information balloon function.
 |
Incoming Call Pop-Up Window
Tip
- No matter where you pick up the call (whether in the application or the pop-up window), the system always behaves identically.
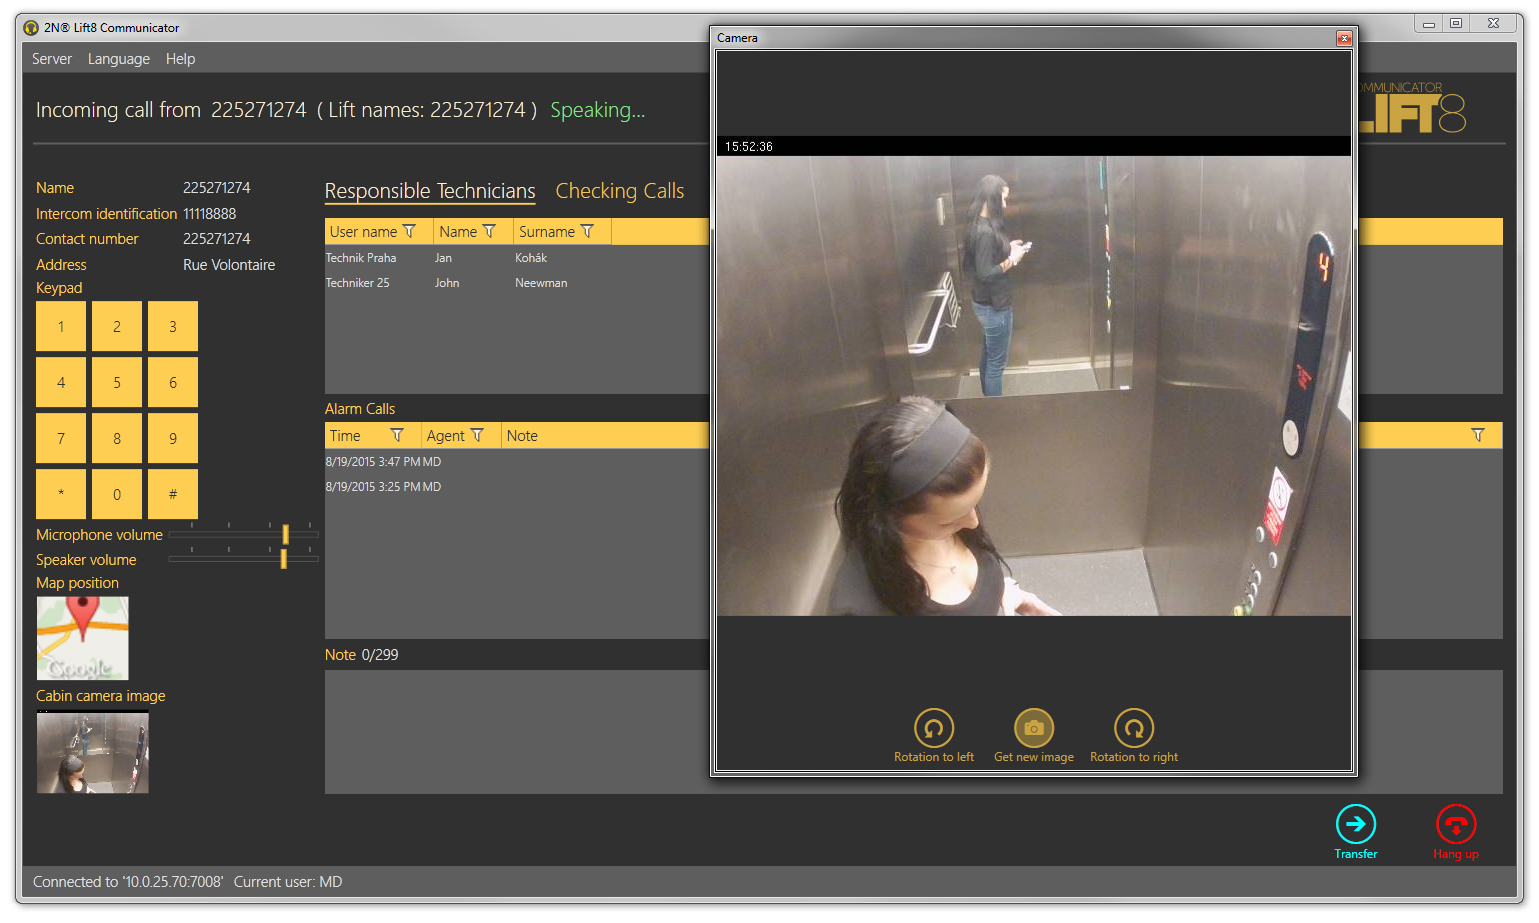
The Incoming call window opens (see below) whenever a call is received. If Automatic confirmation is enabled, the respective DTMF character will be sent. If CPC/P100 confirmation is selected, an appropriate communication will take place before the call. Its state and progress will be signalled with a progress bar. When the communication is terminated, the call will be confirmed automatically and the Incoming call window will get displayed. Click Cancel to skip this step. If there is an active camera in the lift and loading images from the camera is enabled for this CU, the camera image will be transmitted before the Incoming call windows opens. This step is signalled with a progress bar again. Click Cancel to skip this step.
See the figure below for the Incoming call window. The upper part displays the currently speaking intercom name and phone number and one of the following Application states to the right:
- Ringing... – the selected outgoing/incoming call is just ringing.
- Speaking... – the call was answered by both the subscribers and is in progress.
- Call terminated – the call was terminated correctly.
- Call rejected – the outgoing call was rejected by the counterparty.
- Missed call – the incoming call was not served. Ringing stopped before the dispatcher answered the call.
The left-hand part of the screen provides information on the given intercom: Name, Intercom identification, Contact number and Address. Use the keypad below these items to control the Speaking call: confirm the call with DTMF or dial the required shaft number. A calling technician can use the keypad for the CU voice menu control. Press a button to send the particular DTMF character into the call. If the intercom address is completed, the intercom location is displayed on the map below the keypad. Use the slider in the left-hand upper corner to zoom in/out. If the lift cabin is equipped with a camera, you can view the cabin image displayed below the map. Click on this miniature to display the Camera window to view more image details and evaluate the cabin situation more precisely. Click the Get new image button to load a new, more recent image. A progress bar signals transmission and the image will get displayed if transmitted successfully. Click the cross to quit the Camera window.
Tip
- If the Camera window or image transmission is active, the call will not be terminated automatically as the Duration parameter is ignored. It is because high-resolution image transmissions take a rather long time and the time limit might be too low in this case.
 |
Incoming Calls
There are three tables to the right like in the Intercoms menu. Use the column filters for search; refer to the call describing subsections. The Responsible technicians table displays the technicians responsible for the intercom administration and helps quickly select and send the appropriate technician. The Alarm calls table displays a list of alarm calls from the given intercom including the call date/time (Timestamp), call-processing Agent and Note added during the alarm call. The Checking calls table shows all check calls from the given intercom since intercom addition to the database according to the server archives deletion setting. Each record includes its date/time and result.
The last item of the screen is Note where a note can be added anytime while the intercom card is displayed in this window, i.e. after ringing, during the call and after the call end. If you press Save, you will lose the editing option and return to the application relax state and the note will be added to the Alarm calls table. The maximum note length is 300 characters. Find the count of used/total characters per note next to the Note heading.
Note
- The Outgoing call window provides identical formats and functions as the Incoming call window.
Click Transfer to transfer an active call to one of the Available dispatchers/technicians, i.e. those who are online logged in to the 2N® Lift8 system; see the figure below.
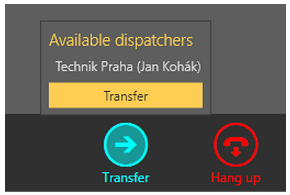 |
Available Dispatchers
Click on the dispatcher's name to select the dispatcher. Then push the yellow Transfer button to terminate your call and forward it to the selected destination. This type of transfer is called call transfer with hang-up, i.e. your call is terminated, the caller gets the ringing tone again and this call will alert the dispatcher's line selected by you.